|
Let's get the lesson started
Mystère rouge ou noir
A red or black mystery
-Preparation
-Material Properties:Set the color of your foreground to color 1 -Set the color of your background to color 2

-Replace your foreground color with a Foreground/Background linear gradient configured like this
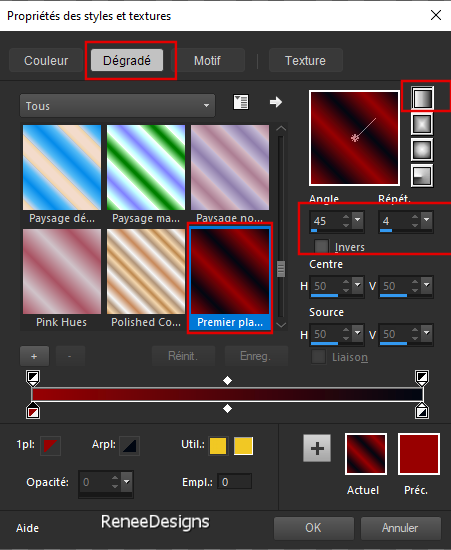
1.
File-Open a new transparent image of this size: 1100 x 800 Pixels
2. Activate the flood fill tool
 –Fill the layer with the gradient –Fill the layer with the gradient
3.
Open the tube ‘’
Renee-TUBES-Rouge-ou-Noir-2’’ -Edit - Copy- Activate your work -Edit - Paste as new layer
4.
Effects – Plugins – Mura’s Meister – Copies use the settings below
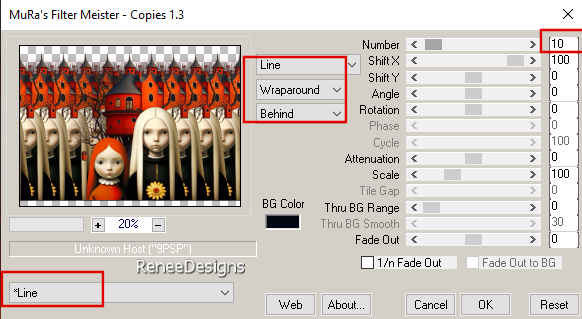
5.
Adjust-Blur-Radial Blur use the settings below
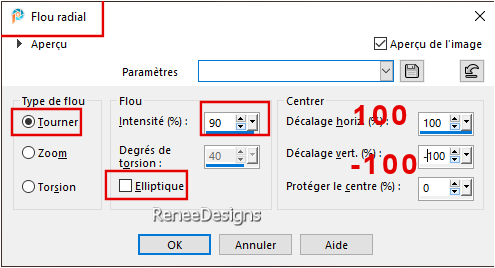
6.
Layers-Properties-Reduce the opacity of this layer to 53%
7.
Effects – Reflections Effects-Rotating Mirror using the default settings
8.
Layers-Merge-Merge Down
9.
Effects - Plugins- Filters in Unlimited 2.0 - &<Bkg
Kaleidoscope> - Flip SidesLsf
10. Layers – Duplicate
11.
Effects –Plugins – Plugin Galaxy – Instant
Mirror use the settings below
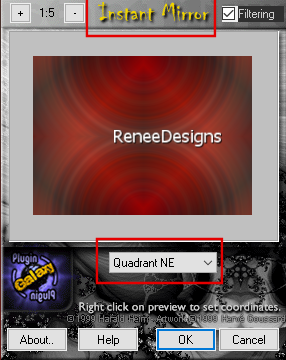
12.
Effects –Plugins – Mura’s Meister – Perspective
Tiling use the settings below
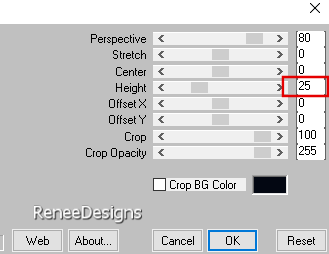
13.
Effects- Plugins – L & K’s – Pia set the setting to 75
14.
Selections –load/save selection –load selection from disc and select my selection: ‘’ Rouge-Noir1’’
15.
Effects –3D-Effects - Cutout - Colors – Black and Color
#837669 (No 3)
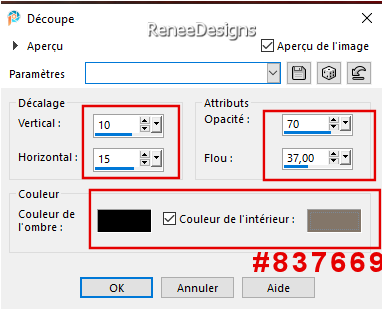
16.Selections-Promoted selection to layers

17. Effects –Plugins – Mura’s Meister – Perspective
Tiling (with the same settings)
18.
Layers-Properties-Set the Blend Mode to "Overlay"
19.
Layers- Merge- Merge Down
20.
Effects- 3D- Effects- Drop Shadow with these settings:
-32 / -1 / 54 /41 Color Black
21.
Selections –load/save selection –load selection from disc and select my selection: ‘’ Rouge-Noir2’’
 4 times

22.
Layers-New Raster Layer
23.
Selections –load/save selection –load selection from disc and select my selection: ‘’ Rouge-Noir3’’
24.
Activate the flood fill tool
 –Fill the selection with the gradient –Fill the selection with the gradient
25.
Effects- 3D- Effects- Drop Shadow with these settings: 0 / 0 / 80 / 40 Color Black

26.
Effects – Distortion Effects– Wave use the settings below
Noir
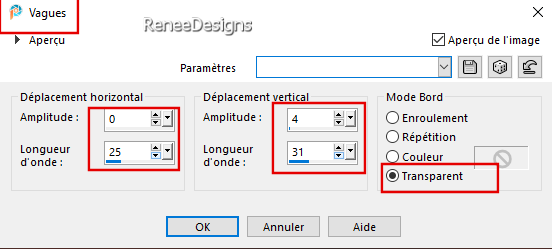
27.
Effects -Plugins - Alien Skin EyeCandy 5 –
Impact – Motion Trail use the settings below
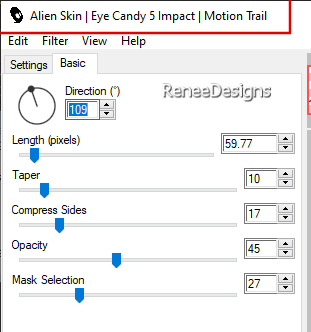
28.
Effects -Plugins - Filters in Unlimited 2.0 -
Graphic Plus – Cross Shadow using the default settings
-Activate Raster 1 in the layers palette
29.
Selections –load/save selection –load selection from disc and select my selection: ‘’ Rouge-Noir4’’
30.
Selections -Promoted selection to layer
31.Effects-3D-Effects-Dropshadow with the same settings
32.
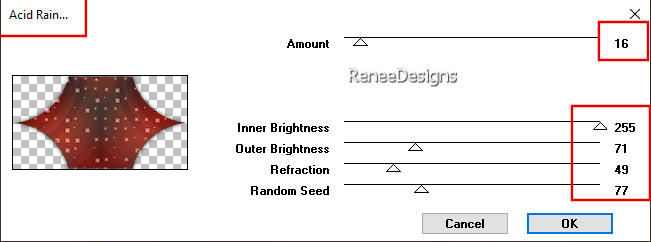
Effects –Plugins – VM Naturel – Acid Rain use the settings below
33.
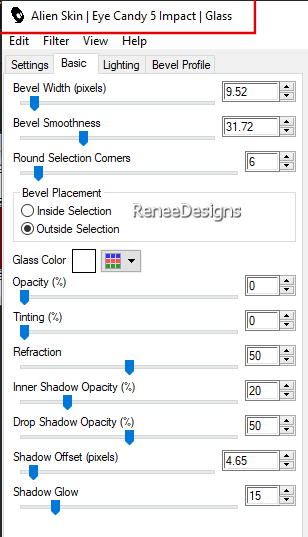
Effects -Plugins - Alien Skin EyeCandy 5 –
Impact – Glass use the settings below

Attention! Choose your tube carefully - you can choose between 2 tubes
34.
Activate the tube ‘’Renee-TUBES-Rouge-ou-Noir-1bis’’
-
Edit - Copy- Activate your work -Edit - Paste as new layer
-Move the tube in the right place ( see finished image)
35.
Layers-Properties-Set the Blend Mode to " Screen"
36.
Layers-Duplicate
37.
Layers- Merge- Merge Down
If you are using the tube ‘’Renee-TUBES-Rouge-ou-Noir-1’’
Image -Resize to 70%.
- Edit - Copy- Activate your work -Edit - Paste as new layer
- Pick Tool: (K) on your keyboard -Enter these parameters on the toolbar
 376
/ -1 376
/ -1
Press ( M ) to close the tool
- Layers-Properties-Set the Blend Mode to "Overlay" or any other
- Activate raster 1 in the layers palette
38.
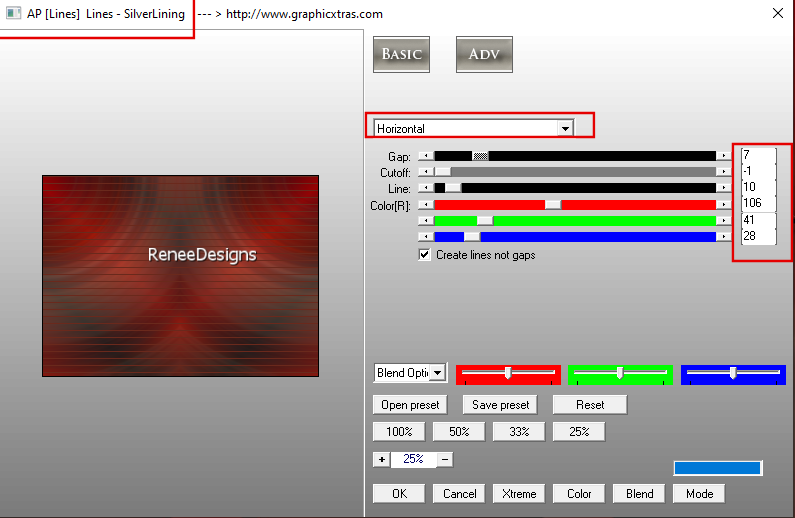
Effects -Plugins - AP[Lines] Lines –
Silverlining use the settings below
39.
Effects –Edge Effects-Enhance
40.
Adjust-Sharpness-Sharpen More
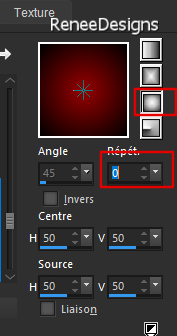
Replace your foreground color with a Foreground/Background Sunburst gradient configured like this
-Replace at the top of the layers palette
41.
Layers-New Raster Layer
42.
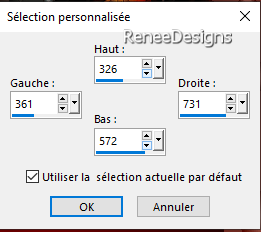
Activate Selection Tool -Custom Selection (S) -Rectangle with these settings 
43.
Activate the flood fill tool
 –Fill the selection with the gradient –Fill the selection with the gradient

44.
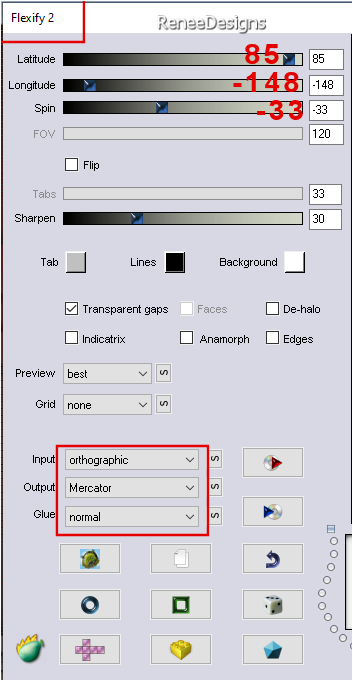
Effects –Plugins – Flaming Pear – Flexify 2 use the settings below
45.
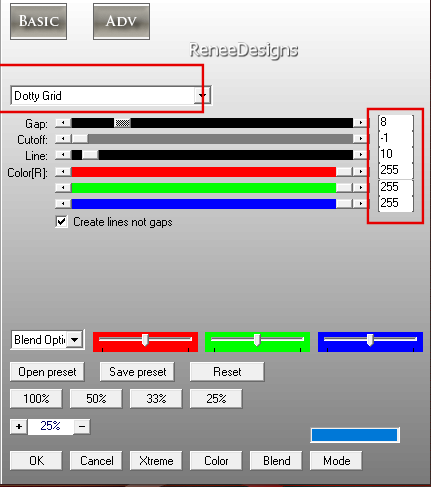
Effects -Plugins - AP[Lines] Lines –
Silverlining use the settngs below
46.
Effects- 3D- Effects- Drop Shadow with these settings: 0 /0 / 85/ 55 Color Black
47.
Effects -Plugins - Filters in Unlimited 2.0 –
Funhouse – Convergance: 165/ 126
48.
Layers-New Raster Layer
49.
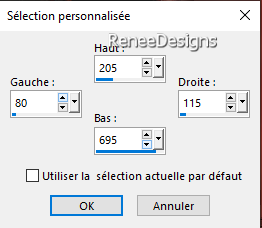
Activate Selection Tool -Custom Selection (S) -Rectangle with these settings
50.
Activate the flood fill tool
 - Fill the selection with the foreground color #980203 ( color 1)
51.
Effects -Plugins - Filters in Unlimited 2.0 -
Neology - H/V Blender use the settings below
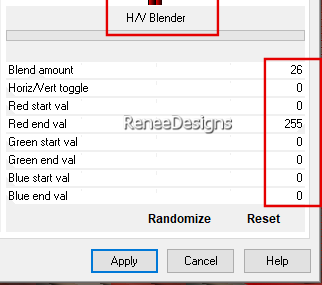

52.
Effects –Plugins - Muras Meister – Copies use the settings below
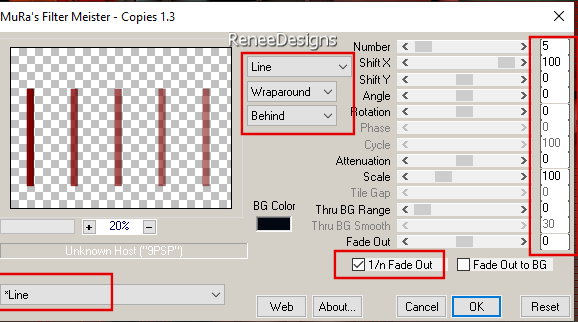
53.
Effects – Reflections Effects-Rotating Mirror use the settings below
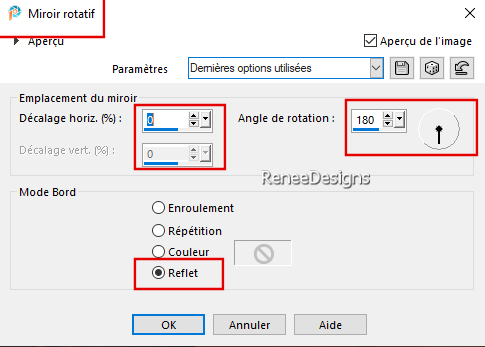
54.
Layers-Arrange-Move Down and repeat– comes above Raster 1
55.
Layers-Duplicate
56.
Effects –Distortion Effects– Polar Coordinates-Polar to Rectangular
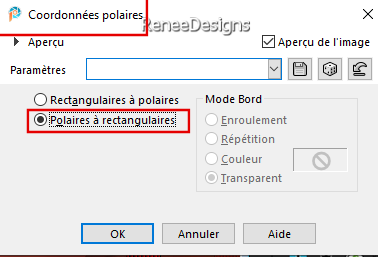
57.
Pick Tool: (K) on your keyboard -Enter these parameters on the toolbar
 0 / 186
-Press ( M ) to close the tool
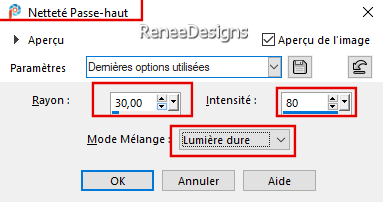
58.
Adjust –Sharpness–High-pass Sharpen with these settings
59.
Selections –load/save selection –load selection from disc and select my selection: ‘’ Rouge-Noir5’’
60.
Activate Color Changer Tool
 Click once with black into the selection Click once with black into the selection

- Activate the top of the layer palette
61.Open the tube "
Renee-TUBES-Rouge-ou-Noir-Echelle" -Edit - Copy- Activate your work -Edit - Paste as new layer
-
Move the tube in the right place ( see finished image)
62.
Open the tube ‘’Titre-Mystere-rouge-ou-noir’’ -Edit - Copy- Activate your work -Edit - Paste as new layer
Place this text above the layer of the swing (between the ropes)(see preview image)
63.
Activate the Pen Tool– Line Style ‘’Dash with Arrowhead End’’ Width 2 -Foreground color to white
Draw three small arrows with the foreground color white (see preview image)
64.Open the tube
‘’
Renee-TUBES-Rouge-ou-Noir-Billes’’-Paste as new layer- Place as you like.
Note: Select two more balls - one red and one black - and attach them to the top left and right of the swing rope. ( see preview image)
65.
Layers- Merge- Merge Visible
66.
Edit -Copy
67.
Open the tube ''cadre''
-Activate your Magic Wand – Tolerance at 0 and Feather at 0
Click with the magic wand in the empty part of the frame
68.
Selections – Modify –Expand with 2 Pixels
69.
Layers-New Raster Layer
70.
Edit-Paste into Selection

71.
Layers-Arrange-Move Down
-
Add the author's watermark to your work and your own watermark
-
Select a tube to your taste -Resize and shadow as necessary
Place on the right side
72.
Layers- Merge- Merge All ( flatten)
73.
Image - Resize -999 Pixels width- Resize all layers checked
Save as JPG
Thanks for your time and enjoyment of this lesson.
Renée
This lesson has been written by Renée 28/06/2024
Edited and Update
in 2024
*
Any resemblance to an existing lesson is purely coincidental.
*
Don't forget to thank the people who work with us and for us - the testers and translators
Thanks
*
|


 Translations


