|
Let's start the lesson.Open the Color Palette
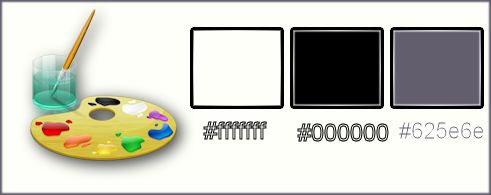
- Material Properties: Set your foreground color to #625e6e -Set your background color to #ffffff
1.
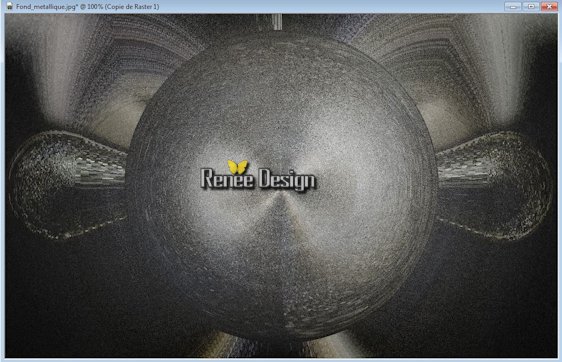
Open the image ‘’Fond_metallique’’-Window - Duplicate (or shift+D) - Close the original and proceed on the copy -Promote Background Layer =Raster 1
2.
Effects-Plugins – Unimited –ICNET FILTERS - Noise Filters-Noisy Rotation
at 165
3.
Layers-Duplicate
4.
Effects-Plugins – Distort – Turn Your Inside
Outside at 152
5.
Effects-Plugins – Flaming Pear – Zephyr
6.
Effects-Plugins – Transparency – Eliminate
Black
7.
Layer Palette: Set the Blend mode to Hard Light
8.
Effects-Plugins – Unlimited2.0 - Teph's Tricks-Slide X 50%
9. Effects-Plugins – Unlimited 2.0- Distort-Turn Your Inside
Outside... at 231
10. Effects-Plugins – Adjust variation -1 click 1x Original- 1
click at Lighter
-The result
11. Layers- New raster layer
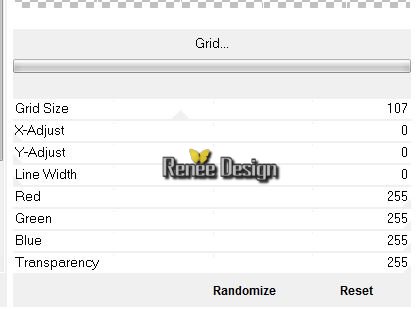
12. Effects-Plugins - VM Toolbox- Grid with these settings as shown below.
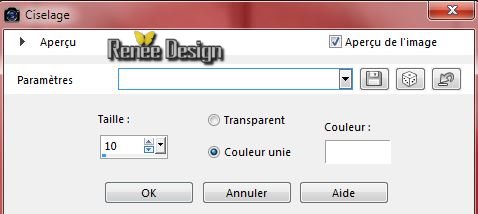
13. Effects-3D Effects-Chisel with these settings as shown below.
14.
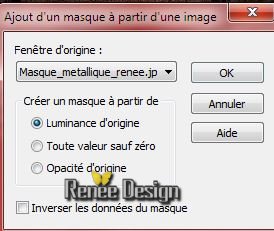
Effects - 3D Effects - Drop shadow with these settings as shown below.
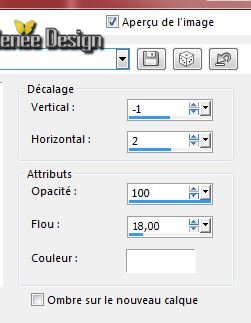
15.
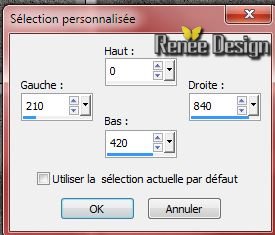
Activate Selection Tool - Custom selection-(S) with these settings as shown below. 
16.
Promote selection to Layer
17. Layer-Palette-Make the layer underneath aktive =(Raster 2)
Press the Delete button on your key board
Selections-Deselect All
Activate the top of the layer-Palette (Promoted selection )
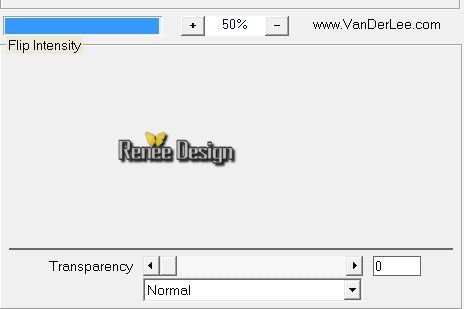
18.
Effects- Plugins - Vanderlee –Unplugged X – Flip
Intensity with these settings as shown below.
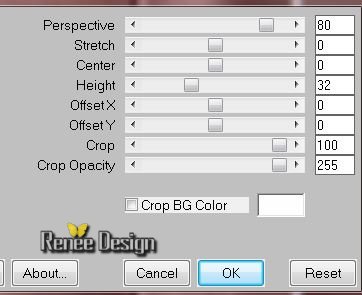
19. Effects-Plugins – Mura’s Meister – Perspective Tilling with these settings as shown below.
- Layer-Palette-Make raster 2 aktive (Raster 2)
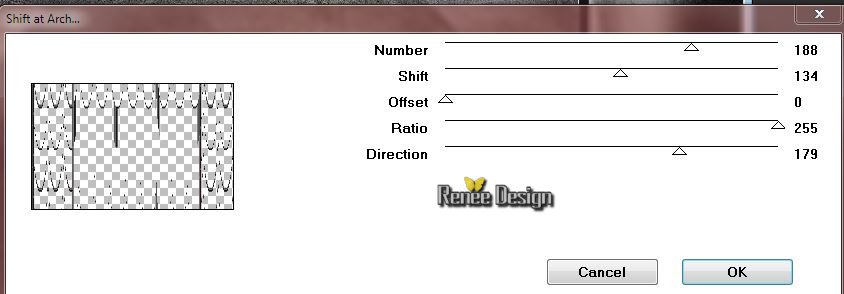
20.
Effects-Plugins – Mura’s Seamless- Shift at
Arch with these settings as shown below.
- Layer Palette: Set the Blend mode to Hard Light
- Layer-Palette-Make raster 1 aktive
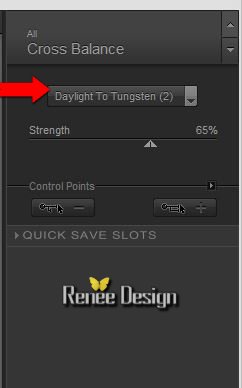
21. Effects-Plugins – Nick Color effex pro3.0- Cross
Balance with these settings as shown below.
22.
Effects- Plugins – Simple – Zoom Out and
Flip
- Activate the top of the layer-Palette
23. Layers- New raster layer
24.
Selections - load/save selection - load selection from disk and choose my selection: ‘’ metallique_1’’
25. Activate the tube ‘’metallique_Image_1 »
- Edit/copy- Edit/ paste into selection
Selections-Deselect All
26. Layers- Duplicate
27. Image -
Mirror
28. Layers- Merge- Merge Layers Down
29. Layer Palette -Double click on this layer and set the Blendmode to "Dissolve " and set the layer opacity of this layer to 61%
30. Layers- New raster layer
- Activate Flood Fill Tool and fill the layer with color white
31. Activate the Mask in your PSP ‘’Masque_metallique_renee.jpg’’
-
Layers- New Mask layer from Image and select Mask
‘’Masque_metallique_renee.jpg’’
32. Effects-Edge Effects-Enhance
- Layers- Merge- Merge Group
33. Activate the tube’’Renee_tube_Metal_zodiac.pspimage’’
- Edit/copy- Edit/ paste as new layer on your working area
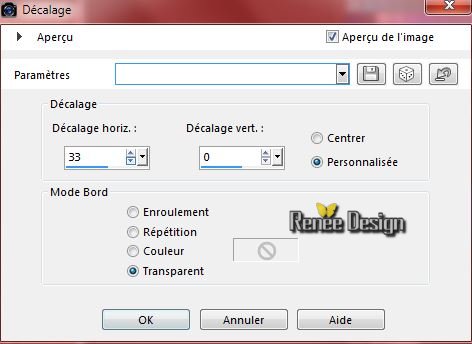
34. Effects-Image Effects-Offset with these settings with these settings as shown below.
35. Layers- New raster layer
36.
Selections - load/save selection - load selection from disk and choose my selection:
« metallique_2’’
-Swap your materials, so the darker color is on the bottom as shown below
37. Pot of Paint: Change the opacity of the color at 55%
-Flood Fill Tool: Fill the Selection with the foreground color white
Selections-Deselect All
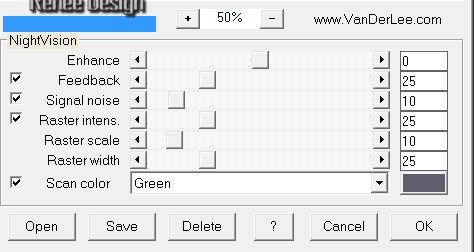
38. Effects- Plugins –Vanderlee- Night Vision with these settings as shown below.– BG-Color
#625e6e
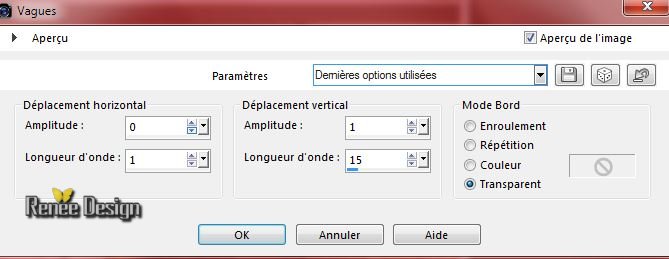
39. Effects-Distortion Effects-Wave with these settings as shown below.
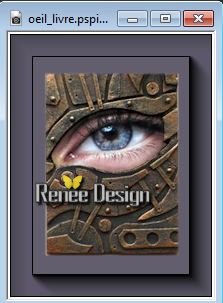
40. Activate the tube ‘’œil_livre’’
- Window - Duplicate (or shift+D) -
Close the original
and proceed on the copy
- Make raster 2 aktive of the tube ‘’œil_livre’’
- Pot of Paint: Change the opacity of the color at 100 % -Activate Flood Fill Tool and fill the layer with the dark background color #625e6e
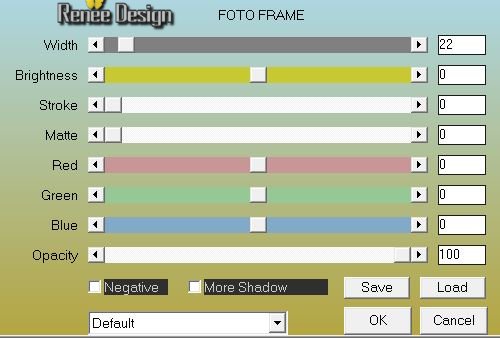
- Effects- Plugins - AAA Frame - Foto Frame with these settings as shown below.
-Layers-Arrange-Move the layer down
- Make raster 1 aktive the little image
- Image Resize with 80%
resize all layers not checked
- Image - Add borders-Symmetric checked: 2 pixels color white
- The result
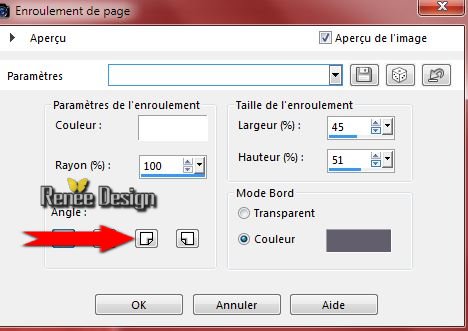
41.
Effects-Image effects-Page Curl with these settings as shown below. Color#625e6e
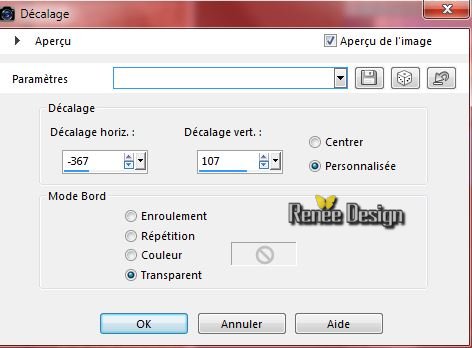
42. Edit/copy- Edit/ paste as new layer on your working area
43. Effects-Image Effects-Offset with these settings with these settings as shown below.
44. Activate the tube deco_tutoriel_metallique »
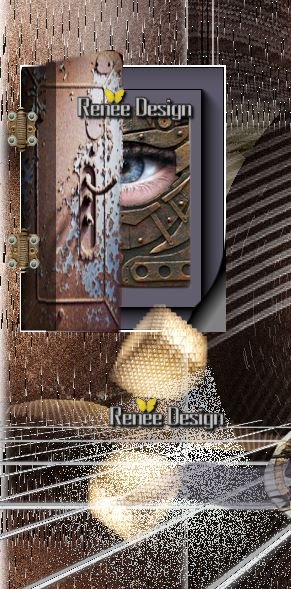
-On this tube - Activate the layer ‘’porte ‘’ Edit/copy- Edit/ paste as new layer on your working area
- Move tool / place your tube on the left side of your image (
see the finished image)
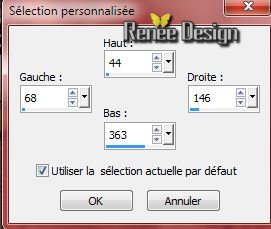
45.
Activate Selection Tool-(S) - Custom selection with these settings with these settings as shown below.
46. Adjust – Brightness and Contrast – Curves with these settings
Find the right curve to obtain the color you like on the selected area or take the same measurements as shown on the curve below
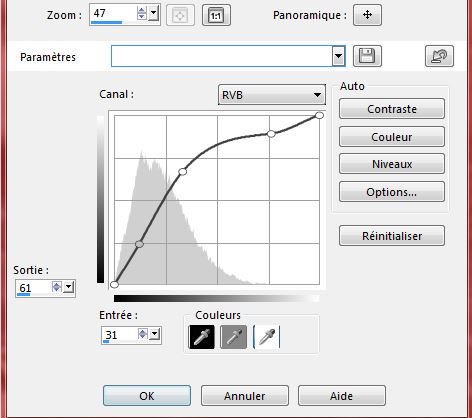
Selections-Deselect All
47. Activate the tube deco_tutoriel_metallique
-Select the elements , place them one by one on your work
-
"charnières "
- "vis
"
- activate "cube’’
and paste as a new layer on your working area - Move tool / place your tube on the left side of your image (
see the finished image)
- Layer Palette: Set the Blend mode to Screen (only the cube)
The result
-Layer Palette- Make Group-Raster 4’’ aktive
48. Activate the tube ‘’metallique_image_brume’’
- Edit/copy- Edit/ paste as new layer on your working area
49. Effects-Image Effects-Offset with these settings with these settings as shown below.

50. Effects- Plugins – Graphic plus- Spot lite with these settings as shown below.
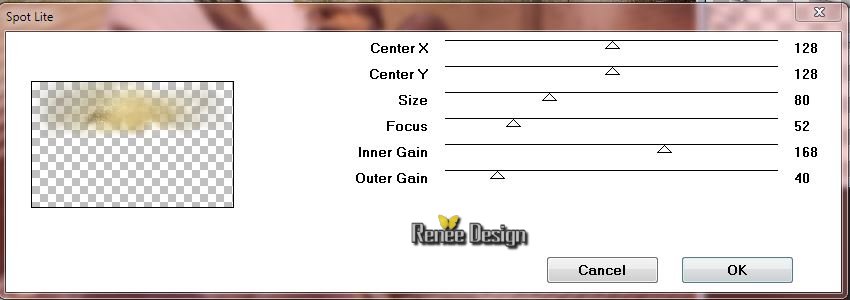
- Set the blendmode to Screen
- Activate the top of the layer-Palette
51. Activate the tube ‘’ tuto_metallique_deco’’
- Edit/copy- Edit/ paste as new layer on your working area
-
With the move tool, move it in the bottom right corner
52. Layers-Merge-Merge Visible
53. Image - Add borders-Symmetric checked: 2 pixels BG-Color #625e6e
54. Image - Add borders-Symmetric checked: 2 pixels Black
55. Image - Add borders-Symmetric checked: 2 pixels BG-Color #625e6e
56. Image - Add borders-Symmetric checked: 100 pixels Black
57. Activate the Magic Wand and select the black border of 100
pixels
58. Effects-Reflection Effects-Kaleidoscope with these settings as shown below.
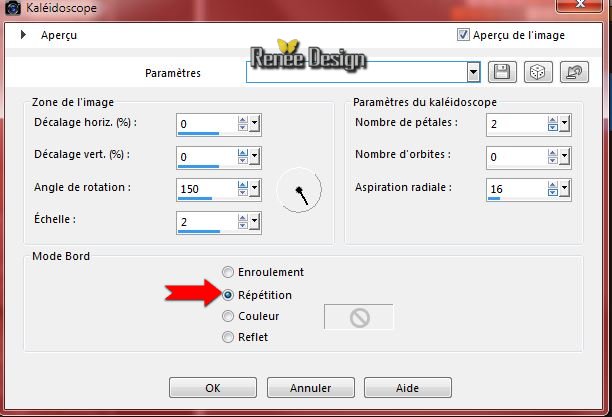
Selections-Deselect All
59. Activate the Magic Wand –Mode Add (shift) -select the two black borders
60. Effects- Textuur Effects-Blinds select the black border - color #5b7095
61. Effects- Plugins - EyeCandy 5 Impact – Perspective
Shadow-Tab-Settings-/Drop shadow Blury with these settings as shown below.

Selections-Deselect All
62. Activate the tube « Renee_tube_clous »
- Make tube 2 "clous" aktive (ad your your taste)
63. Edit/copy- Edit/ paste as new layer on your working area
- Move tool / place your tube on the bottom left side of your image- Layers-Duplicate -Move tool / place your tube on the bottom right side of your image
64. On the both layers!!!-Set the Blendmode to Luminance -Legacy mode Luminance H
65. Activate the tube ‘’titre_metal’’ – Edit/copy- Edit/ paste as new layer on your working area Move tool / place your tube on the upper left corner of your image place
66. Image - Add borders-Symmetric checked: 5 pixels en blanc
67. Image Resize with 995 pixels de large
68. Activate the tube ‘’titre ‘’ –Edit/copy- Edit/ paste as new layer on your working area
69. Layer - Merge - Merge all (Flatten)
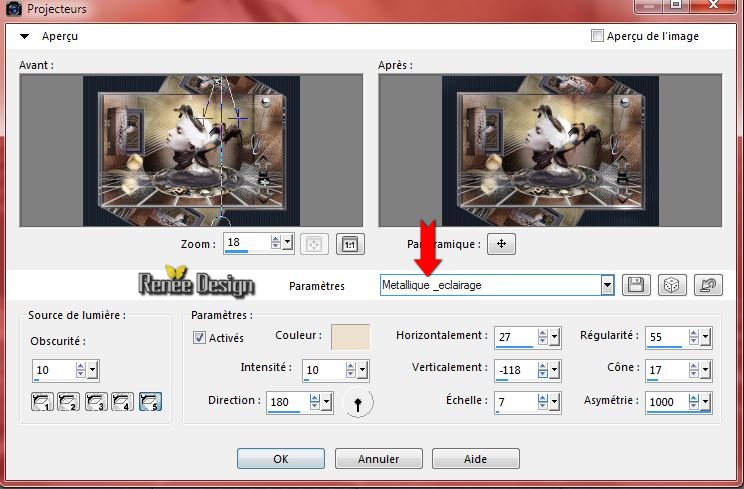
70. Effects-Illumination Effects-Lights-select my file - Preset ''Metallique
eclairage''
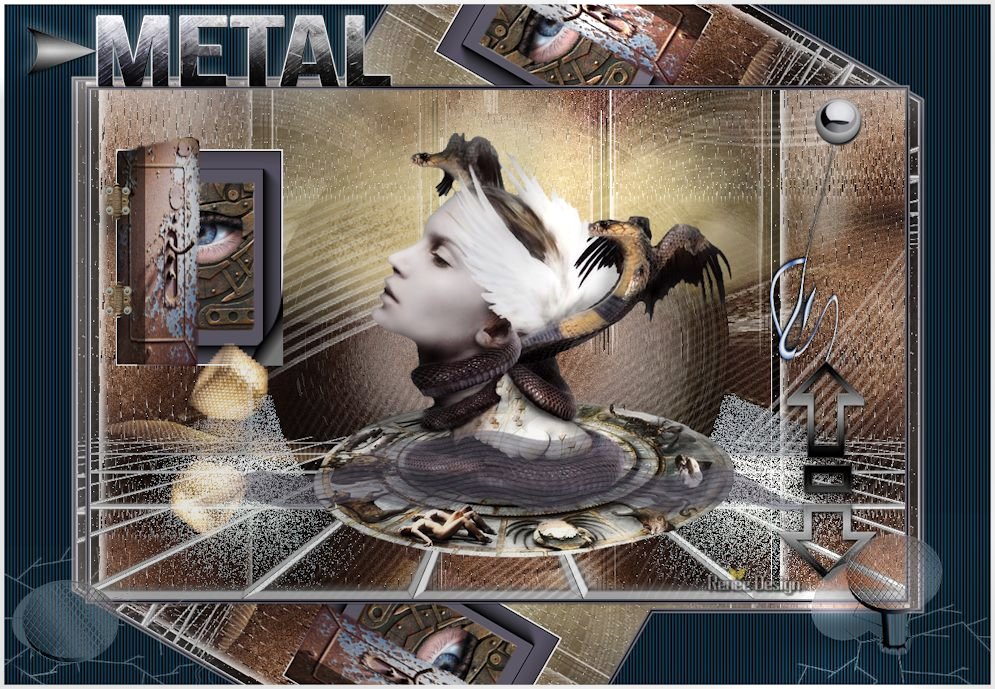
Save as JPG
I hope you enjoyed this lesson
Renée
This lesson was written by Renée 20/03/2015
Placing
2015
*
Any resemblance with an existing lesson is merely a coincidence *
* Don't forget to thank the people who work for us and with us. I named the tubeurs - Testers and the translators.
Thanks Renée.
| 
 Translations


 When you see this logo the filter is imported in Unlimited *

 All rights reserved