|
Let's begin.
View - toolbars - Script checked !!!!!
1. Open the image ''fond_liberty''/Promote Background Layer= raster 1
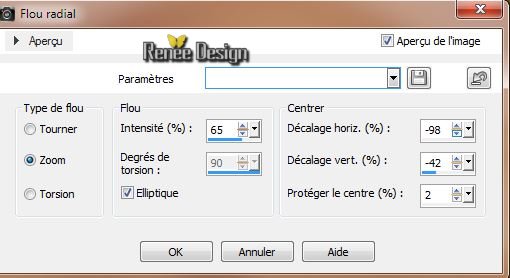
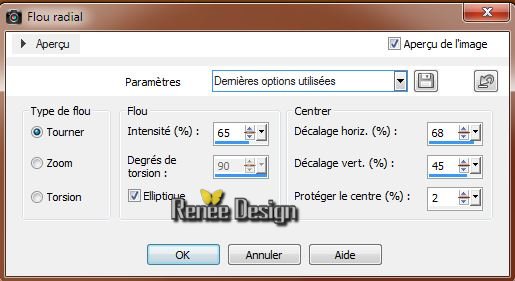
2. Adjust-Blur-Radial Blur
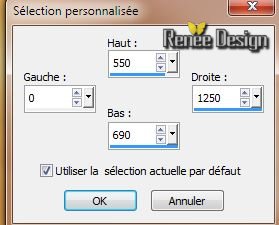
3. Selections-Custom selection with these settings
4. Selections-Promote Selection To Layer
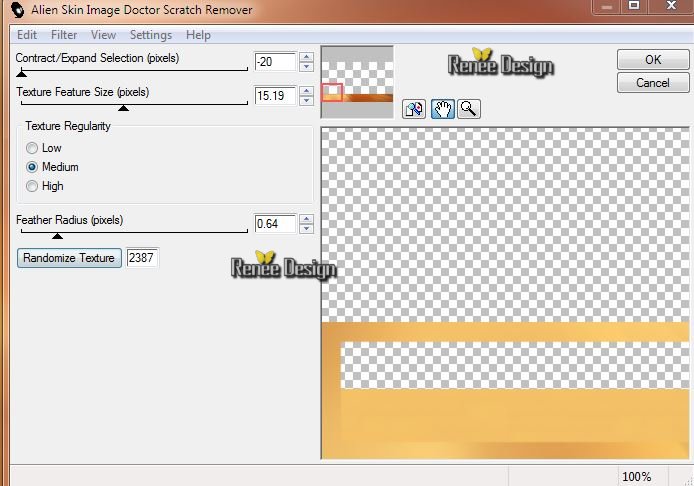
5. Effects -Plugins Alien Skin -Image Doctor / Scratch Remover
6. Selections - Deselect all
7. Effects - 3D Effects-Drop Shadow : 0/0/65/100 black
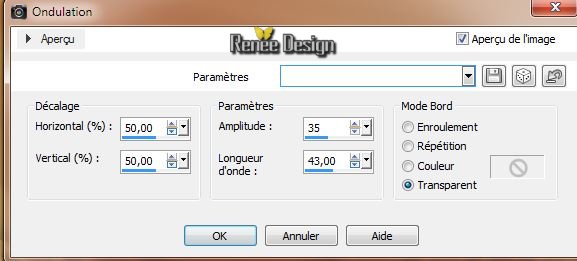
8. Effects - Distortion Effects -Ripple
9. Effects-User Defined Filter - Vibrate default (preset is in the folder
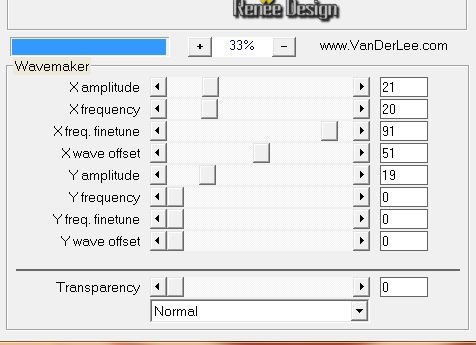
10. Effects -Plugins Vanderlee Unplugged X/ Wavemaker
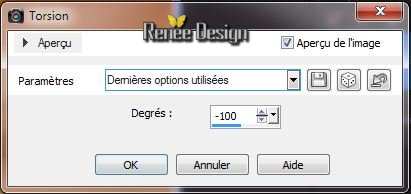
11. Effects- Distortion Effects - Twirl
Aktivate the bottom of the layers-palette (raster 1).
12. Layers-New Raster Layer.Flood Fill Tool: fill the selection with color white
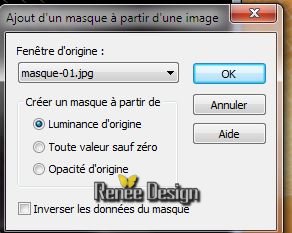
13. Layers-New Mask Layer From Image: aktivate this mask: ''masque_01.jpg''
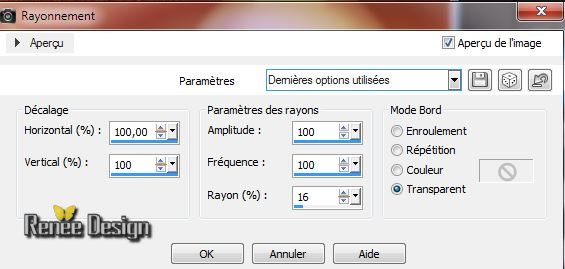
14. Layers - Megre-Merge Group
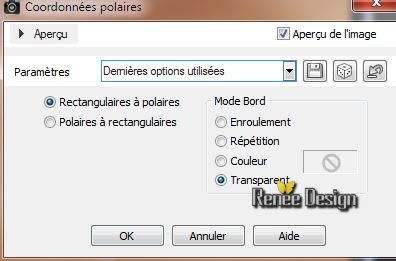
15. Effects- Distortion Effects - Polar Coordinates
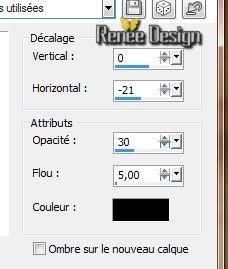
16. Effects - 3D Effects-Drop Shadow :
Aktivate the top of the Layers palette
17. Layers - New raster layer
18. Selections - load/save selection- load selection from disk and select my file ''liberty_1"
19. Effects -Plugins Eyecandy 5 -Chrome -Preset-
''liberty_chrome''
20. Effects - Plugins EyeCandy 5 -Glass - Preset-
''liberty_glass'
Layer Palette: Set the Blend mode to "Overlay"
21.
Selections - Deselect all
22.
Open the tube ''liberty_image_by_endrju.pspimage''
/Image Resize to 80% -Edit/copy -Edit/paste as a new Layer and place
Layers-Arrange-Move Down
22.
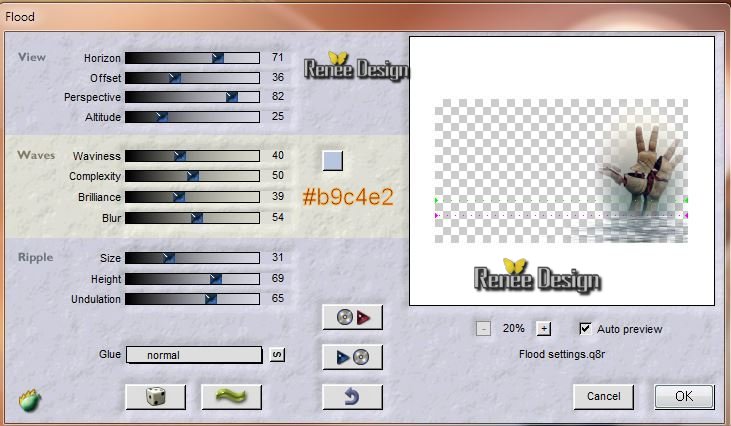
Effects - Plugins Flaming Pear - Flood(Setting Horizon depends where your tube is)
Aktivate the top of the Layers palette
23.
Open the tube ''liberty_effet1'' /Edit/copy -Edit/paste as a new Layer
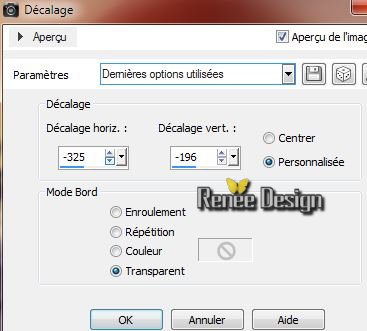
24.
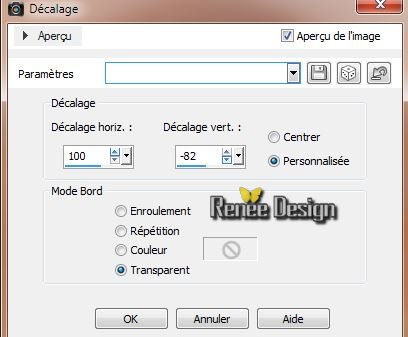
Effects - Image Effects -Offset
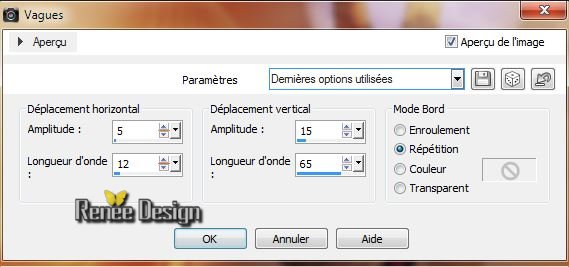
25.
Layer Palette: Set the Blend mode to "Dodge"and lower the opacity down to
48%
26.
Layers-Merge-Merge Visible
27.Materials-Properties: Forground color to color :
#f8bd59. Background color to color: #902b00
28.
Change material from the foreground into Foreground/background Radial gradient with these settings
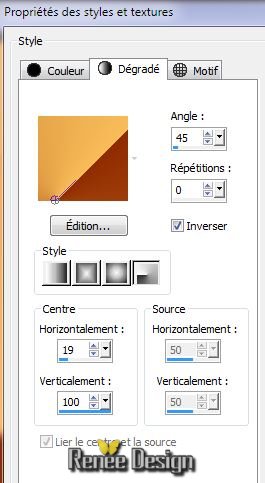
29.
Layers - New raster layer /
Flood FillTool : Fill the selection with the gradient
30. Effects-Plugins Unlimited -Filter Factory Galler H / Reverb 163
31. Effects-Plugins Unlimited -Filter Factory Galler H/ Stigmatism
146 /0
32. Adjust-Blur-Radial Blur
33.
Effects - Edge Effects - Enhance More
34.
Layers- Duplicate /Image Mirror -Lower the opacity down to 50%
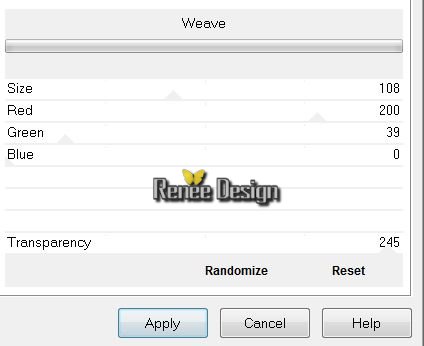
35.
Layers-Merge-Merge Down
36.
Layer Palette: Set the Blend mode to"Soft Light"
37. Layers- Duplicate
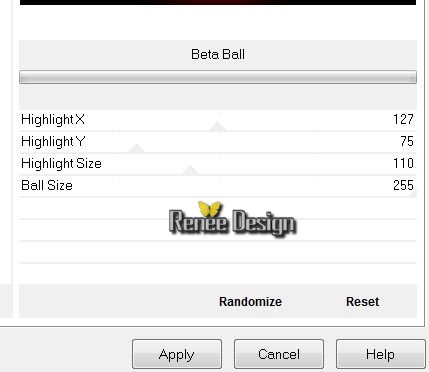
38. Effects-Plugins Unlimited Factory Gallery D / Beta Ball
39.
Effects-Plugins - Transparency - Eliminate Black/Layer Palette: Set the Blend mode to"Soft Light"
40.
Layers- Duplicate
41.
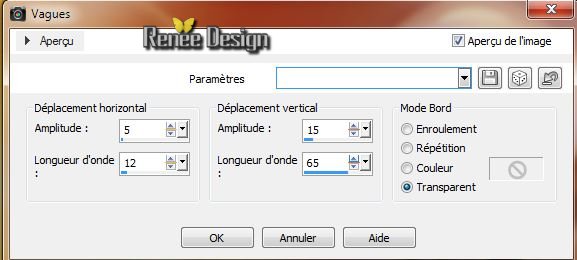
Effects - Distortion Effects - Wave
42.
Effects - Edge Effects-Enhance More
Layer Palette: Set the Blend mode to "Overlay"and lower the opacity down to 73%
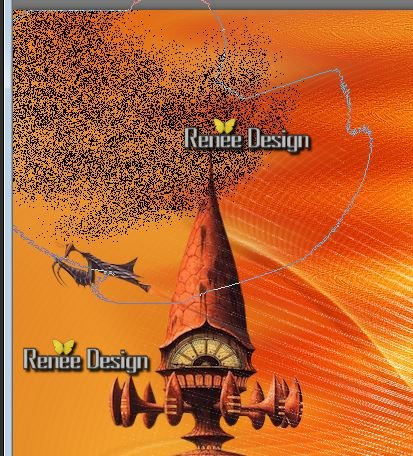
Your work is like this right now
43.
Layers - New raster layer
44.
Selections - load/save selection- load selection from disk and select my file ''liberty_2'' /Flood Fill Tool: fill the selection with this color: #902b00
45.
Selections - Deselect all
46
. Effects - Distortion Effects -Wave
47.
Layer Palette: Set the Blend mode to "Darken " and lower the opacity down to 81%
48. Effects -Plugins EyeCandy 5-Impact- Perspective
shadow-Preset- ''liberty_shadow''
49.Open the tube ''
KRYSSURREALISME-22-02-14-105'' (Note: connect the layers of the tube you do not want to use
and take the tube and the image of the tube I used for the lesson)
Layers- Merge- Visible layers of the tube /Image
Resize 80% -Edit/copy-Edit/paste as a new Layer and place.
Effects -Plugins EyeCandy 5-Impact- Perspective
shadow/Preset ''liberty_shadow_2''
50.
Open the tube "
KRYSSURREALISME-22-02-14-104.pspimage''/ Close the bottom layer of the tube. Layers- Merge- Visible.( layers of the tube) ./ Image Mirror /Image
Resize to 75 % /Edit/copy-Edit/paste as a new Layer and place.
51.
Effects -Plugins Flaming Pear Flood (with the same settings but the settings for Horizon depends on where you have placed the tube.
52.
Open the tube''liberty_effet_1'' /Edit/copy-Edit/paste as a new Layer and place.
53.
Effects - Image Effects- Offset
54.
Effects- Distortion Effects- Spiky Halo
55.
Layers- New Raster layer
56.
Activate Brush Tool and select my file: ''BrushTip_Mtm-Biart-62'' Size 999 -opacity 50 %. Foreground color to color black - configured as follows:

Apply at the top left like this
Having problems with the brush: the brush tube is in the folder/Edit/copy-Edit/paste as a new Layer and place
57.
Open the tube ''vol_oiseaux" - Edit/copy-Edit/paste as a new Layer and place
58.
Layers- Merge-Merge Visible
59.
Activate toolbar Script, choose my file in the list : ''liberty ''C:\Users\YourName\Documents\Corel PaintShop Pro\16.0\ Scripts-trusted
Click the little blue arrow it will run/faire ok to each application until the script completes
If problems with the script:
Image - Add Borders - Symmetric checked : 2 pixels black
: 2
pixels white
:
2 pixels black
:
40 pixels white
:
2 pixels black
60.
With the magic wand -select the border of : 40
pixels
61. Effects-Plugins Unlimited - Filter Factory Gallery A -
Weave
62.
Selections-Invert
63.
Effects - 3D Effects-Drop Shadow :
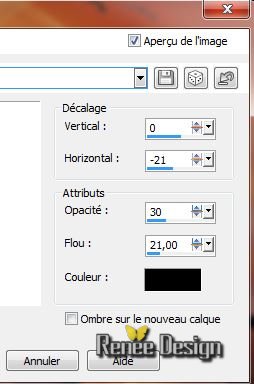
64.Repeat: Effects - 3D Effects-Drop Shadow : V = -21 / H =0
65.
With the police ''New Brillant''/Size 48
take 2 colors -Write text :" Liberty"
66.
Transform the vector to raster layer
67.
Effects - 3D Effects-Drop Shadow 2/-2/95/0 black
68.
Layers- Duplicate
69.
Image -Negative Image /Layer Palette: Set the Blend mode to "Screen"
/and place
70.
Layers-Merge-Merge All ( flatten)
71.
Image Resize to 1025 pixels Width
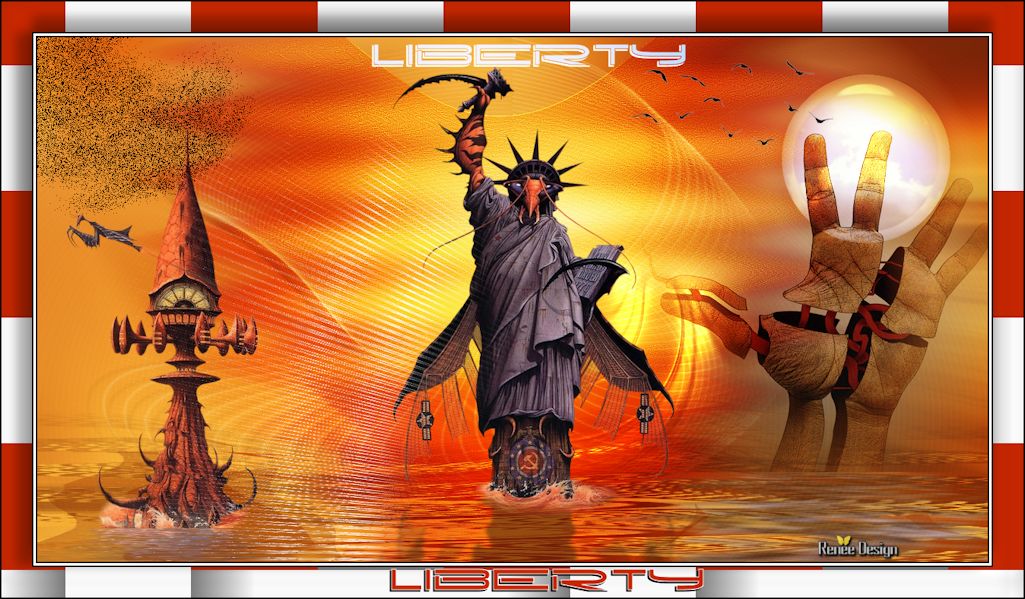
I hope you enjoyed this lesson
Renée
This lesson was written by Renée the 25/02/2014
Created the
6 March 2014
*
Any resemblance with an existing lesson is merely a coincidence
*
Don't forget to thank the people who work for us and with us. I named the tubeurs - Testers and the translators.
Thanks Renée | 

 Translations