|
New
Translations here
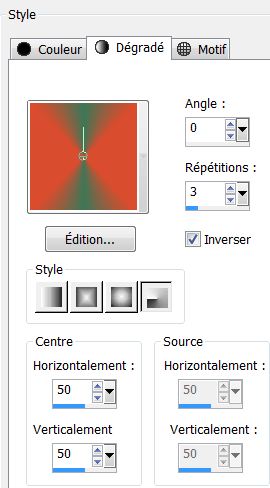
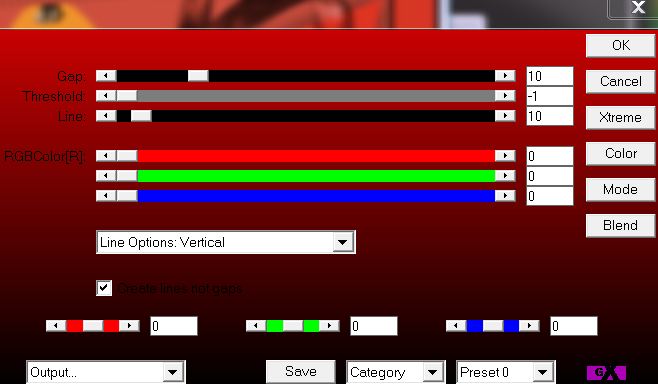
Let's start the lesson. 1. File - New - New Transparent Image:995 x 615 pixels 2. Material Properties: Foreground color to this color:#d94c2e Background color to this color #3c7757 - Prepare a radial gradient configured like this.
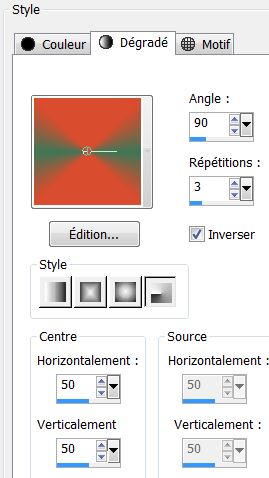
3. -Activate Flood fill tool and fill the layer with the gradient 4. Effects- Plugins - Simple -Pizza slice mirror - Repeat Effects- Simple /Pizza slice mirror 5. Properties Foreground: Change the settings of this gradient angle to 90°like this
6. Layers- New raster layer 7. Selections - load/save selection - load selection from disk and choose my selection: ''renee_la dame _ au serpent1'' - Activate Flood fill tool and fill the selection with the gradient 8. Selections-Deselect All 9. Effects - 3D Effects - Drop shadow with these settings:0/0/50/40 black 10. Effects- Plugins -Simple -Top left mirror - Layer Palette -Double click on this layer and set the Blendmode to Hard Light and set the layer opacity of this layer to 91% 11. Open the tube ''logane_misted_fantasy'' Edit/copy-Edit paste as a new layer on your working area /Do not move !!
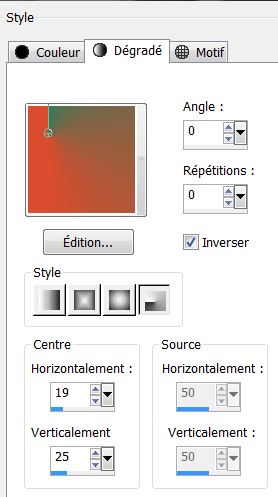
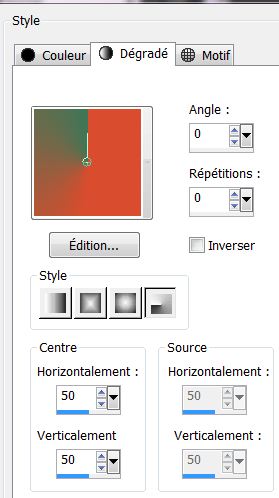
12. Effects- Plugins - FM Tile Tools - blend emboss - Properties Foreground: Change the settings of this gradient like this
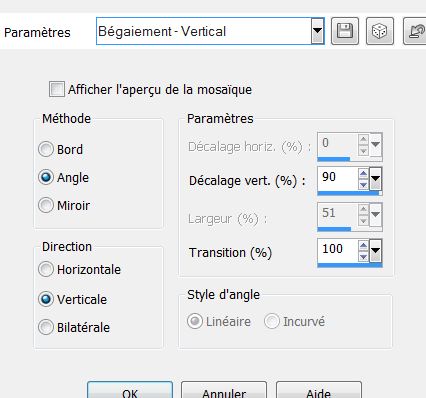
13. Layers- New raster layer/ Activate Flood fill tool and fill the selection with the gradient 14. Effects- Plugins -Unlimited -Tile & Mirror/ XY offset 50%(positif) 15. Image Mirror /Image Flip - Set the layer opacity of this layer to 52% 16. Effects-Image Effects-Seamless Tiling use settings below
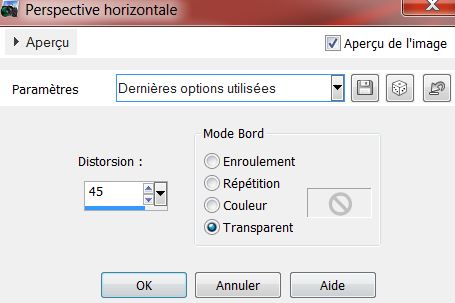
18. Effects- Plugins -Unlimited - Filter Factory Gallery F/Border Fade 2 / 36/1/191 19. Effects- Plugins - Unlimited - Filter Factory Gallery M /loom 0/255 20. Effects- Plugins - Simple / Top left mirror 21.Effects-Geometric Effects -Perspective Horizontal
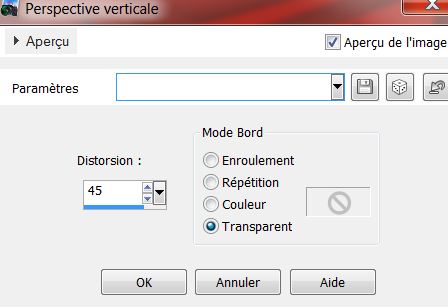
22.Effects-Geometric Effects - Perspective Vertical
- Layer Palette -Double click on this layer and set the Blendmode to Hard Light 23. Effects- -Eyecandy 5 -Perpsective shadow-tab Settings/User Settings and choose my preset-''renee_femme au serpent'' 24. Open the tube 'yoka_snake'' Edit-Copy-Edit-Paste as a new layer on your working area /With your move tool place it to the upper left side - Layer Palette -Double click on this layer and set the Blendmode to Hard Light 25. Open the tube 'femme au serpent_serpent2 '' Edit-Copy-Edit-Paste as a new layer on your working area /With your move tool place it to the right side - Layer Palette -Double click on this layer and set the Blendmode to Luminance 26. Open the tube ''image-danae_fourchette et fleur_thafs'' Image Resize 50% Edit-Copy-Edit-Paste as a new layer on your working area. With your move tool place it to the right side at the mouth of the snake - Layer Palette -Double click on this layer and set the Blendmode to Hard Light 27.Effects - 3D Effects - Drop shadow with these settings:
- Activate the top of the layer Palette 28. Layers- New raster layer 29. Selections - load/save selection - load selection from disk and choose my selection: 'renee_la femme au serent_2'' - Pot of Paint with these settings !!!! Properties Foreground: Close the gradient.FG-Color to color:#ffc600
30. Activate Flood fill tool and fill the selection with the FG-Color #ffc600 ./ Selections-Deselect All 31. Open the tube ''la dame au serpent _attache'' Edit-Copy-Edit-Paste as a new layer on your working area and move 32. Layers- New raster layer 33. Selections - load/save selection - load selection from disk and choose my selection: ''renee-la dame au serpent 3'' - Properties Foreground: FG-Color to color: #35110a use settings below
34. Activate Flood fill tool and fill the selection with the FG-Color (Reset the settings of your flood fill toll ) 35. Selections- Deselect All 36. Open the tube ''la dame au serpent_bulles '' Edit-Copy-Edit-Paste as a new layer on your working area and move 37. Layers- New raster layer 38. Selections - load/save selection - load selection from disk and choose my selection: ''la dame au serpent_4'' - Properties Foreground: FG-Color to color:#ea2810 /Activate Flood fill tool and fill the selection with the FG-Color #ea2810 39. Selections-Deselect All 40. Effects-Edge Effects-Enhance More 41. Layers- Duplicate 42. Layers- Merge- Merge Down 43 Open the tube ''steampunkinsects04'' Edit-Copy-Edit-Paste as a new layer on your working area /With your move tool place it to the left side /Image Free Rotate 45 to the right 44. Layers- Merge- Merge Visible 45. Image - Add borders-Symmetric checked: 4 pixels black 46. Image - Add borders-Symmetric checked: 50 pixels color #e93315 47. Image - Add borders-Symmetric checked: 5 pixels black 48. Layers- New raster layer 49. Selections - load/save selection - load selection from disk and choose my selection: ''renee _la dame au serpent _5'' 50. Material Properties: Foreground color to this color:#d94c2e Background color to this color #3c7757 - Prepare a radial gradient configured like this.
- Activate Flood fill tool and fill the selection with the gradient 51. Selections-Deselect All 52. Effects- Plugins -AP 01 (-Innovations )-AP line Silverling
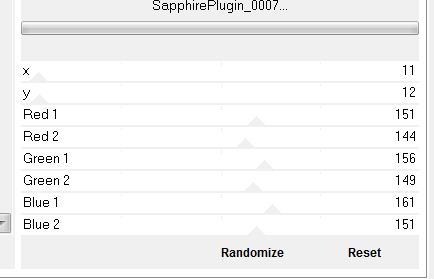
- Repeat- Effects-Plugins -AP 01 -Innovations -AP line silverling with the same settings 53. Effects- Plugins - Eyecandy5 Impact - Perspective shadow-tab Settings/User Settings and choose my preset- ''renee_ femme au serpent2'' 54. Layers- Duplicate 55. Image Mirror-Image Flip 56. Layers- New raster layer 57. Selections - load/save selection - load selection from disk and choose my selection: ''renee_la dame au serpent_6'' - Properties Foreground: Close the gradient.Foreground color to this color: #d28616 /Activate Flood fill tool and fill the selection with the foreground color #d28616 58. Effects- Plugins - Unlimited - Filters Sapphire Plugin 01/Sapphire plugin _0007
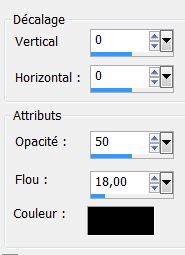
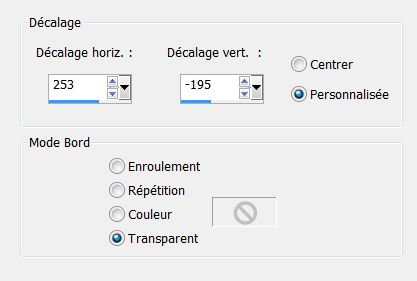
59. Effects-Plugins - Eye Candy 5 Impact- perspective shaodw-with the same settings 60. Layers- Duplicate 61. Image Resize 50% resize all Layers not checked 62. Effects- Image Effects-Offset use settings below
63. Image Mirror and move to the right side/look at the big picture it is very important 64. Layers- Duplicate -Image Flip 65. Image - Add borders-Symmetric checked: 2 pixels black 66. Image Resize 985 pixels Width 67. Activate the tube "text "/Edit/copy-Edit paste as a new layer on your working area / Ore write your own text ( Font is included into the zipfile) Save as JPG
I am part of Tutorial Writers Inc. My tutorials are regularly recorded. ReneeGraphisme_All rights reserved
*
|
 Translations