|
Let's start the lesson.
-
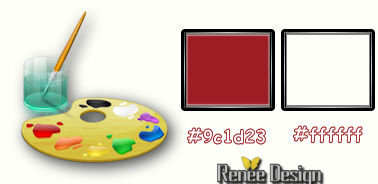
Color Palette- Set your foreground color to #9c1d23 - Set your background color to #ffffff
1.
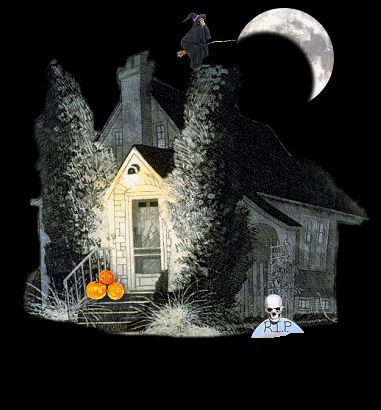
Open the background image ‘’Fond_halloween_2016.jpg’’ – Window - Duplicate (or shift+D) - Close the original and proceed on the copy -Promote Background Layer = Raster 1
2.
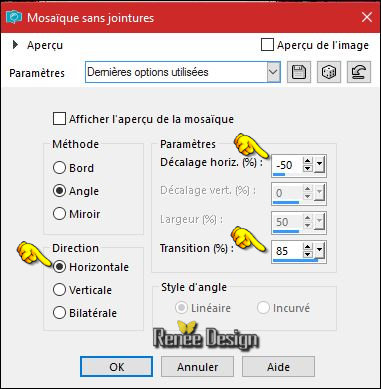
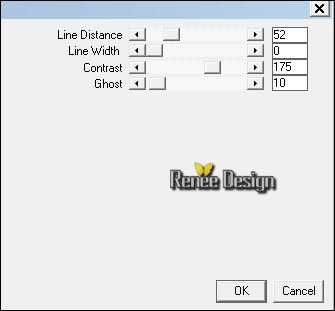
Effects- Image Effects- Seamless Tiling use settings below
3. Layers- Duplicate
4.
Effects –Plugins -(or in Unlimited ) VM Natural or VM
Texture – Cross Weave

5.
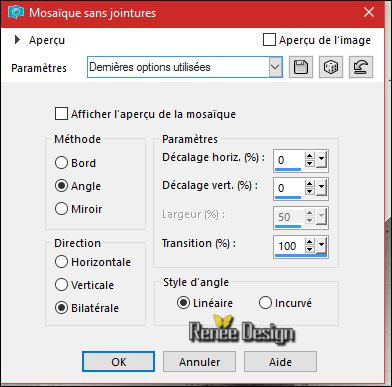
Effects- Image Effects- Seamless Tiling use settings below
6.
Activate Selection Tool -Custom Selection (S) -Rectangle with these settings
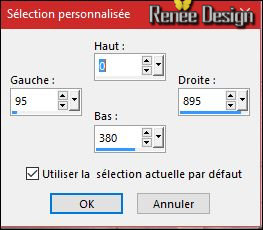
7.
Selections- Promote selection to Layer
8.
Effects –3 D Effects – Drop Shadow with these settings: 17/3/30/18 black
Selections- Deselect All
9.
Layers- Duplicate
10.
Effects – Plugins - (or in Unlimited) VM Extravanga –
Transmission
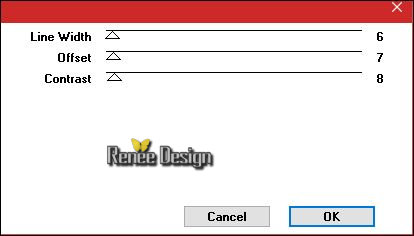
11.
Effects- Edge Effects- Enhance More
Double click on this Layer and set the Blend Mode to "Hard Light "
12.Layers- Arrange- Move Down
-
Activate the layer above in the Layer Palette
13.
Layers- Merge- Merge Down
14.
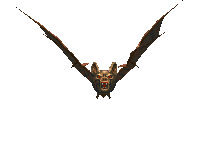
Open the tube ‘’
Halloween_2016_image1.png’’
-
Edit - Copy- Activate your working area, Edit - Paste as a new layer
Move Tool-
Place against the left edge
15.
Effects – Plugins – Simple – Center
Tile
16.
Layers- Duplicate
-
Image Mirror CTRL+B)– Image Flip (CTRL+I)
17.
Layers- Merge- Merge Down
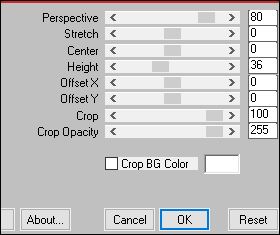
18.
Effects –Plugins – Mura’s Meister – Perpsective
Tilling
19.
Effects –3D Effects –Drop Shadow with these settings: 2/8/50/15 black
-
Repeat - Effects –3D Effects –Drop Shadow
20.
Effects –Plugins- Unlimited ICNETFILTES- Color Effects - Inverter
(the filter is into the zipfile)
21.
Open the tube ‘’Halloween_2016_image2’’
-
Edit - Copy- Activate your working area, Edit - Paste as a new layer
-Move Tool: Move as shown in the example below
22.
Effects –Plugins – Flaming Pear Flood/Preset ‘’
Halloween_2016_Flood settings.q8r’’
Click on the red arrow  and select my file-preset-2. Can be used in any folder of your choice by clicking it. -3 Open it will be ok in your filter and select my file-preset-2. Can be used in any folder of your choice by clicking it. -3 Open it will be ok in your filter 
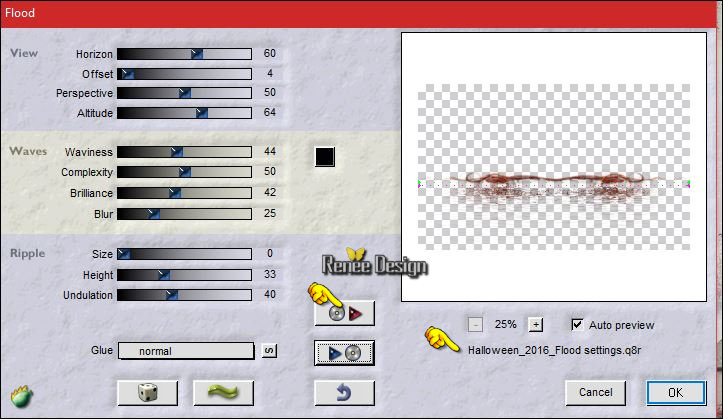
- Double click on this Layer and set the Blend Mode to "Hard Light "
23.
Layers- New Raster Layer
- Activate Flood Fill Tool and fill the layer with the background color #ffffff
24.Selections - Load/save selection - Load from disk
Load selection ‘’Narah_mask_Abstract132’’
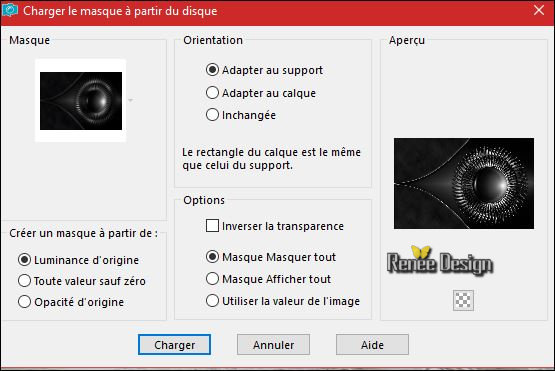
- Layers- Merge- Merge Group
25. Image
Resize to 45 % all layers not checked
26. Effects- Image Effects- Offset with these settings: H = 55 and V =
110
27. Layers- New Raster Layer
- Layers- Merge- Merge Down
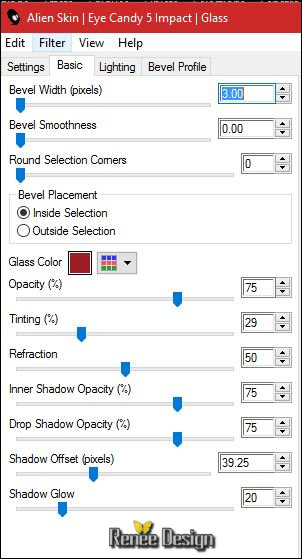
28.
Effects –Plugins –EyeCandy 5 Impact – Glass- tab Settings/User settings choose my Preset
‘’ Halloween_2016_Glass’’
29. Effects
–3D Effects –Drop Shadow with these settings: 1/1/50/12 black
30.
Open the tube “DECOS “ (Do not close we need it later for the rest of the work)
- Activate the layer
‘’sol’’-of the tube >>Edit - Copy- Activate your working area, Edit - Paste as a new layer
31. Effects- Image Effects- Offset with these settings: H = 9 and V = - 240
- Activate the layer
‘’escalier ‘’of the tube >>Edit - Copy- Activate your working area, Edit - Paste as a new layer
32. Effects
– Image Effects -Offset with these settings : H = -250 and V = -
43
- Activate the layer
‘’lampe ‘’ of the tube>>Edit - Copy- Activate your working area, Edit - Paste as a new layer
- Move Tool- Place to the right side
- Activate the layer
‘’arbre’ of the tube >> Edit - Copy- Activate your working area, Edit - Paste as a new layer
33. Effects – Image Effects -Offset with these settings : H = - 73 and V = 3
- Activate the layer
‘’chauve-souris’’ of the tube>>Edit - Copy- Activate your working area, Edit - Paste as a new layer
34.Move Tool- Place on top of the stairs
- Activate the layer
’’monstre’ of the tube >>Edit - Copy- Activate your working area, Edit - Paste as a new layer
-
Place it in the right place see finished image
- Activate the layer
‘’affiche’’ –of the tube >> Edit - Copy- Activate your working area, Edit - Paste as a new layer
35. With the move tool, move it in the upper right corner
- Layer- Arrange- Move Down (underneath raster 6 (behind the lamp)
-
Activate the top of the layer palette
- Back on tube "
Décos "
36. Activate the layers
‘’citrouille and layer personnage’ of the tube >>
Edit - Copy- Activate your working area, Edit - Paste as a new layer’
-Move Tool- Place on the bottom left side
37. Layers- Merge- Merge Visible
38. Effects
– Plugins– FM Tile Tools –Blend Emboss using the default settings
39. Layers- New Raster Layer
40.
Selections –load/save selection –load selection from disc and select my selection: ‘’Halloween_2016’’
41. Activate Flood Fill Tool and fill the selection with #ffffff
Selections- Deselect All
42.
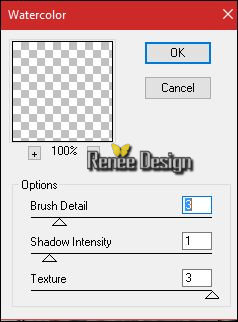
Effects – Plugins – Artistic – Watercolor (attention not filter
Artistique)
43. Effects
– Edge Effects –Enhance More
44. Activate Tool '' Change to Target Brush" with these settings

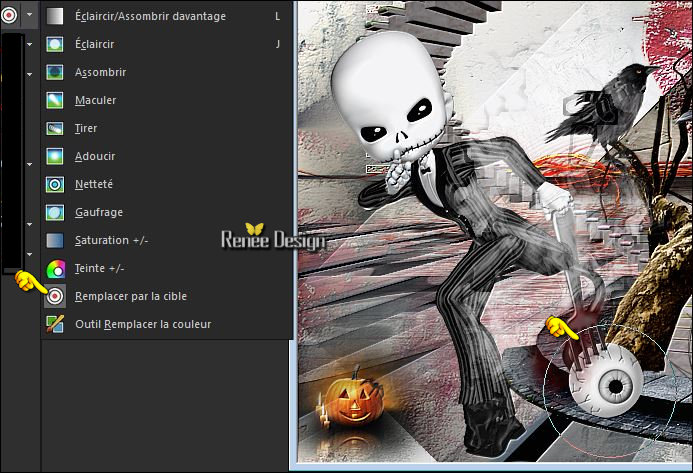
And with the foreground color applied like this see above screen shot
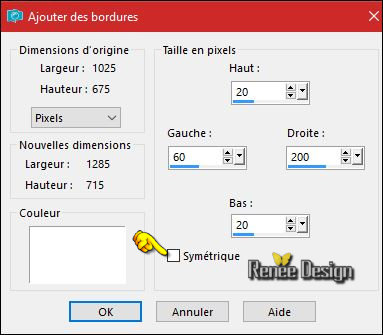
45. Image - Add borders-Symmetric checked: 5 pixels #9c1d23
46. Image - Add borders-Symmetric NOT checked with these settings-Color #ffffff
47.
Promote Background Layer = Raster 1
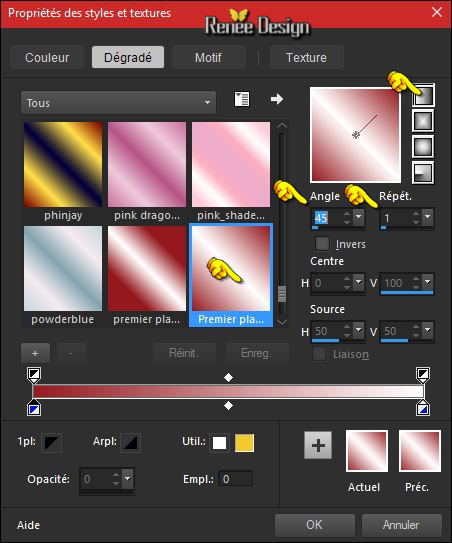
- Properties foreground:
Set your foreground to gradient 'Foreground-background' - Linear gradient with settings below
48. Activate the Magic Wand and select the white border
49. Layers- New Raster Layer
50. Activate Flood Fill Tool and fill the selection with the gradient
51. Effects
– Plugins– Carolaine and Sensibility- CS-Texture
- Swap your materials, so the darker colour is on the bottom
52. Layers- New Raster Layer
53. Activate Flood Fill Tool and fill the selection with the gradient
54. Effects
–Plugins – Carolaine and Sensibility- CS-Texture
with the same settings
55. Double click on this Layer and set the Blend Mode to "Difference" -Set the layer opacity of this layer to 55%
56. Effects- Edge Effects- Enhance More
57. Layers- Merge- Merge Down ( Blend Mode to " Normal"
Set the opacity of this layer to 100%)
Selections- Deselect All
58. Open the tube ‘’tete_mort ‘’ Edit - Copy- Activate your working area, Edit - Paste as a new layer and move to the left side
59. Effects-3 D Effects Drop Shadow using the default settings
60. Open the tube "Text" ( three layers ) >>Edit - Copy -Activate your working area, Edit - Paste as a new layer and move to the right side
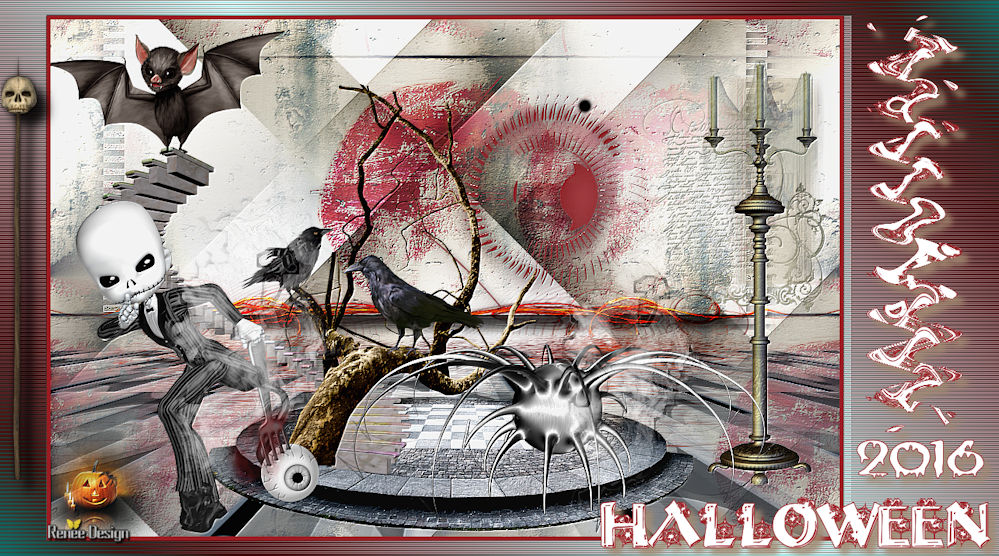
61. Layers- Merge- Merge All (flatten)
62. Image Resize to 999 pixels width.
Save as JPG
I hope you enjoyed this lesson
Renée
This lesson was written by Renée 20/06/2016
Edited and Update
2016
*
Any resemblance with an existing lesson is a coincidence
* Do not forget to thank the people who work with us and for us I have appointed the tubeurs and translators
Thanks Renée *
*
| 

 Translations


 If a plugin supplied appears with this icon it must necessarily be imported into Unlimited *

 All rights reserved