|
Let's start the lesson.
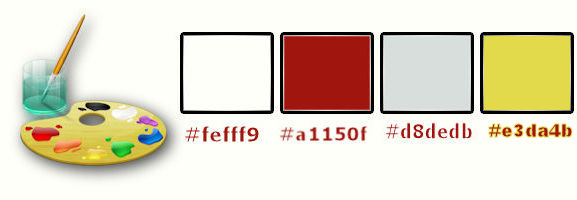
- Color-palette:Set your foreground color to color #fefff9 -Set your background color to color #a1150f
1. Open the image ‘’ Fond_Fobots-recycled’’- Window - Duplicate (or shift+D) - Close the original and proceed on the copy -Promote Background Layer =Raster 1
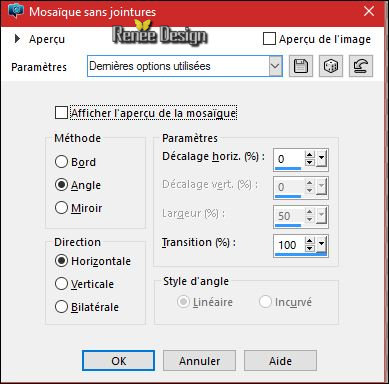
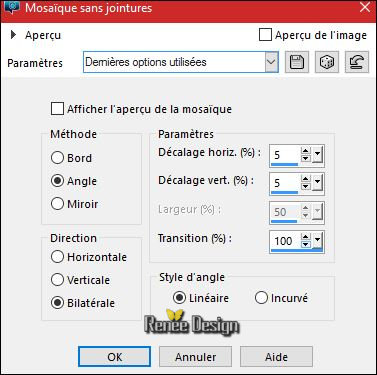
2. Effects- Image Effects- Seamless Tiling use settings below
3.
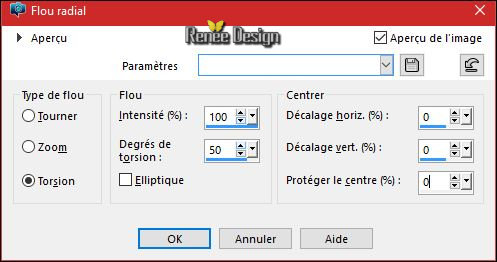
Adjust- Blur- Radial Blur use settings below
4.
Layers- Duplicate
5.
Effects –Plugins- Unlimited - Two Moon- Grinder..172
6. Layers- Duplicate
7. Image
Mirror (CTRL+B)
-
Set the layer opacity of this layer to 44%
8. Layers- Merge- Merge- Down
9. Effects- Edge Effects-Enhance More
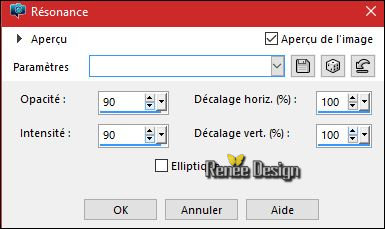
10. Effects- Relection Effects- Feedback with these settings
11. Effects- Edge Effects-Enhance
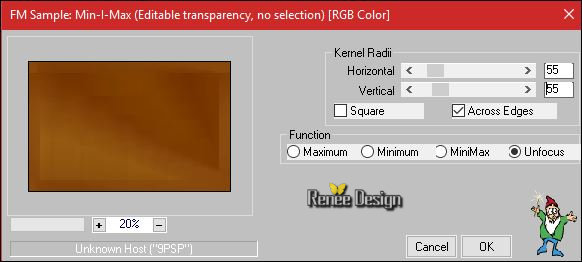
12. Effects
–Plugins – Filter Meister- FMSample –Min -I -Max
13. Effects- Edge Effects-Enhance More
14. Selections –load/save selection –load selection from disc and choose my selection: ‘’ Fobots_1 »
-
Selections- Promote Selection to Layer
Selections- Deselect All
15. Effects- 3 D Effects- Drop Shadow with these settings: 2/2/41/20 black
16. Effects
–Plugins– Adjust Variation – Click 1x Original / Click 1x
lighter
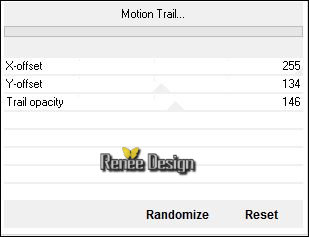
17. Effects
–Plugins -Unlimited – Toadies – Motion Trail
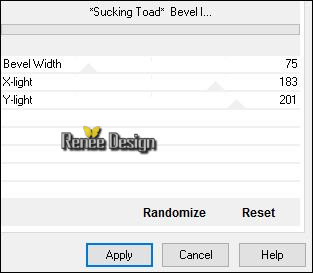
18.
Effects –Plugins-Unlimited –Toadies - *Sucking Toad* Bevel
I...
19.
Effects – Plugins -Toadies What are you- With these settings 2
and 20
- Layer Palette - Double click on this Layer and set the Blend Mode to "Hard Light "
20.
Selections –load/save selection –load selection from disc and choose my selection:‘’ Fobots_2 »
21.
Selections- Promote Selection to Layer
Selections- Deselect All
22. Effects- 3 D Effects- Drop Shadow with these settings: 2/2/41/20
-
Layer Palette - Double click on this Layer and set the Blend Mode to "Overlay "
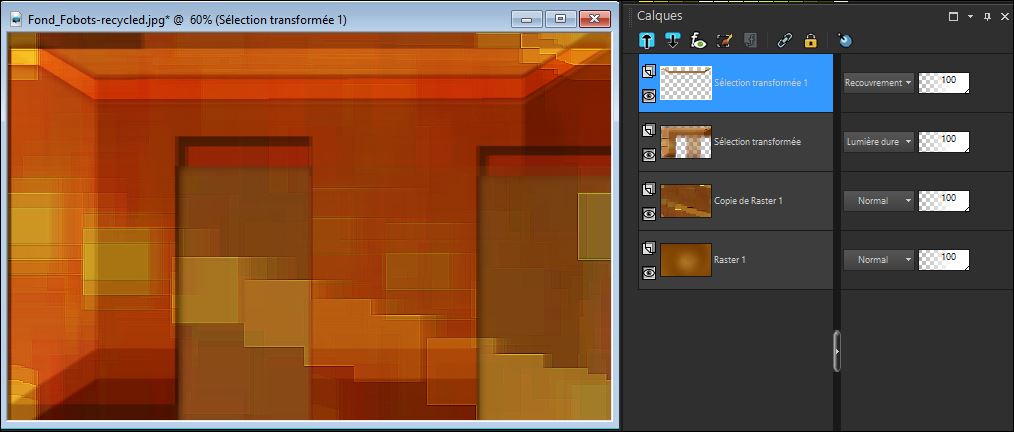
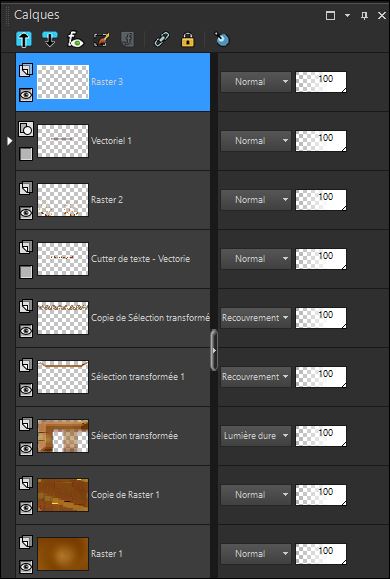
-Your work and Layer Palette look like this now -You should have this result
23. Layers- Duplicate
24. Effects- Distortion Effects- Curlicues use settings below
25. Effects- 3 D Effects- Drop Shadow with these settings-Color black

26. Effects- Image Effects- Offset with these settings : H = 0 and V = - 40
/Transparent checked
- Layer- Palette- Make Copy of Raster 1 active
27. Activate your Text Tool-Font ‘’ Verdana’’ or another font what you like
/Size 48
-
Type your text ‘’FOBOTS RECYCLED ‘’or whatever you like
- As shown in the example below
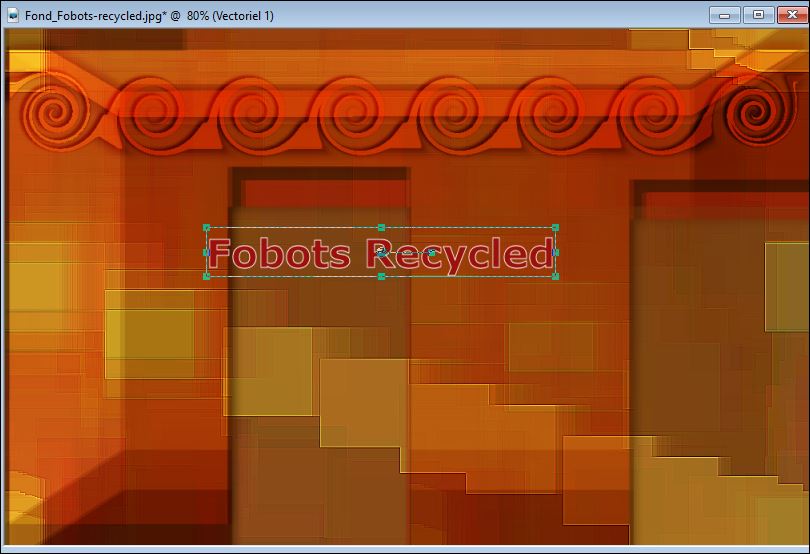
- Return to the Text Toolbar and click here =Text Cutter

- Now you have just the text with a transparent background that you can use everywhere
and this allows you to choose the desired texture for your text
and than Delete (1 Vector layer and Vector text Cutter layer )
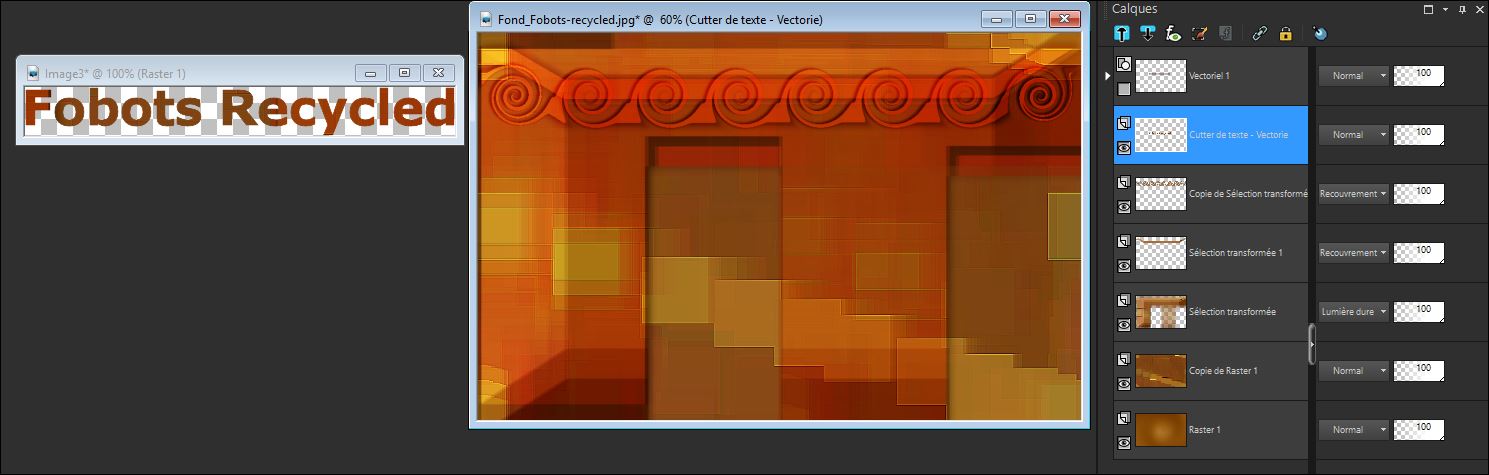
- Activate your Text
28. Effects- Edge Effects- Enhance
- Edit/ Copy-Edit - Paste as new layer on your working image
Do not move it is in the right place !!!
29. Effects
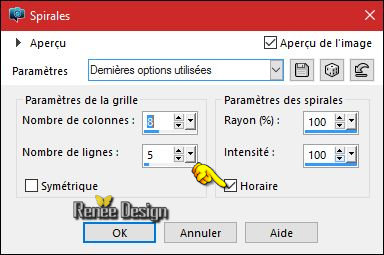
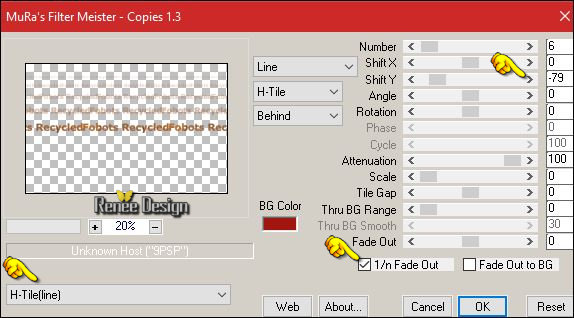
–Plugins – Mura’s Meister – Copies with these settings
30. Effects-
Distortion Effects- Wave use settings below

31. Effects- Image Effects- Offset with these settings: H = 0 and V = - 280/Transparent checked
31. Selections –load/save selection –load selection from disc and choose my selection: ‘’ Fobots_3 »
Hit the Delete Key of your Keyboard

Keep Selected
-
Your Layer Palette look like this now-Activate top layer in the Layer palette
32. Layers- New Raster Layer
33. Pot of Paint: Change the opacity of the color at 45% -Activate Flood Fill Tool and fill the selection with the foreground color #fefff9
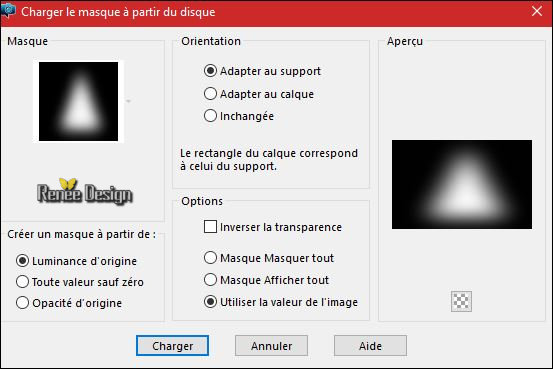
34. Layers-Load/Save Mask-Load mask from Disk and select ‘’’ 1217491303_masques »
- Layers- Merge - Merge Group
Selections- Deselect All
35.
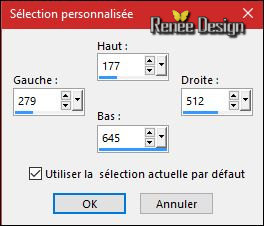
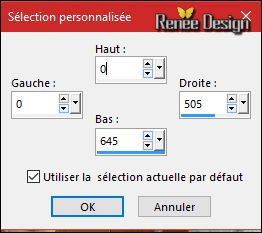
Activate Selection Tool -Custom Selection (S) -Rectangle with these settings
36. Effects
–Plugins – Andromeda Perspective/Side Walls/It open
close
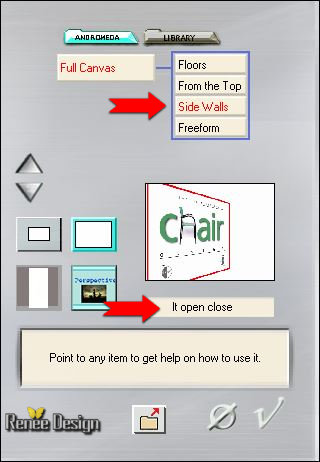
37. Effects
–Plugins EyeCandy 5 Impact – Extrude –use settings below-Color
#ae9430
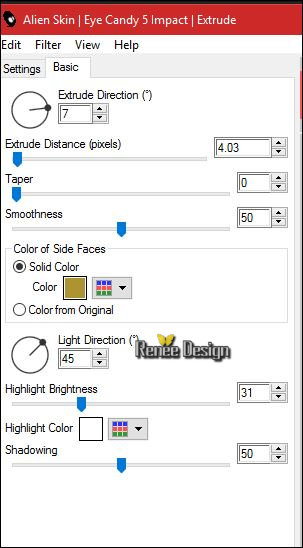
Selections- Deselect All
38. Layers- Duplicate
39. Image
Mirror (CTRL+B)
40. Effects- Image Effects- Offset with these settings: H = - 220 and
V = 0/Transparent checked
41. Layers- Merge- Merge Down
- Layer Palette - Click on the Bottom Layer =Raster 1
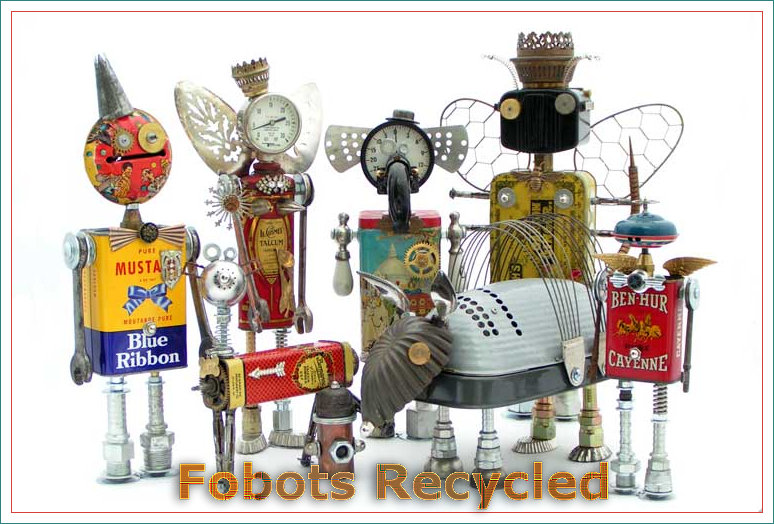
42.
Selections –load/save selection –load selection from disc and choose my selection:‘’ Fobots_4 »
-
Selections- Promote selection to Layer
43. Layers-Load/Save Mask-Load mask from Disk and select ‘’’ 1217491303_masques »
with the same settings
- Layers- Merge - Merge Group
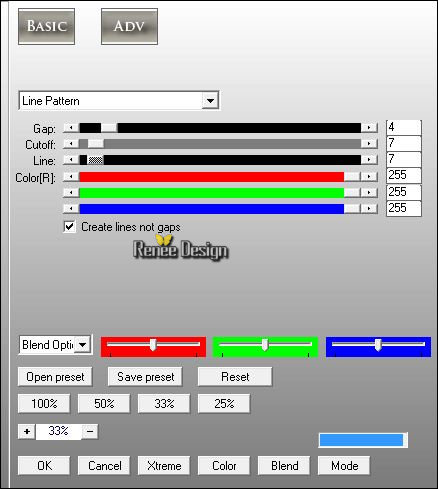
44. Effects- Plugins – AP[Lines] - Lines Silverling use settings below
45. Effects- Edge Effects- Enhance More
Selections- Deselect All
46. Layers - Arrange- Move 2 Times Up !!!
-
Activate top layer in the Layer palette
47. Layers- New Raster Layer
48 .Selections –load/save selection –load selection from disc and choose my selection: ‘’ Fobots_5 »
49. Pot of Paint: Change the opacity of the color at 100%
- Activate Flood Fill Tool and fill the selection with the foreground color #fefff9
Selections- Deselect All
50. Layer Palette - Double click on this Layer and set the Blend Mode to "Luminance "
51. Layers- New Raster Layer
52. Activate Flood Fill Tool and fill the foreground color #fefff9
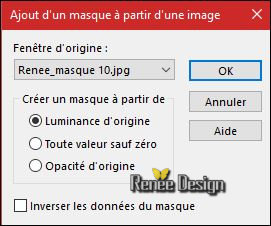
- Open the Maske ''Renee_masque10.jpg ''in your PSP
53. Layers- New Mask layer from Image and choose Mask:
-Layers- Merge- Merge Group
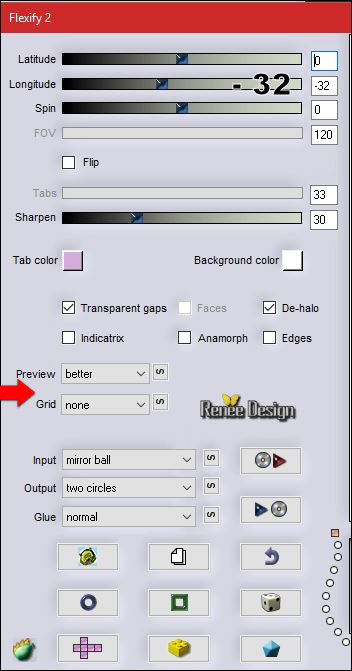
54. Effects
–Plugins- Flaming Pear - Flexify 2 use settings below
55.
Activate Selection Tool -Custom Selection (S) -Rectangle with these settings
Hit the Delete Key of your Keyboard
Selections- Deselect All
56. Layer Palette - Double click on this Layer and set the Blend Mode to "Overlay "-Set the layer opacity of this layer to 79%
57. Open the tube ‘’ Renee_tube_robot_artista_7.jpg’’
- Image
Resize to 55 %
- Edit/ Copy-Edit - Paste as new layer on your working image
58. Effects- Image Effects- Offset with these settings: H = - 29 and V = -
139/Transparent checked
59. Layers- New Raster Layer
60. Selections –load/save selection –load selection from disc and choose my selection: ‘’ Fobots_6 »
61. Color-palette:Set your foreground color to color #e3da4b - Activate Flood Fill Tool and fill the selection with the foreground color #e3da4b
Selections- Deselect All
62. Open the tube ‘’Renee_tube_robot_artista_3’’
- Image
Resize to 55 %
- Edit/ Copy-Edit - Paste as new layer on your working image
- Move tool / place your tube on the right side of your image
63. Layers- Merge- Merge Layers Visible
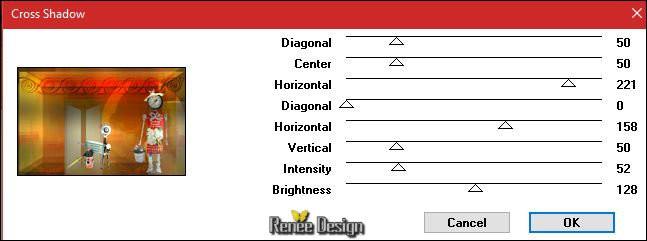
64. Effects
–Plugins – Graphic plus- Cross Shadow use settings below
65. Open the tube ‘’ Renee_Fobots_image1’’
- Edit/ Copy-Edit - Paste as new layer on your working image
66. Effects- Image Effects- Offset with these settings: H = -
343 and V = 15/Transparent checked
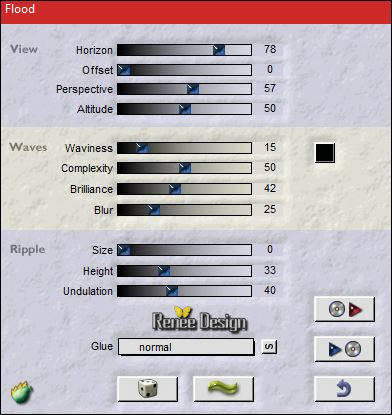
67.
Effects –Plugins – Flaming pear – Flood-Preset ‘’
Robots_recycled_Flood settings.q8r’’
click on the red arrow>>select my file preset ‘’ Robots_recycled_Flood settings.q8r’’ can be used in any folder of your choice by clicking it. -3 Open it will be ok in your filter can be used in any folder of your choice by clicking it. -3 Open it will be ok in your filter
Or manual settings as shown in the example below
68. Effects
–3D Effects –Drop Shadow with these settings : 1/ -2/50/5 black
- Color-palette:Set your foreground color to color
#fefff9
69. Layers- New Raster Layer
-
Open the Brush image ’’ Robots_tree13.PspBrush’’ in your
Psp
- File- Export Custom Brush -Give it a name-"Robots_tree13.PspBrush'’
70. Activate Brush Tool and select my file in the list "Robots_tree13.PspBrush'’ with these settings

-
Stamp your brush at the right place by using your foreground color #fefff9 /As shown in the example below
71. Effects- 3 D Effects- Drop Shadow with the same settings
72. Layers- New Raster Layer
73.
Selections –load/save selection –load selection from disc and choose my selection:‘’ Fobots_7 »
74. Activate Flood Fill Tool and fill the selection with the foreground color #fefff9
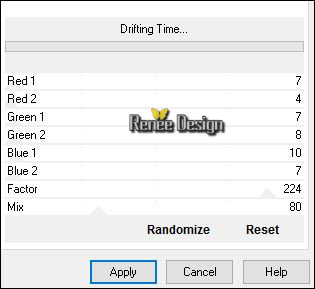
75.
Effects –Plugins- Unlimited - Andrew's Filter Collection 57- Drifting
Time..use settings below .
Selections- Deselect All
76.
Effects- 3 D Effects- Drop Shadow with the same settings
77. Open the tube ‘’ Renee_Fobots_image2.pspimage’’
- Edit/ Copy-Edit - Paste as new layer on your working image
- With the Move Tool, move it in the right place (see finished image)
78. Layers- New Raster Layer
79.
Selections –load/save selection –load selection from disc and choose my selection:‘’ Fobots_8 »
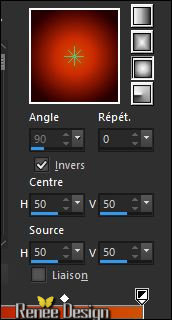
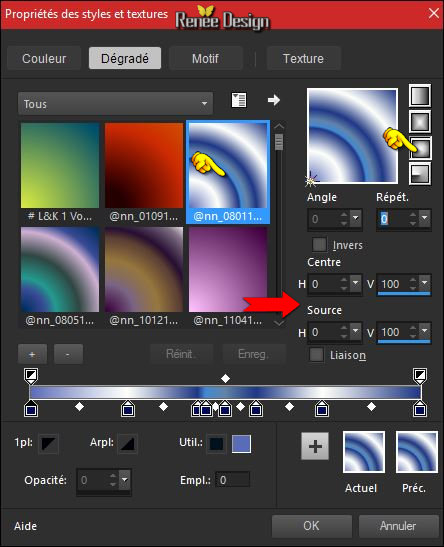
- Color Palette: Set your Foregroundcolor to gradient and select ''@nn_010914_GR_Autumn_tdstudio '' -Prepare a sunburst gradient configured like this.
80. Activate Flood Fill Tool and fill the selection with the gradient
Selections- Deselect All
81. Effects- 3 D Effects- Drop Shadow with these settings: 4/ -3 /50 /18 black
-And Repeat -Drop Shadow with the same settings
82. Layers- New Raster Layer
- Color-palette:Set your foreground color to color #fefff9 -Set your background color to color #d8dedb
-Color Palette: Set your Foregroundcolor to gradient and select « @nn_080114_GR_142_tdstudio »
- Prepare a sunburst gradient configured like this.
83. Pot of Paint: Change the opacity of the color at 82 %–Activate Flood Fill Tool and fill the layer with the gradient
84. Effects- Image Effects- Seamless Tiling use settings below
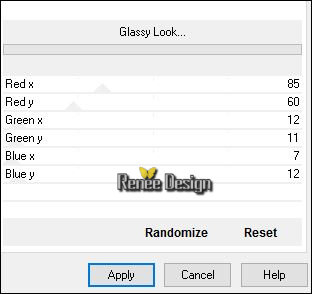
85.
Effects –Plugins - Unlimited - Andrew's Filters 7- Glassy
Look…with these settings
86. Effects
–Plugins– L& K’s –Dimitri a 188
87. Layer Palette - Double click on this Layer and set the Blend Mode to "Hard Light "
88. Open the tube ‘’ Fobots_nuages’’
- Edit/ Copy-Edit - Paste as new layer on your working image
- Move tool / place your tube on the bottom of your image
89. Layer Palette - Double click on this Layer and set the Blend Mode to "Overlay "
- In the Layer-Palette: activate the layer underneath
90. Effects- Illumination Effects- Sunburst with these settings -Background color
91. Repeat: Effects- Illumination Effects- Sunburst with these settings -Color white

-
Activate top layer in the Layer palette
92. Layers- New Raster Layer
93.Selections –load/save selection –load selection from disc and choose my selection: ‘’ Fobots_9 »
- Color Palette: Set your Foregroundcolor to gradient and select « akgradient23 » Prepare a linear gradient configured like this.

94. Pot of Paint: Change the opacity of the color at 45%
- Activate Flood Fill Tool and fill the selection with the gradient
Selections- Deselect All
95. Adjust- Blur- Gaussian Blur : Radius: 30
96. Effects
–Plugins- Unlimited - Andrew's Filters 3 - Outer Noise... 14
97. Effects- Edge Effects- Enhance
98. Layer Palette - Double click on this Layer and set the Blend Mode to "Multiply "-Set the layer opacity of this layer to 75%
99. Open the tube ‘’Fobots_tubes_dossier ’’ (Do not close we need it later for the rest of the work )
- Activate the layer ‘’raster_1’’of the tube
- Edit/ Copy-Edit - Paste as new layer on your working image
- Move tool / place your tube on the left side of your image
100. Image - Add borders-Symmetric checked: 1 pixel #a1150f
-
Image - Add borders-Symmetric checked: 15 pixel #ffffff
-
Image - Add borders-Symmetric checked: 1 pixel
#a1150f
-
Image - Add borders-Symmetric checked: 40 pixel #ffffff
-
Image - Add borders-Symmetric checked: 1 pixel #a1150f
101.
Back on the tube ‘’Fobots_tubes_dossier’’’
- Activate the layer :raster 2 and raster 3 of the tube
- Edit/ Copy-Edit - Paste as new layer on your working image
- Move tool / place your tube on the left side of your image
102. Image - Add borders-Symmetric checked: 3 pixels #ffffff
103. Image
Resize to 999 pixels width
Save as JPG
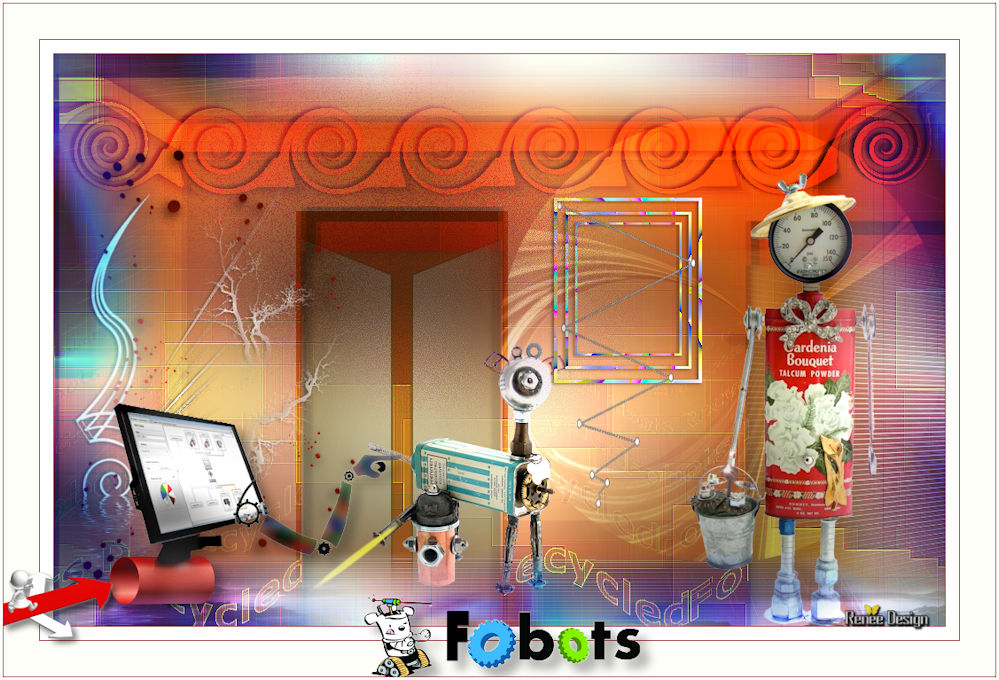
I hope you enjoyed this lesson
Renée
This lesson was written by Renée 15/06/2016
Edited and Update
2016
*
Any resemblance with an existing lesson is a coincidence
* Do not forget to thank the people who work with us and for us I have appointed the tubeurs and translators
Thanks Renée
| 
 Translations


 *
When you see this logo the filter is imported in Unlimited *
*
When you see this logo the filter is imported in Unlimited * 

 All rights reserved