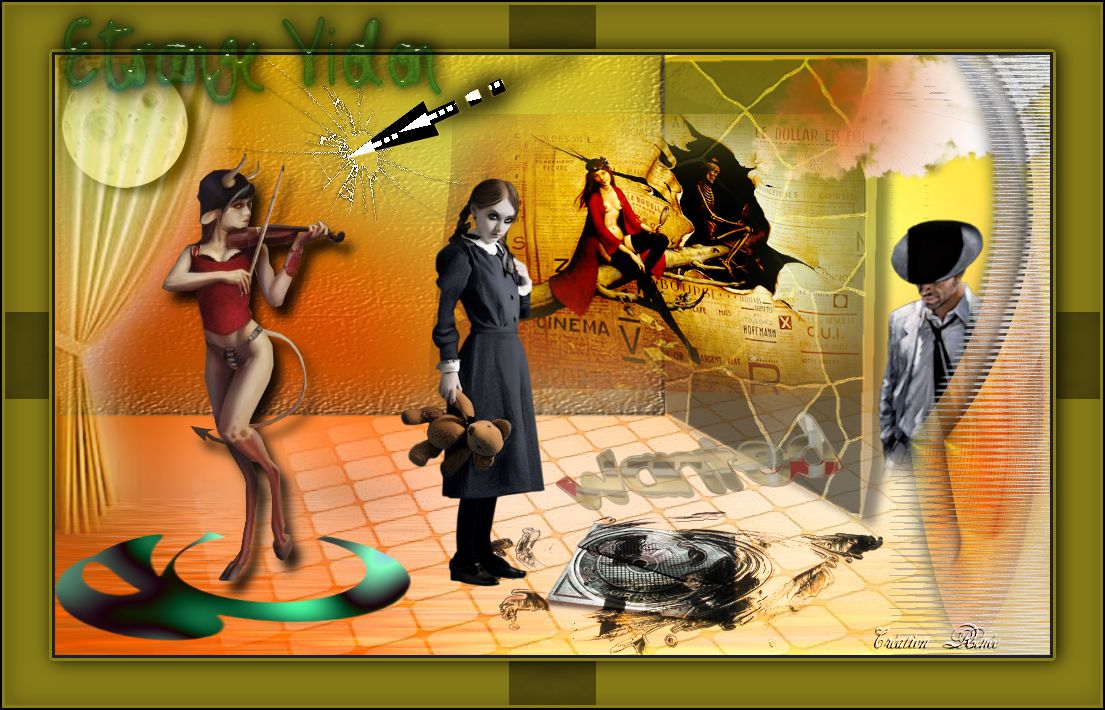
Let's begin
1. Open tube "fond_etrange_violon jpg" Window
duplicate - close original we will work with the
copy
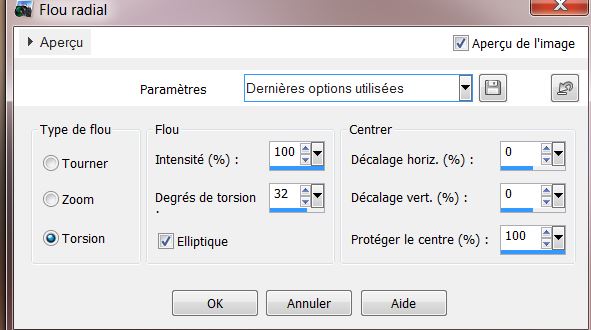
2. Adjust - blur - radial blur
3. Effects - Fotomatic Filter - Skygrad
4. Layers - add a new layer / fill with white
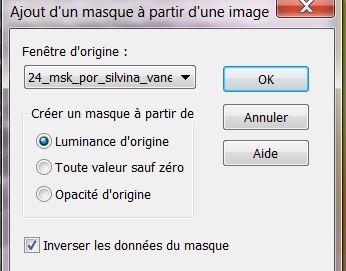
5. Layers - New mask layer from image
"24_msk_por_silvana_vanessa_orsi jpg"
6. Layers - merge group / Effects - Image effect/
Offset - H = 0 and V = -250
7. Effects - Edge effect - Enhance
8. Layers - Add a new layer
9. Selections - load selection from disk "violon1"
10. Flood Fill tool like this and with the color
#c2a27d / fill the selection

11. Effects - Eyecandy 5 Textures / Stone wall /
Preset "texture_stones_violon_magic"
12. Selections - deselect
13. Effects - Eye Candy 5 Impact - Extrude / Preset
"violon_magic_extrude"
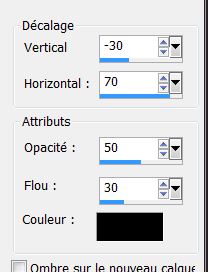
14. Effects - 3-D effect - Drop Shadow
15. Set the layer to Hard Light mode and opacity 59
16. Layers - Add a new layer
17. Selections - load selection from disk "violon2"
18. Open the tube "image_mur_bruin" - paste into
selection
19. Selections - deselect
20. Effects - Filter - Namesuppressed_Softner

21. Effect - User defined filter/ Emboss3 - default
22. Open the tube "image_nuage" Paste as new layer
on the top right
23. Effects - Illumination Effects - Sunburst
Your pallet should look like this now
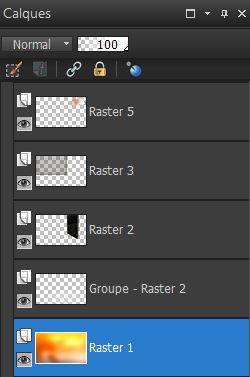
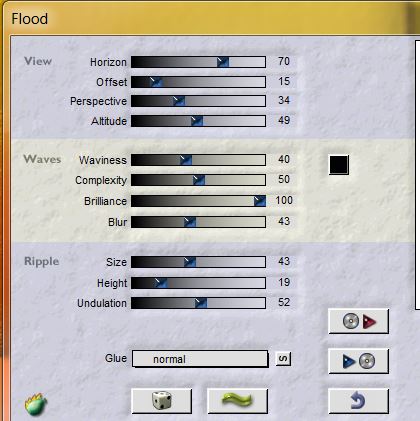
24. Click and activate the bottom layer (Raster 1)
25. Effects - Flaming Pear/ Flood
Go to the top of the Layers palette
26. Open the tube and paste "image_droite" and paste
as a new layer against the right edge of the work
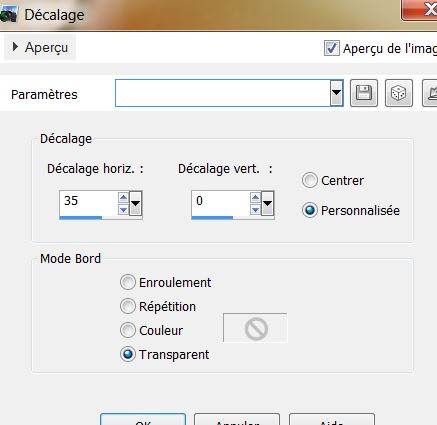
27. Duplicate layer / change to hard light mode
28. Effects - Image effect/ Offset
29. Selections -load selection from disk "violon 3''
Adjust/ Blur - Radial Blur

30. Selections - select none
31. Open the tube ''verlaine6'' and paste as a new
layer/ place like this
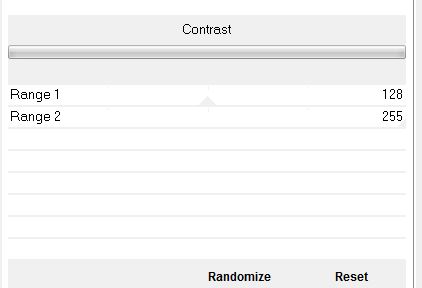
32. Effects - Filters Unlimited 2.0 / ColourWorks /
Contrast
33. Effects - Distortion effects - Warp
34. Open the tube "rideaux" Paste as a new layer
35. Open the tube "lune" Paste as new layer - move
into a good place
36. Effects - 3D effects - drop shadow on black
3/3/85/30 - Lower Opacity to 69
37. Open tube "violon_stange_bea_07_2013" ombre the
layer and the layer tube - layers - merge down -
copy - paste as a new layer on your worksheet
38. Layers - new raster layer
39. Selections - load selection "violon4" - fill
with black color
40. Selections - select none
41. Effects - Filters unlimited2.0 - liquid silk
filersut VolIII (change the parameters if you want
to see different results)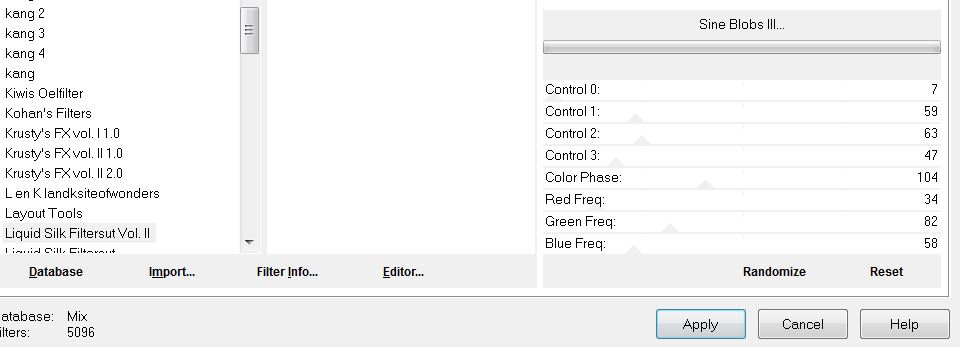
42. Open the tube "homme_luzCrista" - resize
125% - edit copy/ edit paste as new layer
Move into place. Layers - Arrange - move down in
layers (below raster 4)
43. Get back on the top layer of the layer stack
44. Open the tube ''eclats'' Paste as new layer
place well on the wall
45. Open the tube ''logane_plaquegout_30juin203''
Activate and select raster tube5 / Image Resize to
55%
Edit/ copy - edit/ paste as new layer
46. Open the tube ''tache_huile'' Paste as a new
layer / position on the sewer lid
Set the layer to Hard Light mode and opacity to 91
47. Open the tube ''Alone in the dark'' resize to
65% and Paste it in place as a new layer / position
to your liking
48. Layers - Add a new layer
49. Selections - load a selection from disk
"violin5''
Fill it with black color
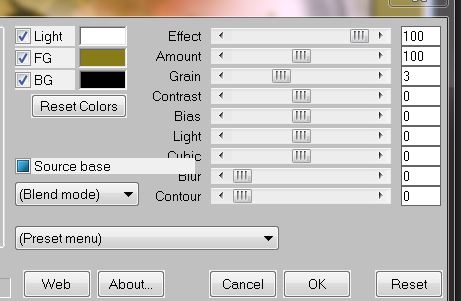
50. Effects - EyeCandy 5 - Chrome / Preset
''etrange_violon_chrome" / lower opacity to 63
51. Layers - Add a new layer
52. Selections - load a selection from disk -
''Violin 6" - fill with white
Color palette - Change the Foreground to white and
background to black
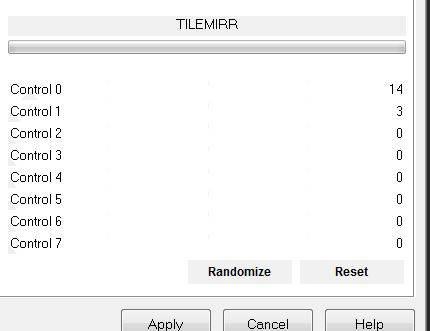
53. Effects - Filters Unlimited 2.0 - AFS Import -
TILEMIRR
54. Selections - deselect
55. Effects - 3-D effect - Drop shadow
56. Layers - merge all layers
57. Change your foreground color to black and the
background to #887c18
58. Image - add borders 3 pixels black
59. Image - add borders 50 pixels color #887c18
60. With the magic wand select the 50 pixels border
61. Selections - Modify - Contract by 3 pixels
62. Effects - Mura's Meister Clouds - colors White
/#847B21/black
63. Selections - transform selection to layer
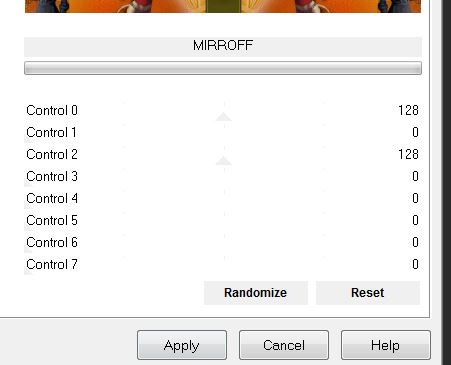
64. Effects - Filters Unlimited 2.0 - AFS (import)
MIRROFF
65. Selections - invert
66. Effects - Eye Candy 5 Impact - Perspective
shadow - Preset "violon_shadow"
67. Selections - select none
68. Image - add borders 2 pixels black
69. Write the title or paste the one of mine which
uses Hard Light mode and an opacity of 85
All finished
Thanks Sally