|
Let's start the lesson
DOUBLE FACE
The two sides of freedom are expressed in the choice between yes and no.
Preparation
-Material Properties: Set the foreground color to color number 1-Set the background color to color number 2

- Replace your foreground color with a Foreground/Background Linear gradient. Configure it as follows
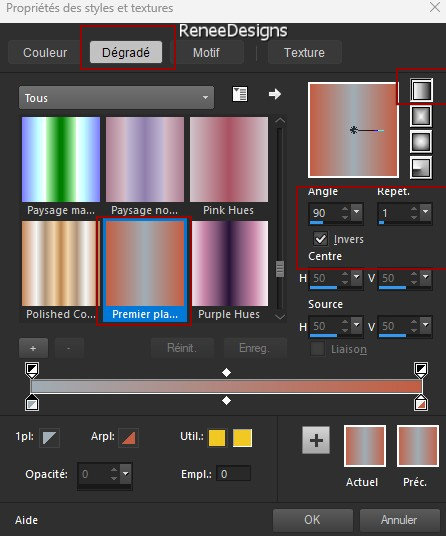
1. File-Open a new transparent image in this size :1050 x
700 Pixels
2. Activate Flood Fill Tool –Flood fill
the layer with the Gradient –Flood fill
the layer with the Gradient
3. Layers-New Raster Layer
- Selections- Select All
4. Activate the tube
‘’TUBES-Double-Face- femme’’
-activate raster 1 of the tube
Edit - Copy - Activate your work - Edit - Paste into selection

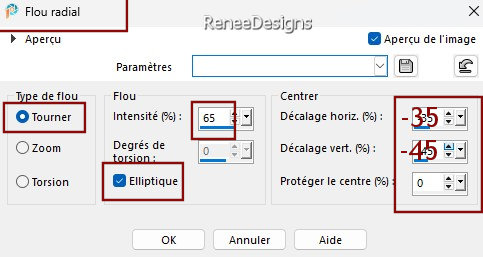
5. Adjust-Blur- Radial Blur use the settings below
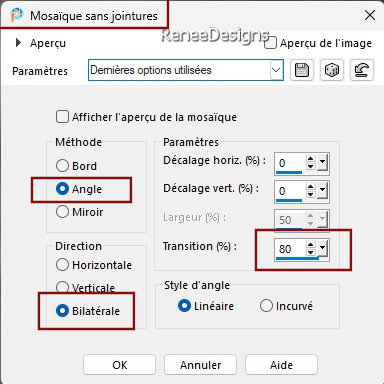
6. Effects- Image Effects- Seamless Tiling use the settings below
7. Layers-Properties-Set the Blend Mode to Overlay
8. Layers-Merge-Merge Visible
9. Effects - Plugins - Filters in Unlimited 2.0 - ScreenWorks - Dot
Screen
10. Selections –load/save selection –load selection from disc and select my selection:’’ Double-face 1’’
11. Selections-Promote selection to layer
12. Effects - Plugins - Simple – Pizza Slice Mirror
- Edit-Repeat- Pizza Slice Mirror

13. Adjust-Sharpness-Sharpen
14. Effects - Plugins – Toadies – What are you- default settings
15.
Layers-Properties-Set the Blend Mode to Multiply
- Activate the layer underneath(merged layer)
16. Selections –load/save selection –load selection from disc and select my selection: ’’ Double-face 2’’
17. Selections-Promote selection to layer
18. Effects - Plugins - Filters in Unlimited 2.0 – Dcspecial - Rich-n-r...: 94/193

19. Effects- 3D-Effects- Drop Shadow with these settings: 0/0/100/40 Color black
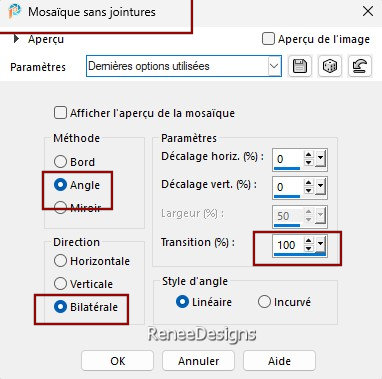
20. Effects- Image Effects- Seamless Tiling use the settings below
21. Effects – Edge Effects-Enhance
- Activate the top of the layer palette
22. Layers- New Raster Layer
23. Selections –load/save selection –load selection from disc and select my selection:’’ Double-face 3’’
24. Material Properties: Set the foreground color to color number 4-Set the background color to color number 3
25. Replace your foreground color with a Foreground/Background Linear gradient. Configure it as follows
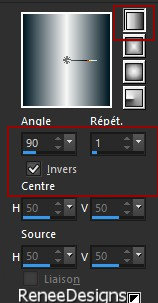
26. Activate Flood Fill Tool
 –
Flood fill the selection with the Gradient –
Flood fill the selection with the Gradient
27. Selections-Modify-Contract 10 Pixels
28. Activate Flood Fill Tool
 –
Flood fill the selection with the background color –
Flood fill the selection with the background color
Selection remains active
29.Open the tube ‘’Renee-TUBES-Double-Face- image 1’’ - Edit - Copy- Activate your work -Edit - Paste as new layer
30. Place in the centre of the frame - (see finished image)
31. Selections-Invert

32. Selections-Invert
33. Selections-Modify-Select Selection Borders-Inside-5
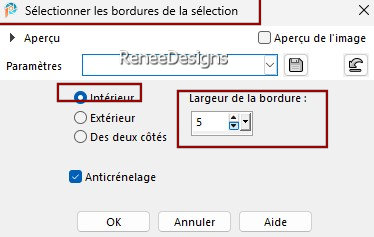
34. Set the foreground color to color white
Activate Flood Fill Tool–
Flood fill the selection with color white
35. Effects- 3D-Effects- Drop Shadow with these settings: 1/1/100/40 Color black

36. Layers-Merge-Merge Down
37. Layers-Properties-Set the Blend Mode to Soft Light
38. Layers-Duplicate
39. Layers-Properties-Set the Blend Mode to Overlay – Reduce the opacity of this layer to 40%
40. Layers- New Raster Layer
41. Selections –load/save selection –load selection from disc and select my selection:’’ Double-face 4’’
42. Acticate Flood Fill Tool
 –
Flood fill the selection with color white –
Flood fill the selection with color white
43. Effects – 3D Effects –
Chisel – Color black
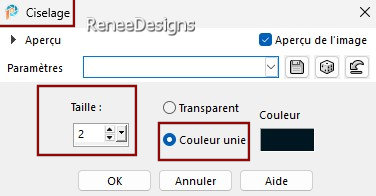
44. Selections-Modify-Contract 4 Pixels
45. Activate Flood Fill Tool
 –
Flood fill the selection with the background color –
Flood fill the selection with the background color
46. Effects - Plugins - Filters in Unlimited 2.0 - Filter Factory
Gallery C - Emission Mirror: 165

47. Effects - Plugins - Alien Skin EyeCandy 5 – Impact – Extrude use the settings below
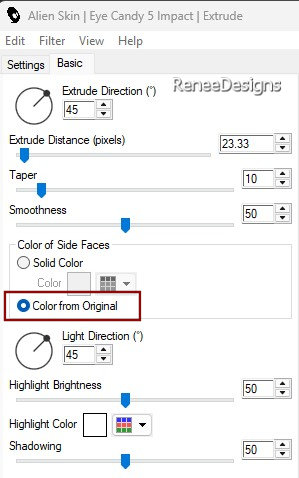
48.Open the tube ‘’Renee-TUBES-Double-Face-
femme 2’’ -Edit - Copy- Activate your work -Edit - Paste as new layer
49.
Place on top of the cubes (see finished image)
50. Effects - Plugins - Alien Skin EyeCandy 5 – Impact – Perspective
Shadow use the settings below
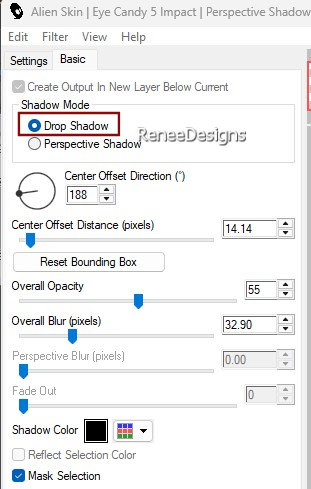
- Activate "promoted selection layer" in the layer palette
51.Open the tube ‘’ Renee-TUBES-Double-Face-
image 2’’ - Edit - Copy- Activate your work -Edit - Paste as new layer
52. Pick Tool: (K) on your keyboard -Enter these parameters on the toolbar
 500 / 13
Press the ( M ) button to close the tool.
- Note! Place the woman on the cube so that her hand is on the door handle.
-Activate the top of the layer palette
53.Open the tube ‘’Renee-TUBES-Double-Face- image 3’’ -Edit - Copy- Activate your work -Edit - Paste as new layer
- Move the tube in the right place ( see finished image)
54. Layers- New Raster Layer
55. Selections –load/save selection –load selection from disc and select my selection:’’ Double-face 5’’
56. Activate Flood Fill Tool
 –
Flood fill the selection with color white (2 to 3 clicks) –
Flood fill the selection with color white (2 to 3 clicks)

57. Layers- New Raster Layer
58. Selections –load/save selection –load selection from disc and select my selection:’’ Double-face 6’’
59. Activate Flood Fill Tool
 –
Opacity 40% –
Flood fill the selection with color white –
Opacity 40% –
Flood fill the selection with color white

60. Effects – Plugins – Toadies – What are you 20/20
61. Effects – Plugins- Vanderlee – Unplugged X – Transition use the settings below
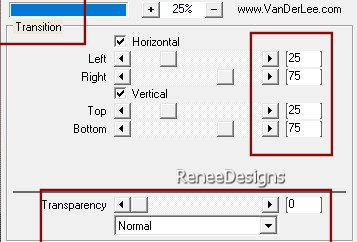
62. Effects- 3D-Effects- Drop Shadow with these settings: 10/10 /50 35 Color black
63. Effects – Edge Effects-Enhance More
64. Effects – Plugins – L & K’s – Katharina 4/0
65. Layers-Properties-Set the Blend Mode to Exclusion
66. Effects – Edge Effects - Enhance
- Set the foreground color to color number 6
67. Layers-New Raster Layer
68. Selections –load/save selection –load selection from disc and select my selection:’’ Double-face 7’’
69. Activate Flood Fill Tool–
Opacity 100% –
Flood fill the selection with the foreground color
70. Effects – Texture Effects – Blinds use the settings below /Color black
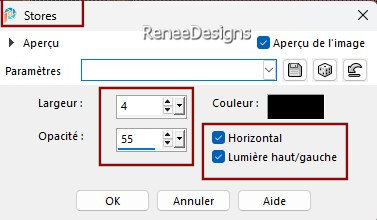
71. Effects – Edge Effects-Enhance More

72. Effects- 3D-Effects- Drop Shadow with these settings: 1/1 50 /18 Color black
73. Layers-Duplicate
- Activate the layer underneath (Raster 8)
74. Effects - Plugins -Alien Skin EyeCandy 5 -Impact -Tab-Settings-User Settings and choose my file
Preset :
‘’Backlight Double-face-Backlight’’
- Activate the top of the layer palette ( Copy of Raster 8)
75. Effects – Distortion Effects-Curlicues use the settings below
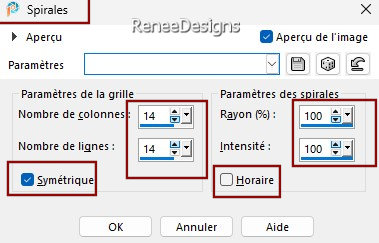
76.Open the tube’’Renee-TUBES-Double-Face-
image 4’’- Edit - Copy- Activate your work -Edit - Paste as new layer
77. Pick Tool: (K) on your keyboard -Enter these parameters on the toolbar
 90/600 90/600
- Press the ( M ) button to close the tool.
78. Open the tube
‘’Renee-TUBES-Double-Face- femme’’
- Activate the layer ‘’tuto-double-face" of the tube
- Edit - Copy- Activate your work -Edit - Paste as new layer
Pick Tool: (K) on your keyboard
 74/ 177
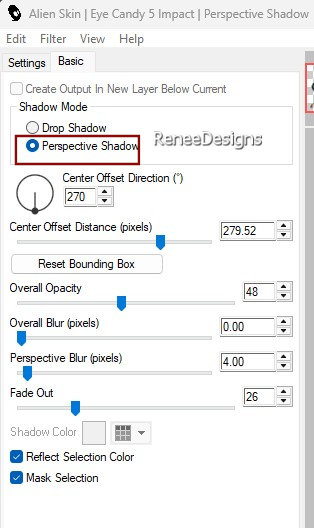
79. Effects - Plugins - Alien Skin EyeCandy 5 – Impact – Perspective
Shadow use the settings below
80.Open the tube ‘’ Renee-TUBES-Double-Face-texte’’ -Edit - Copy- Activate your work -Edit - Paste as new layer
Place the tube to your liking
81. Image - Add Borders-Symmetric checked: 2 Pixels -Color white
82. Image - Add Borders-Symmetric checked: 4 Pixels -Color #001823
Edit-Copy
83. Activate the frame -Activate your Magic Wand - Tolerance at 0 and Feather at 0
Select the inner part with the magic wand
Edit-Paste into selection
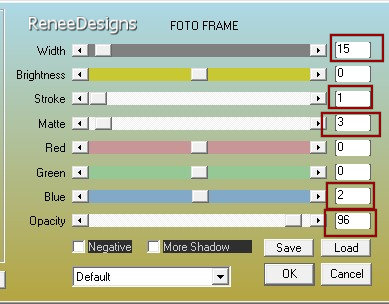
84. Effects – Plugins – AAA Frame – Foto Frame use the settings below

85. Layers - Resize 85 % -Resize all layers checked
- Add the author's watermark and your own watermark
-Layers-Merge-Merge All (flatten)
Thanks for your time and enjoyment of this lesson.
Renée
This lesson was written by Renée 05/02/ 2025
Edited and Update
in 2025
***
* Any resemblance to an existing lesson is purely coincidental.
* Don't forget to thank the people who work with us and for us - the testers and translators
Thanks
|


