Let's begin
1: Open your background ''fond_dolls'' (Raster1)
Window - Duplicate then close the original because we
will work with the copy
2: Layers - duplicate
3: Effects - Simple - pizza slice mirror
4: Selections - load selection from disk - "dolls_1"
5: Layers - add a new raster layer
6: Color palette - change the foreground color to
#808080 - and background to #5d181c
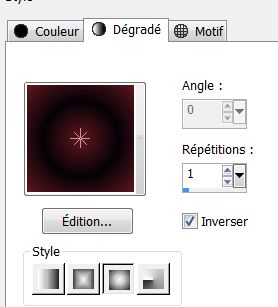
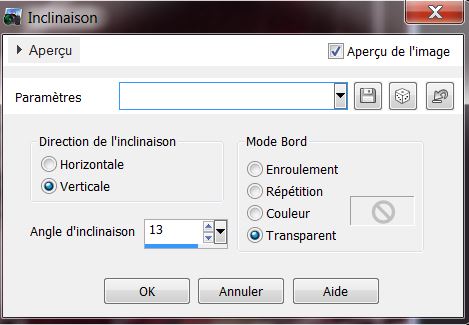
7: Prepare a sunburst gradient/ configured like this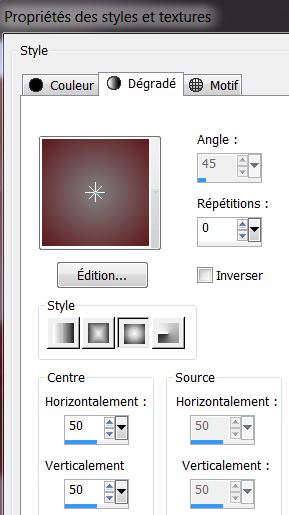
8: Layers - add a new layer and fill the
selection with gradient
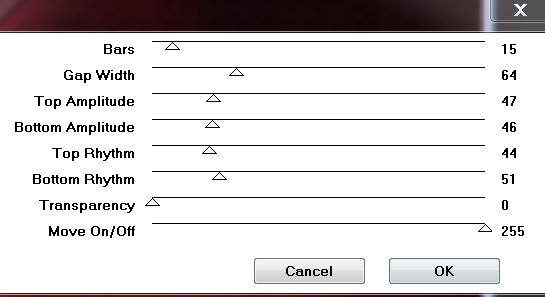
9: Effects - VM extravaganza - shoutin!
10: Selections - select none
11: Effects - Simple - centre tile
12: Effects - Edge effect - enhance
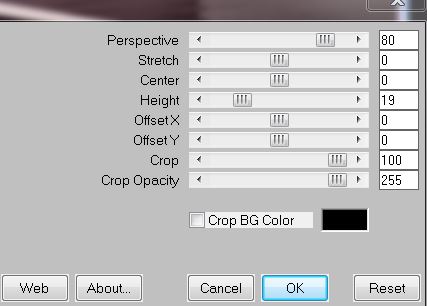
13: Effects - Eye candy5 impact - perspective shadow -
preset "dolls_psp"
14: Layer - add a new raster layer
15: Selections - load a selection from disk "dolls_2"
16: Open the tube "blending materiaal5_tube devils" -
and past into selection
17: Selections - select none - effects - edge effect -
enhance
18: Layers - add a new raster layer
19: Selections - load the selection "dolls_3" - fill it
with white
20: Selections - select none
21: Effects - Eye candy5 impact - extrude - preset "dolls_ext"
22: Layers - lower the opacity down to 40
23: Layers - add a new raster layer
24: Prepare a sunburst gradient configured like this
25: Selections - load the selection "dolls_4" - fill
with the new gradient

25: Selections - load the selection "dolls_4" -
fill with the new gradient
26: Effects - Filters Unlimited2.0 - <& bkg designer sf
10III - radial ring1 - default as loaded
KEEP THE ACTIVE SELECTION
27: Selections - modify - contract by 8 pixels -
Selection invert - delete
28: Layers - Add a new raster layer
29: Selections - Invert
30: Open the tube "wiremeshtorn" - paste into the
selection
31: Effects - Edge effect - enhance more
32: Layers - add a new raster layer
SELECTION REMAINS ACTIVE
33: Open the tube "my heart_misted tube_devil" - copy
the selected part then paste into the selection
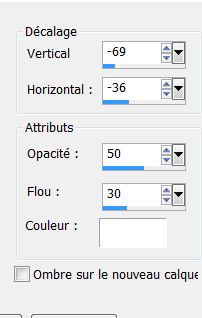
34: Layers - Arrange - move down/ lower the opacity to
46
35: Selections - select none
you are here
36: Click to activate the top layer (raster6)
37: Layers - Add a new raster layer
38: Selections - load the selection "dolls_5" - change
the foreground color to black
39: Fill the selection with the gradient
40: Selections - select none
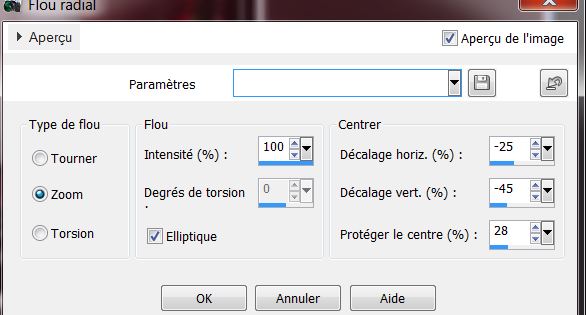
41: Layers - Add a new layer
42: Selections - load the selection "dolls_6" - fill it
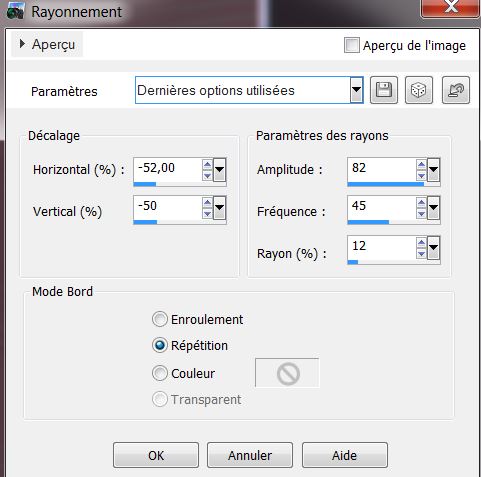
with white
43: Selections - select none
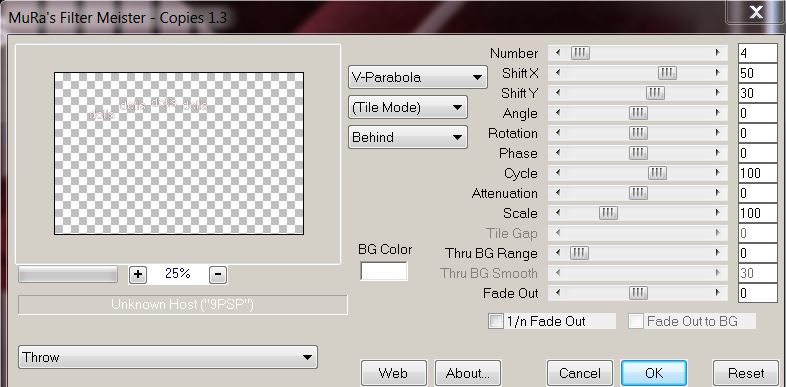
44: Effects - Mura’s meister - copies
45: Layers - duplicate
46: Effects - Distortion effects - wind on the left/100
47: Layers - merge down
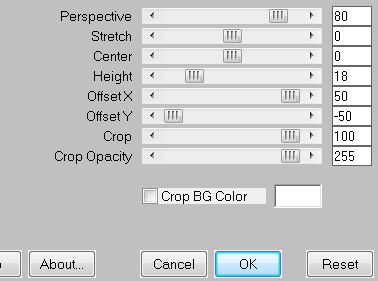
48: Effects - Mura’s meister - perpective tiling
49: Effects - Geometric effect - Skew
50: Lower the layer opacity to 63
51: Open the tube "fucked up doll_tubed devil" - rezise
to 75% and paste it in place as a new layer
52: Effects - 3D effect - Drop shadow/ default
53: Layers Merge Visible
54: Image add borders 20 pixels #e2deca
55: Select the 20 pixels border with the magic wand
56: Effects - Eye candy5 - glass - preset - clear
57: Selections - select none
58: Layers - duplicate
59: Effects - andromeda - perspective - side walls - it
shift - repeat
60: Click to activate the bottom layer
61: Adjust - Blur - radial blur
62: Effects - simple - 4 way average
63: Effects - distortion effects - spiky halo
64: Layers - promote background layer - Layers/
duplicate
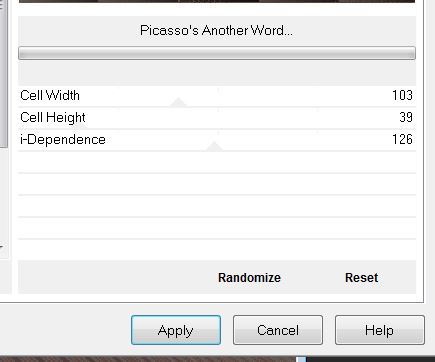
65: Effects - Filters Unlimited2.0 - Toadies - Picasso's/
Another word
66: Effects - Mura's meister - Perspective tiling
67: Layers palette - Click to activate the top layer
68: Layers - add a new layer
69: Selections - load the selection "dolls_7" - fill
with black
70: Selections - select none
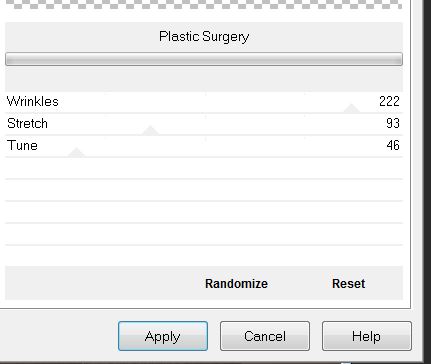
71: Effects - VM extravaganza - plastic surgery
If you have unsightly cracks in the filter effect,
use the png that is in the folder
72: Effect - 3D effect - Drop Shadow/ default
73: Change the layer mode to screen
74: Open the tube "yoka_dolls_girlie151212" - rezize to
85% and paste as a new layer in place
75: Layers - add a new raster layer
76: Selections - load the selection "dolls_6" - fill
with the color #eeeecc
77: Selections - select none
78: Effects- Mura’s meister - Copies

79: Effects - Nik Color Pro 3.0 - bi color of your
choice - (I chose color set purple pink -2 )
80: Effects - 3D effect - Drop shadow
81: Image add border of 5 pixels black
82: Image add border of 25 pixels white
83: Image add border of 2 pixels black
84: Image add border of 2 pixels white
85: Image add border of 2 pixels black
86: open my tube "titre" - copy and paste as the title/
or use the font
"AR Hermann" to write something of your choosing.
Lesson over
Thanks Sally
*
|