|
Background image (Wallpaper) of your computer
Customize Windows… ‘’into steampunk
‘’
Let's start the lesson.
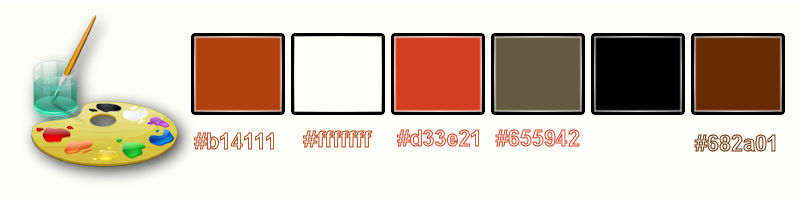
- Color-Palette : Set your foreground color to color #b14111 -Set your background color to color #ffffff
du blanc
1.
Open the background image ‘’fond_customiser_windows’’- Window - Duplicate (or shift+D) - Close the original and proceed on the copy -Promote Background Layer =Raster 1
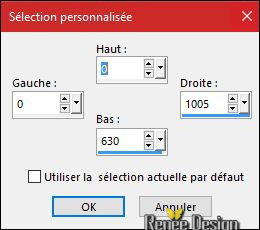
2.
Activate Selection Tool -Custom Selection (S) -Rectangle with these settings

-
Selections- Promote selection to Layer
3.
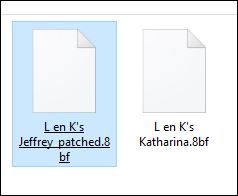
Effects- Plugins –L & K’s -
Katarina with these settings: 5 and 0
4.
Effects- Edge Effects- Enhance More
5.
Effects- Plugins – EyeCandy 5 Impact – Glass-tab Settings/User settings choose my Preset
‘’ Customiser Windows _glass’’
Selections- Deselect All
6. Open the tube ‘’ Customiser Windows _image 1’’
-
Edit/ Copy-Edit - Paste as new layer on your working image
7. Effects-Image Effects-Offset with these settings: H = 0 and V = 39
- Layer Palette - Double click on this Layer and set the Blend Mode to " Hard Light " >>Set the layer opacity of this layer to 44 %
8. Layers- New Raster Layer
9.
Activate Selection Tool -Custom Selection (S) -Rectangle with these settings-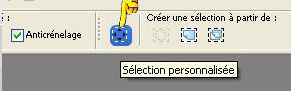
10. Activate Flood Fill Tool and fill the selection with #ffffff
- Open the Maske ‘’ maskcameron165.jpg’’ in your Psp
11. Layers- New Mask layer from Image and choose Mask: ‘’
maskcameron165.jpg »
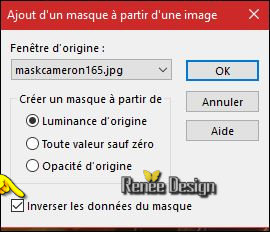
- Layers- Merge- Merge Group
Selections- Deselect All
12. Effects- Plugins – Flaming Pear – Laquer - 2 colors #b14111
-click on the red arrow>>select my file preset ’’ Customiser_lacquer ‘’can be used in any folder of your choice by clicking it. -3 Open it will be ok in your filter
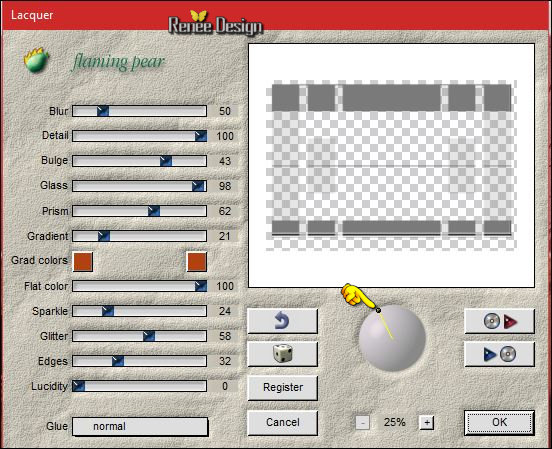
13. Layer Palette - Double click on this Layer and set the Blend Mode to " Hard Light ">> Set the layer opacity of this layer to 69%
14. Effects- Edge Effects- Enhance
- Repeat: Effects- Edge Effects- Enhance
15. Layers- Duplicate
- Image
Flip
16. Layers- Merge- Merge Layers Down
17. Layers- New Raster Layer
18.
Selections –load/save selection –load selection from disc and choose my selection: « Customiser
Windows_1 »
19. Pot of Paint: Change the opacity of the color at 40% >>Activate Flood Fill Tool and fill the selection with #ffffff
20.
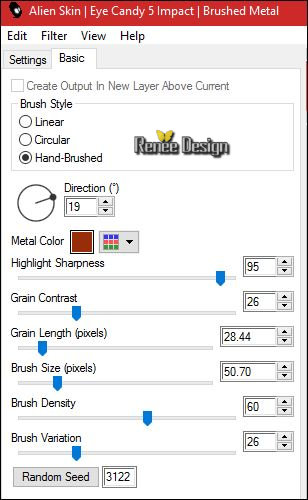
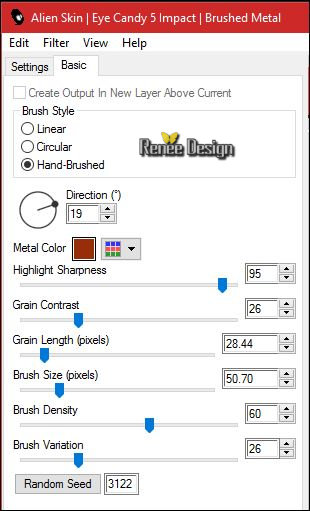
Effects- Plugins – EyeCandy 5 Impact – Brushed Metal
–tab Settings/User settings choose my Preset‘’ Customiser Windows
_brush_Metal’’
Selections- Deselect All
21. Effects-Plugins – L & K’s Jeffrey
85
22. Effects- Edge Effects- Enhance More
-
Set the layer opacity of this layer to 73%
23.
Open the tube ‘’ Customiser Windows
_elements.pspimage’’
Do not close we need it later for the rest of the work (some are hidden layers to lighten the weight of the tube simply open)
- Activate Layers ‘’Raster 1 –Raster 2 and Raster 3 "
- Edit - Copy -Edit - Paste as new layer on your working area.
/With your move tool move to the bottom (on the taskbar )
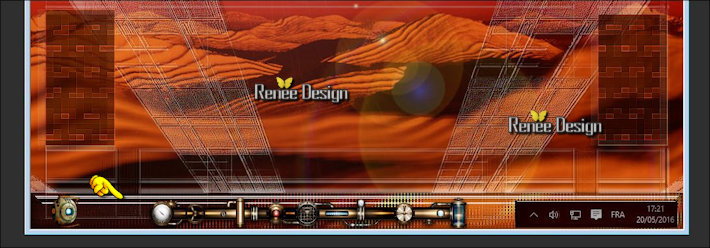
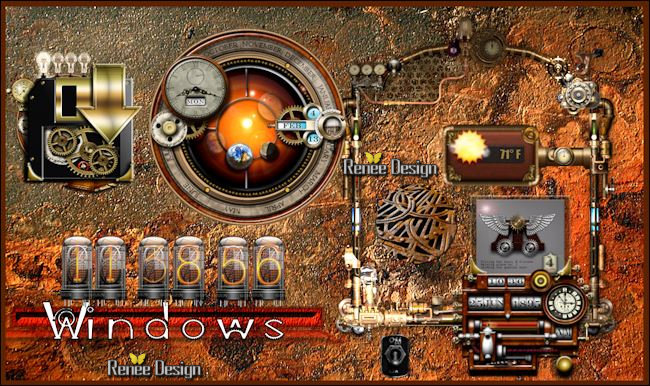
- Your work look like this now-You should have this result
24. Back on the tube ’'
Customiser Windows
_elements.pspimage’’
- Activate the layer > Raster 4
- Edit - Copy -Edit - Paste as new layer on your working area.
- With the Move Tool, move it to the right
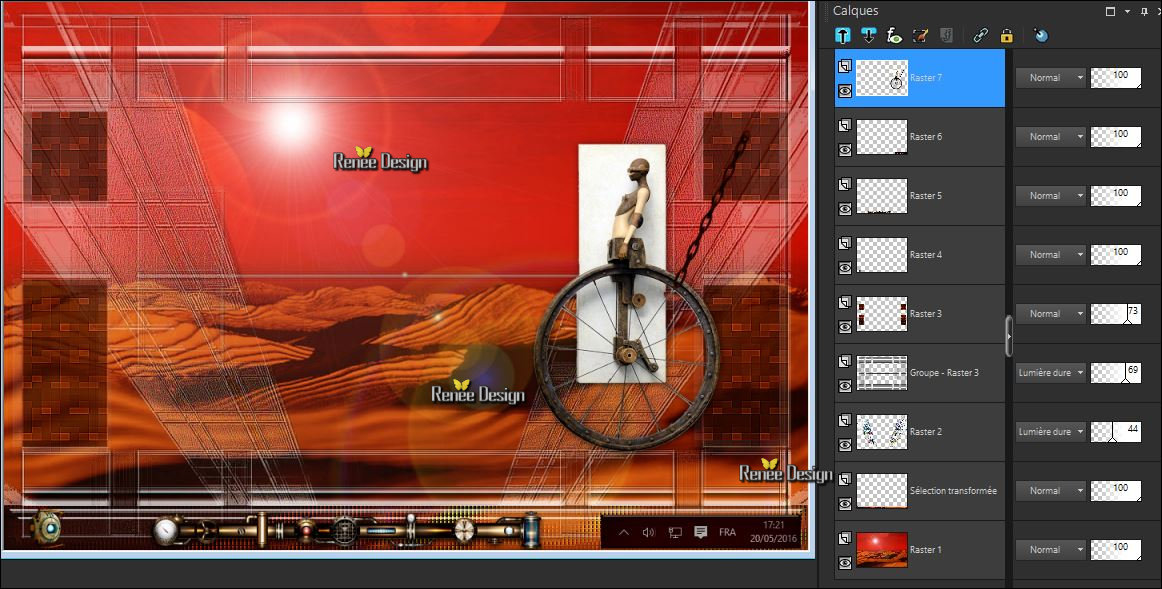
Your work and Layer Palette look like this now-You should have this result
- You may minimize your working area for a moment, but do not close, we will need it again soon
***
Part two
25. Color-Palette : Set your foreground color to color #d33e21 -Set your background color to color
#655942
26. Activate file ‘’Fonds_rouille’’ - Open an image of your choice – I chose ‘’Fond_metal_1’’
27. Open the background image ‘’Fond_metal_1’’- Window - Duplicate (or shift+D) - Close the original and proceed on the copy -Promote Background Layer =Raster 1
28.
Activate Selection Tool -Custom Selection (S) -Rectangle with these settings

29.
Selections- Promote selection to Layer
30. Layers- New Raster Layer
31. Pot of Paint: Change the opacity of the color at 50% – Activate Flood Fill Tool and fill the selection with the foregroundcolor
32. Layers- Merge- Merge Layers Down
33. Effects- User Defined Filter Emboss 3 using the default settings
34.
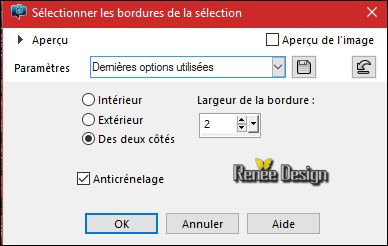
Selections -Modify
-Selections-Modify-Select Selection Borders with these settings-Both Side
35. Pot of Paint: Change the opacity of the color at 100%>> Activate Flood Fill Tool and fill the selection with the backgroundcolor
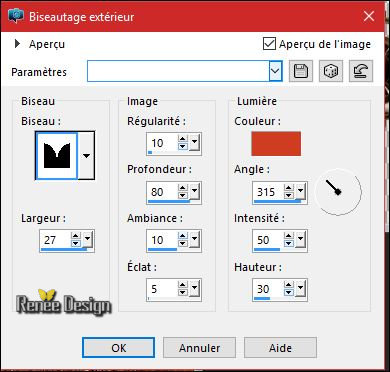
36.Effects- 3 D Effects-Outer Bevel with these settings-Foregroundcolor
Selections- Deselect All
37.
Effects- Plugins – Eyecandy 5 Impact – Perspective
shadow-tab Settings/User settings choose my Preset ‘’ Customiser Windows _Persp
Shadow’’
- Color-palette:Set your foreground color to color black > -Set your background color to color #ffffff
38. Click on your Text Tool/Font « Janworx-Gears » You will see this font in PSP as "‘’Gears »Size
72 Pixels (Included into the zipfile)
-
Write « W i n d o w s”
-
Convert to Raster Layer (and place the word on the bar ( point 39 see screen )
- Back on the tube "Customiser
Windows _elements.pspimage"
39. Activate the layer ''Raster 5''
- Edit - Copy -Edit - Paste as new layer on your working area.
- With the Move Tool, move it in the right place as shown in the example below -
Your work look like this now-You should have this result
40. If you choose other tubes you give the correct orientation to match your work
or take mine. I used:
-Raster 6-
Raster 7-Raster 8- Raster9-Raster10- Raster 11 and raster 12
-Edit/ Copy-Edit - Paste as new layer on your working image
Put like this
-Then you are sure that it is in the right place
You should have this result
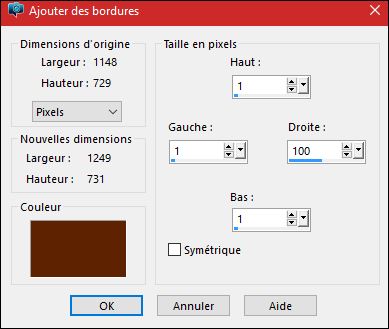
41. Image - Add borders-Symmetric checked: 10 pixels #682a01
42. Image Resize to 75 %
- Edit -Copy !!
- Activate your minimized image of point 25
43. Edit - Paste as new layer on your working image
44. Effects- Image Effects- Offset with these settings : H = -154 and V = 0
-Replace the right tube if necessary
45. Image - Add borders-Symmetric checked: 1 pixel black
46. Image - Add borders-Symmetric checked: 20 pixels #682a01
47.
Activate the magic wand and select the border of
20
pixels
48.
Effects- Plugins – Eyecandy 5 Impact – Brushed
Metal use settings below
Selections- Deselect All
49. Image - Add Borders NO SYMMETRIC with these settings- Color #682a01
50. Activate the magic wand and select the border
51. Effects- Plugins – EyeCandy 5 Impact - Glass use settings below-Color #523c63
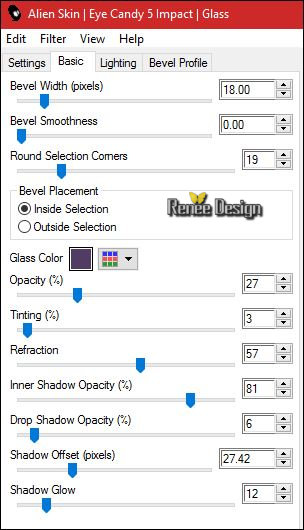
Selections- Deselect All
52. Open the tube’’ Renee_tube_barre_recherche_icone’’
- Edit-Copy–Edit - Paste as new layer on your working image
- Move at top of your image
53.
Open the tube ‘’ Renee_tube_chat_Customiser
Windows’’
- Edit-Copy–Edit - Paste as new layer on your working image
- With the move tool, move it in the upper right corner
54. Open the tube ‘’ Renee_tube_icones_droit’’
- Edit- Copy and paste the 4 tubes icons to the right
55. On this 4 icons
- Effects- 3 D Effects- Drop Shadow with these settings : 4/ -4 / 100 /1 black
56.Image - Add borders-Symmetric checked: 2 pixels #ffffff
Save as JPEG
For people who can use their creation
As a wallpaper image from their computer
customize and have clickable icons in steampunk
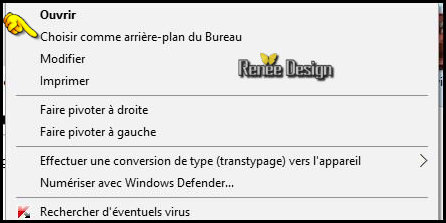
1. How to Change the Desktop Background / Right click for your image you want create
- and the window opens /and select the image on your desktop
2. Your creation is on your screen
3. Your desktop icons (here steampunk) and we will make them clickable
- We need the picture size '' ico''
(If you do not enter an image size, your file will get automatically resized to that image size.)
-
To transform the format icons - Here is a simple converter
Link here 
-How to use the converter
- Choose the right Size and Format for Icons ''png ''- we need to convert ''
ico''
1 Click image converter>>2 Convert to ''ico''>> 3 Choose file>>search for the file ( png into the zipfile)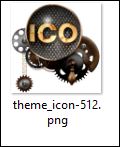 4. Convert file 4. Convert file
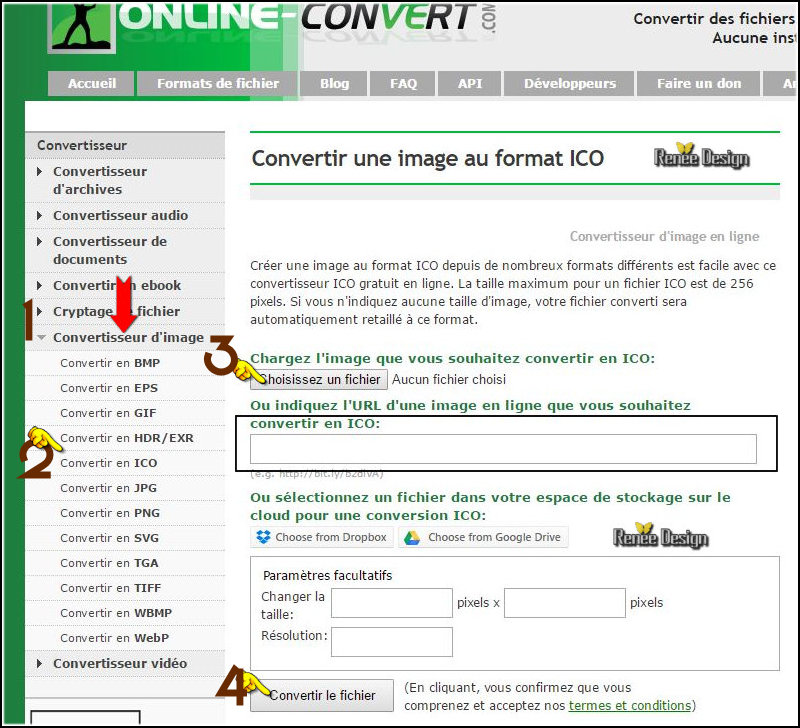
-
The file is in your downloads folder converted format ‘’ ico
‘’

- Create a folder ''Icons on the desktop '' and put the number of icons
********
To replace a desktop icon '' steampunk style icons ''
-
Right-click the existing icon on your desktop for example, that Google Chrome 
-
customize
-
Choose an icon
-
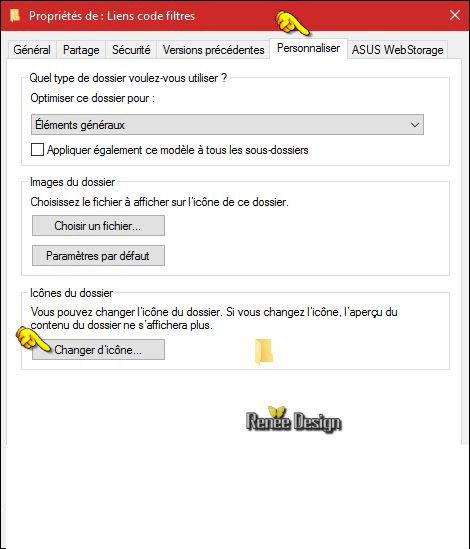
a window will appear allowing you to select one of the bases icons
-
Click Browse and navigate to the folder you created ''Icons on the desktop''
- choose an icon
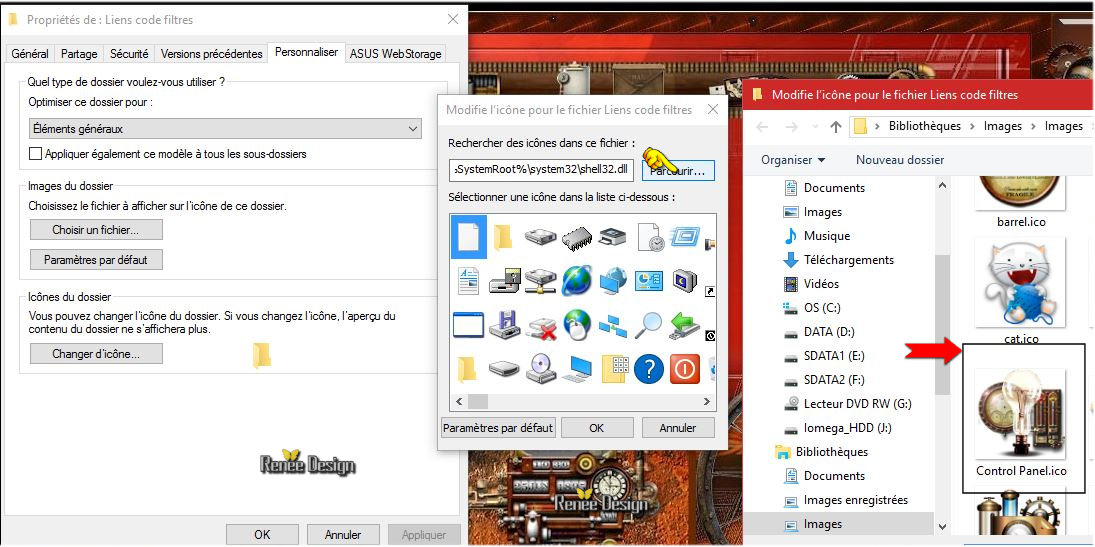
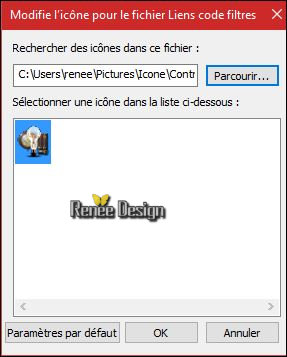 OK OK
And here is your icon to your liking and it works.
To facilitate your work I added in the zipfile icons in png and ico -Steampunk
I hope you enjoyed this lesson
Renée
This lesson was written by Renée 14/05/2016
Edited and Update
30/5/2016
*
Any resemblance with an existing lesson is a coincidence
* Do not forget to thank the people who work with us and for us I have appointed the tubeurs and translators.
Thanks Renée
| 
 Translations


 *
When you see this logo the filter is imported in Unlimited
*
When you see this logo the filter is imported in Unlimited 

 All rights reserved