|
Let's begin
View - Toolbars - Script checked !!!!!
Material Properties: Foreground color to :
#fdfdf1 .Background color to : #2c5277
1. File - New - New Image 1125x 655 pixels
transparent
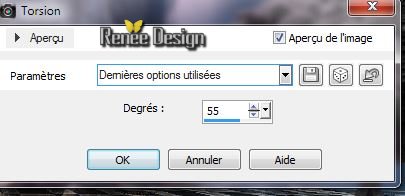
2. Effects -Plugins Medhi/ Wavy Lab1.1

3. Effects -Plugins Penta Com - Color Dot
4.
Open the tube "Couloir du_temps_SCicegi_image
1.pspimage''/Edit/copy-Edit/paste as a new Layer and place
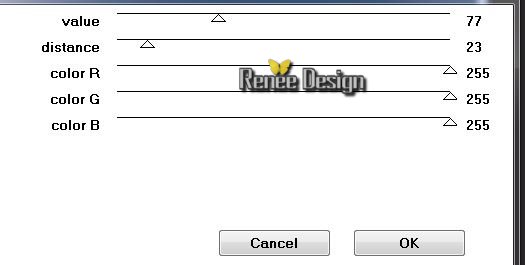
5. Effects -Plugins EyeCandy 5 Impact -Perspective shadow - Preset
- "Drop shadow blury''
6.
Layers- Duplicate
7.
Effects -Plugins Medhi - Weaver
8.
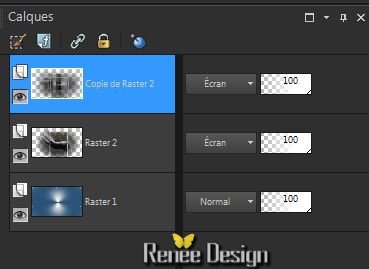
Effects - Edge Effects- Enhance./ Layer Palette: Set the Blend mode to"Screen"
Activate the layer underneath / Layer Palette: Set the Blend mode to"Screen"
9.
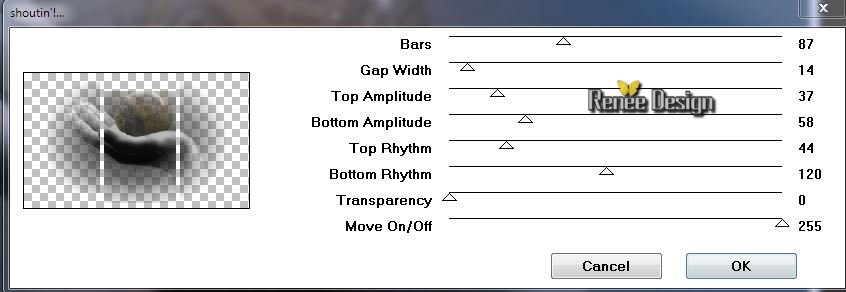
Effects -Plugins VM Extravanga - Shoutin
10.
Effects - Edge Effects- Enhance More
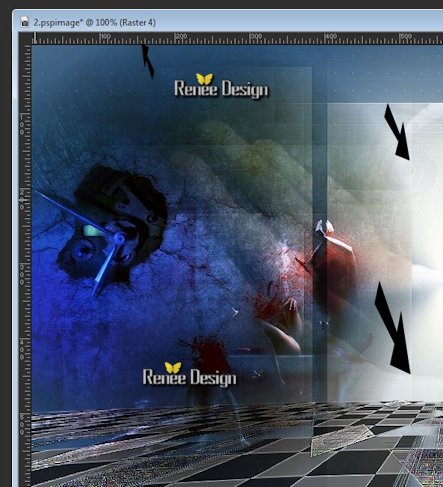
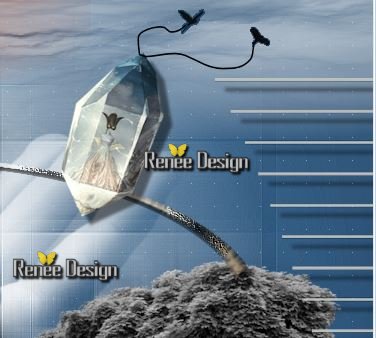
Your work is like this right now
11.
Layers- Duplicate
12.
Effects - Plugins Simple - Blintz
13.
Effects -Plugins Simple -Pizza slice Mirror( repeat 2x )
14.
Effects - Edge Effects- Enhance More
15. Effects -Plugins Layout Tools/ Contrast Checkers

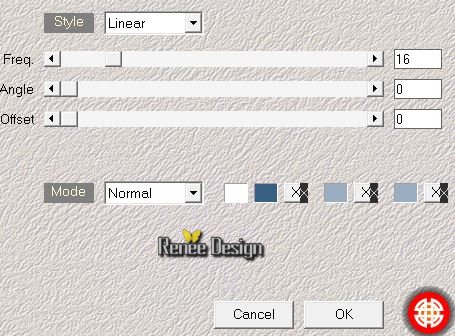
16.
Layers- Duplicate
17. Layers-Merge-Merge Down /Layer Palette: Set the Blend mode to "Normal"
18
Layers- Duplicate -Image Mirror /Layers-Merge-Merge Down
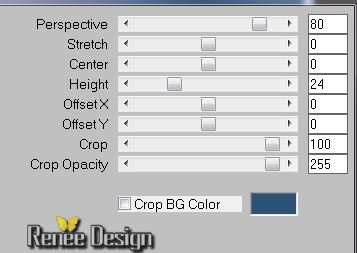
19. Effects -Plugins Murra's Meister -Perpective
Tilling
20. Effects - Edge Effects- Enhance More
21. Activate the layer underneath (Raster 2)
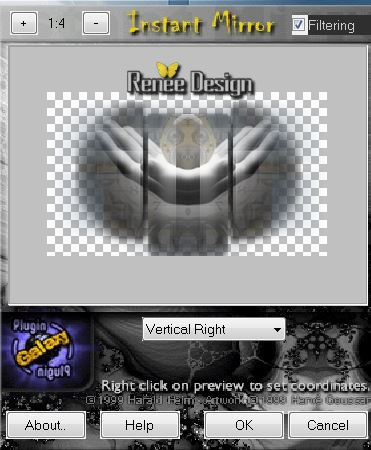
22. Effects - Plugins Galaxy / Instant Mirror
23. Aktivate the top of the Layers palette (Copie de Raster
2)
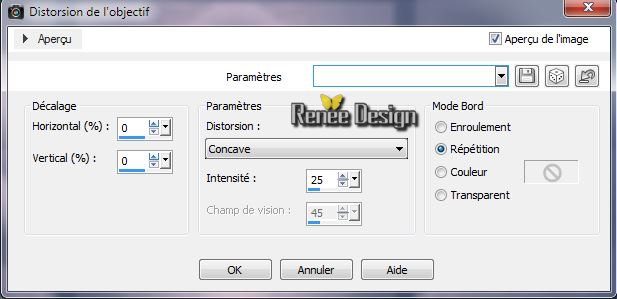
24. Effects - Distortion Effects /Lens Distortion-Pincushion
25. Open the tube ''Couloir_du_temps_Image2.pspimage''
- Edit/copy -Edit/paste as a new Layer and place
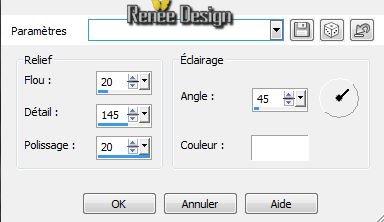
move following the example
26. Layers-Arrange- Move 3x Down (above
raster 1)
-
Aktivate the top of the Layers palette
27. Layers - New raster layer
Material Properties: Foreground color to #c83f0f Background color to : White
28. Activate Brush Tool and select my file: ''couloir du
temps_pinceau_rouge ''/Size:999 -opacity 63%

29
Apply 1clic brush right and 1 left mouse click
(put it right at the top of your work)
30. With the Pick Tool: (K) -raise to 130 pixels
(If it does not work with the brush ''de
couloir_du_temps_nuage_rouge '' In the folder of materials is an image and Edit/copy-Edit paste as a new layer )
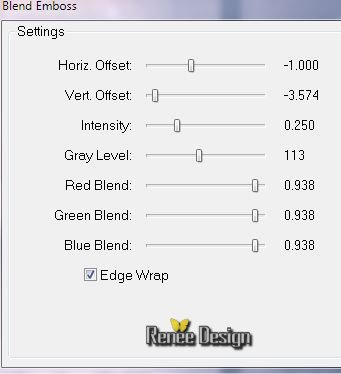
31. Effects -Plugins FM Tile Tools / Blend Emboss
32. Open the tube ''1706_TReagen_01-2013/ Image
Resize 60% - Edit/copy-Edit/paste as a new Layer and place
33. Effects -Plugins Eye Candy 5 Impact -Perspective Shadow-
Preset ''couloir_temps_perspective''
34. Open the tube ''TReagen_3394.png'' /Edit/copy-Edit/paste as a new Layer and place
slightly upwards
Layer Palette: Set the Blend mode to "Hard Light"and lower the opacity down to 85%
35. Material Properties: Foreground color to : White Background color to : #8f7b60-
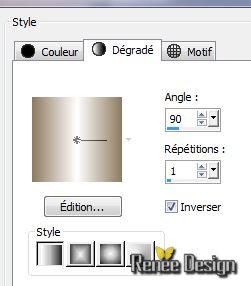
36.
Prepare a linear gradient configured like this
37. Layers - New raster layer
38. Selections - load/save selection- load selection from disk and select my file ''couloir_temps_1''
Flood Fill Tool: Fill the selection with the gradient
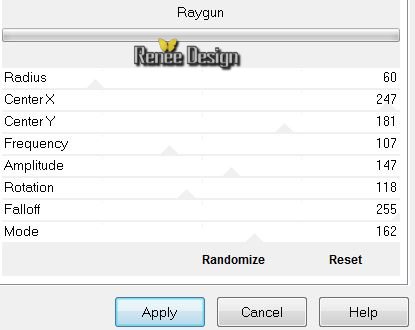
39. Effects - Plugins Unlimited - Filter Factory Gallery A/
Raygun
40. Selections - Deselect all
41. Effects -Plugins Eye Candy 5 Impact - Extrude -Preset-''couloir_temps_extrude''
42. Layers- Duplicate /Image Mirror
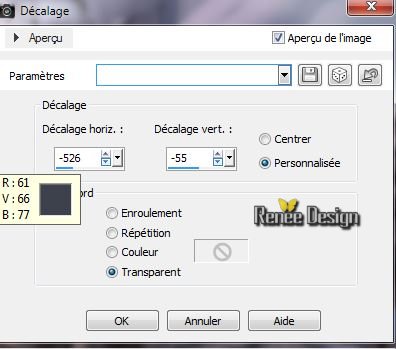
43. Effects - Image Effects- Offset
44. Layers-Merge-Merge Down
45. Effects - Distortion Effects- Twirl
46. Open the tube ''couloir_temps_mur'' /Edit/copy -Edit/paste as a new Layer and place
47.Open the tube ''couloir_temps-roue'' / Be placed on the layer "roue"/Image Resize 80% -Edit/copy -Edit/paste as a new Layer and place
Layer Palette: Set the Blend mode to"Hard Light "Lower the opacity down to
79%
48. Layers - New raster layer
49. Selections - load/save selection- load selection from disk and select my file ''couloir_temps_2''/
Flood Fill Tool: Fill the selection with the gradient
50. Effects -Texture Effects -Polished Stone
51. Selections - Deselect all
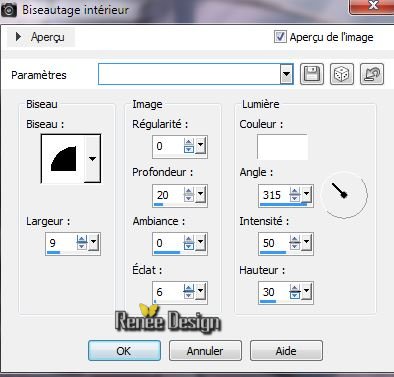
52. Effects - 3D Effects-Inner Bevel/Color White
53. Open the tube''couloir_temps_roue''
Be placed on the layer ''vis'' Edit/copy-Edit/paste as a new Layer and place
54. Layers - New raster layer
55. Selections - load/save selection- load selection from disk and select my file
''couloir_temps_3'' /Flood Fill Tool: fill the selection with color:
#b9c0be
56. Selections-Select none
57. Effet - 3D Effects-Drop Shadow /default
58. Open the tube ''couloir_temps_diamant"- Edit/copy-Edit/paste as a new Layer and place
59.Layers - New raster layer
60. Selections - load/save selection- load selection from disk and select my file ''couloir_temps_4''
/Flood Fill Tool: fill the selection with color black
Selections - Deselect all
61
.With Pen Tool and draw 2 black lines as shown in the example with these settings

for this results
62. Layers-Merge -Merge Down and repeat
63. Layers - New raster layer
64. Selections - load/save selection- load selection from disk and select my file
''couloir_temps_5''Flood Fill Tool: fill the selection with color: #3c5068
65
.Effects-Plugins Eyecandy 5 Impact - Glass- Preset-
''couloir_temps_glass''
Layer Palette: Set the Blend mode to "Screen"
66. Open the tube''TriziaTubedCardboard_Box.pspimage''
/Image Resize 40% /Edit/copy -Edit/paste as a new Layer and place
Layer Palette: Set the Blend mode to: "Luminance Legacy"
67. Open the tube''Idavi_horloge ''/ Edit/copy-
Edit/paste as a new Layer and place. Lower the opacity down to 73%
68. Open the tube ''nicole_etrange_5-2014.pspimage'' /Edit/copy -Edit/paste as a new Layer and place.
Aktivate raster 2 of the tube/Edit/copy-
Edit/paste as a new Layer and place
69. Open the tube ''couloir_temps_ecrou''/Image
Resize 15% -Edit/copy -Edit/paste as a new Layer and place
70. Layers- New Raster layer
71. Selections - load/save selection- load selection from disk and select my file''couloir_temps_6""/
Material Properties: Foreground color to : #2531ac/Flood Fill Tool: opacity 60% .Fill the selection with your foreground color #2531ac
72. Effects -Plugins Vm Extravanga / Aura Detector /
default
73. Selections - Deselect all
74. Layers-Merge-Merge Visible
Material Properties: Foreground color to #375e83 Background color to :
White
75. Activate toolbar Script, choose my file in the list "Couloir du temps"
C:\Users\YourName\Documents\Corel PaintShop Pro\16.0\ Scripts-trusted

Click the little blue arrow it will run/faire ok to each application until the script completes
--------------------------
If problems with the script
-
Image - Add Borders - Symmetric checked 2 pixels foreground color
-Image - Add Borders - Symmetric checked
3 pixels background color
-Image - Add Borders - Symmetric checked 2 pixels foreground color
-Image - Add Borders - Symmetric checked
35 pixels background color
-Image - Add Borders - Symmetric checked 2 pixels foreground color
-Image - Add Borders - Symmetric checked 3 pixels background color
-Image - Add Borders - Symmetric checked 2 pixels foreground color
----------------------------
76. With the magic wand -select the border of 35 pixels
77. Effects -Plugins Medhi - Wavy Labs 1.1
78. Selections - Deselect all
79. Open the tube text/ Edit/copy -Edit/paste as a new Layer and place. Or write your own text
On mine I applied the filter
Effects-Plugins Vanderlee Unplugged x/ Light/ background color
#2c5277
80.
Image Resize 1125 pixels Width
I hope you enjoyed this lesson
Renée
This lesson was written by Renée the 23/02/2014
Created the
March 2014
*
Any resemblance with an existing lesson is merely a coincidence
*
Don't forget to thank the people who work for us and with us. I named the tubeurs - Testers and the translators.
Thanks Renée | 


 Translations