|
Let's start the lesson.
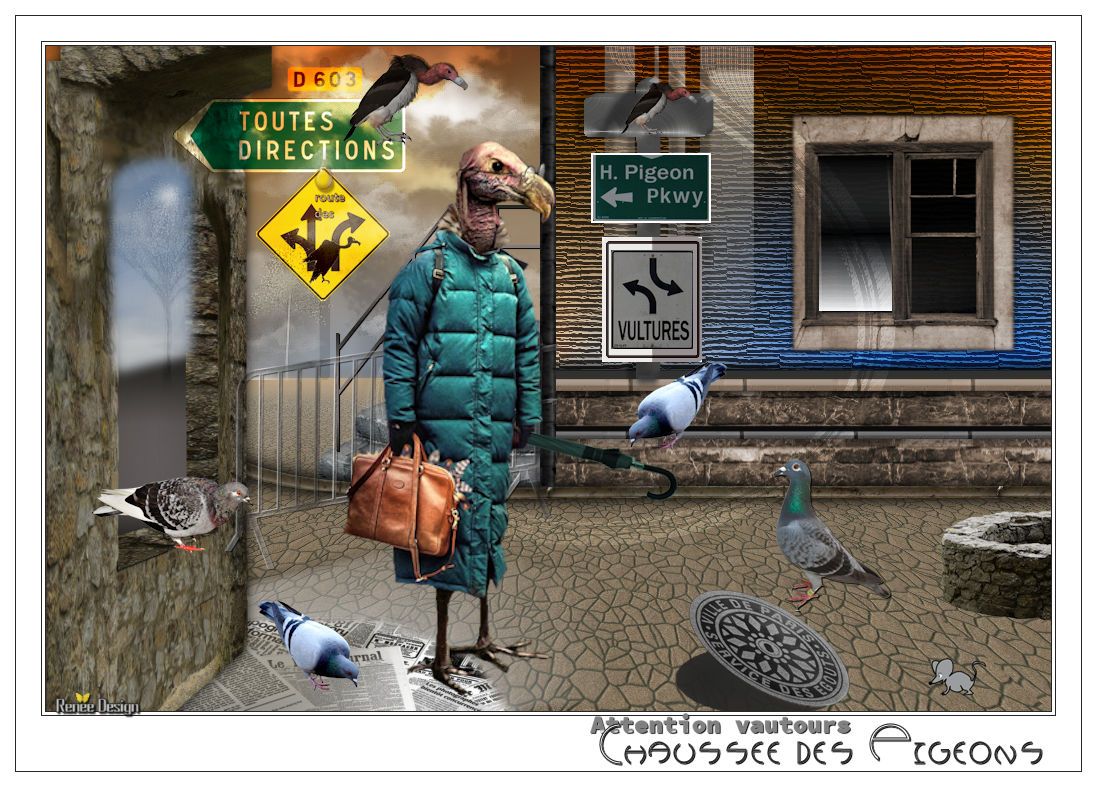
The street of the pigeons
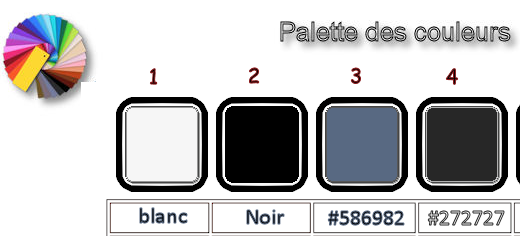
- Preparation - Material Properties: Set your foreground color to #ffffff - Set your background color to # 000000
1. File-Open a new transparent Image 1005 x 665 pixels width
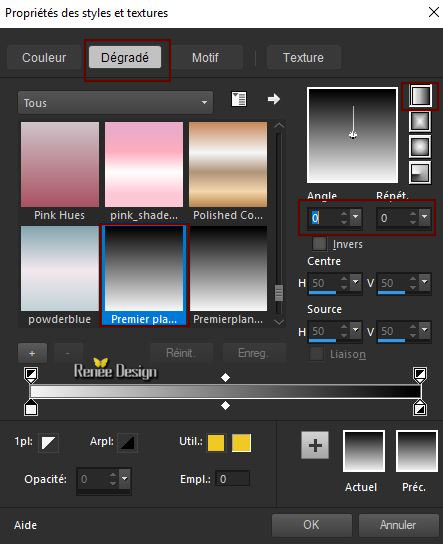
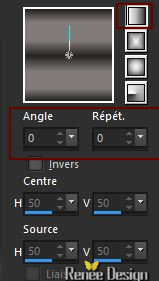
2. Material of the foreground:Set your foreground to gradient 'foreground-background' linear gradient configured like this.
3. Activate Flood Fill Tool  – Flood Fill the layer with the gradient – Flood Fill the layer with the gradient
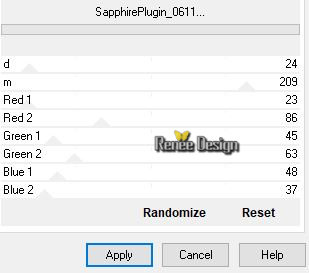
4. Effects –Plugins - Unlimited 2.0 - Sapphire Filters 07
-SapphirePlugin_0611..use the settings below
5. Layers- New Raster Layer
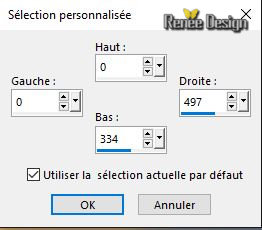
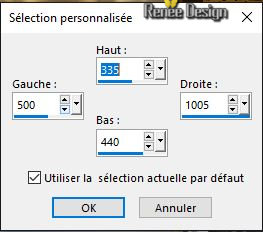
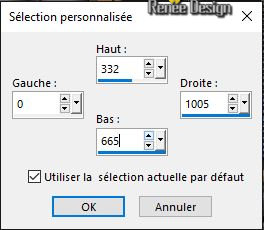
6. Activate Selection Tool -Custom Selection (S) -Rectangle with these settings
7. Activate Flood Fill Tool – Flood fill the selection with the gradient
Selections- Deselect All
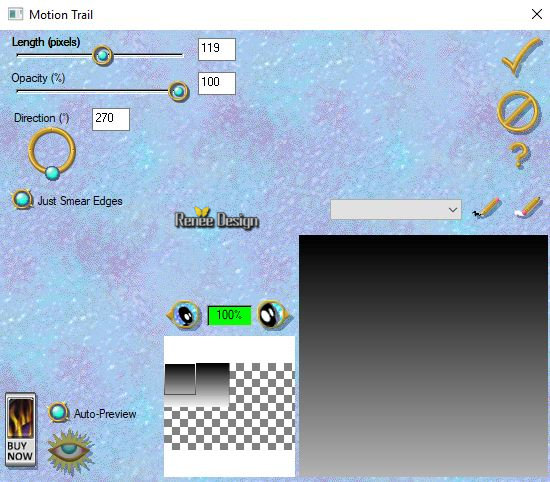
8. Effects –Plugins– Eye Candy 3.1 – Motion
Trail
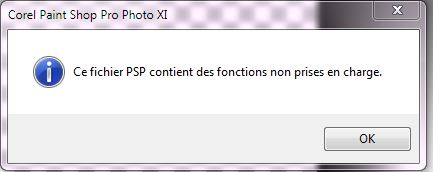
.jpg) If
you get this message >>Click Ok -and the window opens and you can use the filter with these settings If
you get this message >>Click Ok -and the window opens and you can use the filter with these settings
9. Effects –Plugins- Unlimited 2.0 - Harry's Power Grads- Star
Gradient : 162/177/74/148
10. Effects-Plugins- Unlimited 2.0 – Tramage – Pool Shadow use the settings below
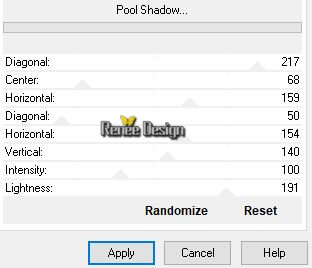
-
Lower the Opacity of the layer to 28 %
11. Layers -Duplicate
12. Image - Mirror - Mirror Horizontal (Image - Mirror in older versions of PSP)
13. Layers-Properties-Set the Blend Mode to " Overlay "-Lower the Opacity of the layer to
63%
14. Effects –Plugins – Eyecandy 5 Textures –
Wood--Tab Settings/User settings choose my preset: ‘’ Pigeon_Textures
- wood.f1s’’
15.
Effects- Edge Effects- Enhance
( Don't worry about space between these 2 images)
16. Layers- New Raster Layer
17. Activate Selection Tool -Custom Selection (S) -Rectangle with these settings
18. Effects –Plugins– Creativity – Splatter –
Clouds- Small
(It does not matter if you do not have exactly the same result, duplicate or erase it, depending on the result)
19. Effects- Edge Effects- Enhance
Selections- Deselect All
20. Activate the tube ‘’nuages ‘’
Edit - Copy- Activate your work -Edit - Paste as a new layer
- With the Move Tool, move it in the upper left corner
21. Layers-Properties-Set the Blend Mode to " Overlay "
22. Activate the tube ‘’Pigeons_fenêtre’’
-
Edit - Copy- Activate your work -Edit - Paste as a new layer
23. Effects- Image Effects- Offset with these settings: H = 355 and V =
145
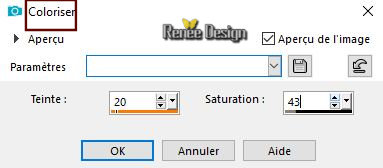
24. Adjust-Hue and Saturation-Colorize use the settings below
-
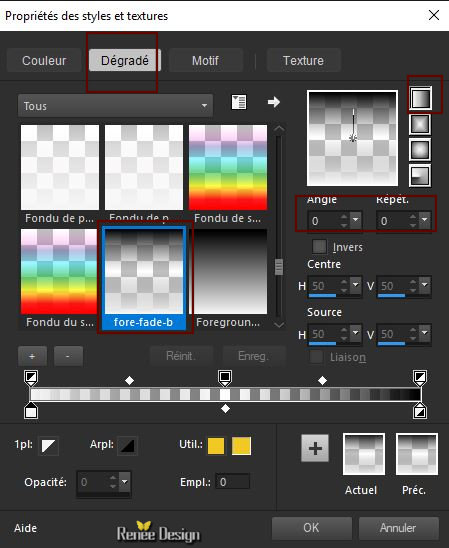
Properties foreground: - Change foreground material into gradient and select :
‘’fore-fade-back’ -Put your foreground on the linear gradient with settings below
-
Do not add a new layer
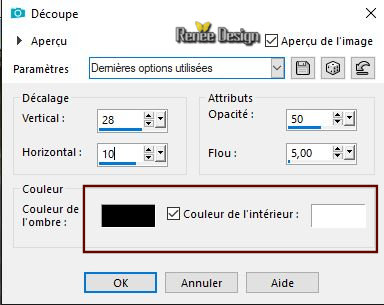
25. Activate Selection Tool (S) Rectangle –Select this part as shown in the example below and flood fill with the gradient
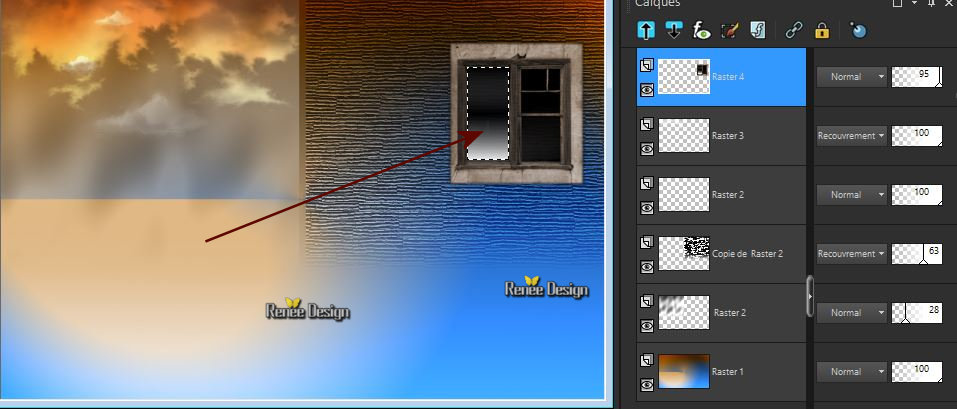
26. Lower the Opacity of the layer to 95%
Selections- Deselect All
27. Layers- New Raster Layer
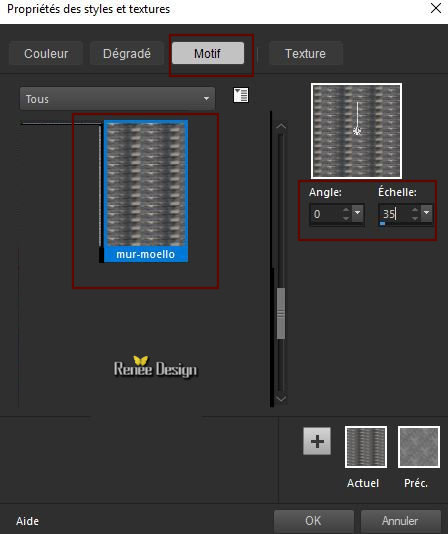
- In your Material palette, click on the tab Pattern of your foreground and select
‘’
mur-moellons’’
28.
Activate Selection Tool -Custom Selection (S) -Rectangle with these settings
29. Activate Flood Fill Tool –
Flood Fill the selection with that pattern
30. Adjust-Hue and Saturation-Colorize with the same settings
Selections- Deselect All
- In the Layers palette, activate layer Raster 2
31. Activate the tube ‘’pigeons –escalier ‘’
-
Edit - Copy- Activate your work -Edit - Paste as a new layer
32. Effects- Image Effects- Offset with these settings: H = - 92 and V = -
21
-To replace the top of the layer-palette
33. Activate the tube ‘’Pigeons-barres ‘’
-
Edit - Copy- Activate your work -Edit - Paste as a new layer
-
Move as shown in the example below
Your work and Layer Palette look like this now-You should have this result
-
Properties foreground: Change foreground material into gradient and select : ‘’yoka-tgr-brun’’
Put your foreground on the linear gradient with the settings below
34. Layers- New Raster Layer
35. Selections –load/save selection –load selection from disc and select my selection:‘’pigeons_1’’
36.
Activate Flood Fill Tool -
Flood fill the selection with the gradient
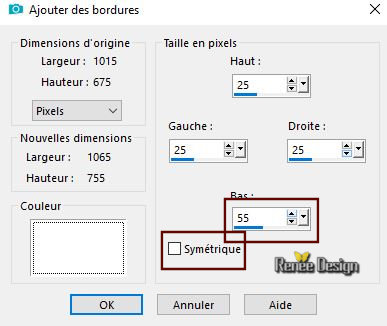
Selections- Deselect All
37. Effects – 3 D Effects – Drop Shadow with these settings : 1/1/100/1 color black
- In the Layers palette, activate layer Raster 1
38. Activate Selection Tool -Custom Selection (S) -Rectangle with these settings
39. Selections- Promote selection to layer
40. Effects –Plugins – Eyecandy 5 – Textures-
Stone Wall
Color #a18d72 and #5c5d4b
Tab Settings/User settings choose my Preset ‘’Pigeons-stone wall
Keep Selected
41. Effects –Plugins – Mura’s Meister –
Perspective Tilling using the default settings
Selections- Deselect All
42. Selections –load/save selection –load selection from disc and select my selection:‘’pigeons_2’’
43.
Adjust- Blur- Gaussian Blur : Radius 25
Selections- Deselect All
-To replace the top of the layer-palette
44. Activate the tube ‘’pigeons-barre-verticale’’
-
Edit - Copy- Activate your work -Edit - Paste as a new layer
- Place the tube in front of the wall as shown in the example below
45. Activate the tube -Pigeons_mur_pierres
Edit - Copy- Activate your work -Edit - Paste as a new layer
46. Objects-Align- Left
47. Effects –Plugins– EyeCandy 5 – Impact
_perspective shadow-Tab Settings/User settings choose my Preset ‘’
Pigeons_perspective-mur’’
48.
Activate the tube ‘’Pigeons-arbres’’
-
Edit - Copy- Activate your work -Edit - Paste as a new layer
- With your Move Tool move to the left side
49. Layers-Properties-Set the Blend Mode to "Soft Light "
50. Adjust- Sharpness- Sharpen More
-Material Properties: Set your foreground color to # 586982 (3) -Set your background color to #ffffff
51. Layers- New Raster Layer
52. Selections –load/save selection –load selection from disc and select my selection:‘’pigeons_3’’
53.
Activate Flood Fill Tool –
Flood fill the selection with the foreground color
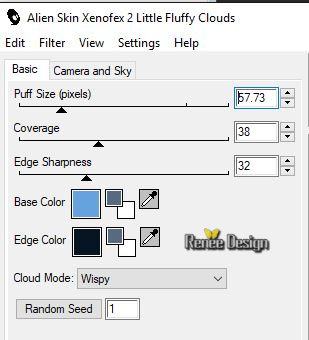
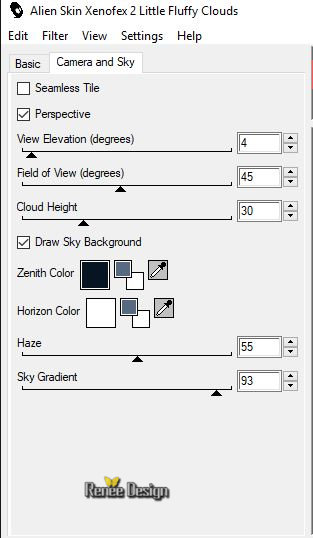
54. Effects –Plugins – Alien skin xenofex 2
- Little Fluffy Clouds
Color #66a3de and #071421
Camera and Sky color #071421 and color #ffffff
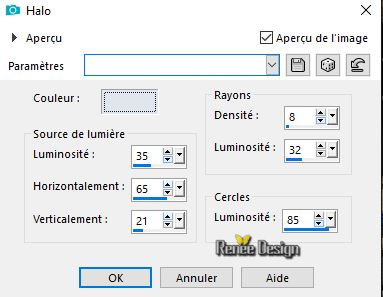
55. Effects-Illumination Effects-Sunburst use the settings below-Color
#e0e6ee
Selections- Deselect All
56. Layers- Arrange- Move down
-
Move slightly so that it fits
- To replace the top of the layer-palette
57. Layers- New Raster Layer
58. Selections –load/save selection –load selection from disc and select my selection:‘’pigeons_4’’
59.
Activate Flood Fill Tool –
Change the opacity of the color at 50%- Flood fill the selection with the foreground color (
3)
60. Effects – 3 D Effects – Cutout use the settings below ( Color black and white )
Selections- Deselect All
61. Lower the Opacity of the layer to 77%
62. Layers -Duplicate
63. Effects-Distortion Effects-Twirl -Degrees 250
64. Effects –Plugins- Unlimited 2.0 – Filter Factory Gallery M –
Loom using the default settings 0/255
65. Effects-Distortion Effects-Twirl -Degrees 250
66. Layers-Properties-Set the Blend Mode to " Overlay " –Lower the Opacity of the layer to 53 %
67. Layers- New Raster Layer
68. Selections –load/save selection –load selection from disc and select my selection:‘’pigeons_5’’
69.
Set your foreground color to #272727
Activate Flood Fill Tool
Change the opacity of the color at 100% –Flood fill the selections with the foreground color (4)
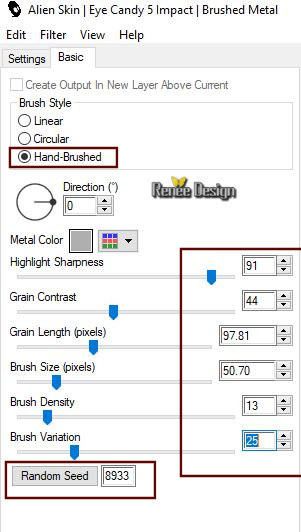
70. Effects – Plugins – Eyecandy 5 Impact-
Brushed Metal –use the settings below- Color #afb0ae
Selections- Deselect All
71. Effects – Plugins – Eyecandy 5 Impact –
Extrude –and select -preset ‘’Small Offset 30 Degrees
72. Effects – 3 D Effects – Drop Shadow with these settings : 0/-9/30/5 color black
73. Activate the tube ‘’Pigeons_plaque-1’’
-
Edit - Copy- Activate your work -Edit - Paste as a new layer
-Activate your Move Tool (M) place it in the right place ( see finished image )
- In the Layers palette, activate layer Raster 10
74. Layers- New Raster Layer
75. Selections –load/save selection –load selection from disc and select my selection:‘’pigeons_6’’
76.
Activate the tube ‘’Pigeons_Journaux’’ -Edit-Copy-Activate your work -Edit - Paste into selection
77. Selections –load/save selection –load selection from disc and select my selection:‘’pigeons_8’’
78.
Adjust- Blur- Gaussian Blur- Radius 65
Selections- Deselect All
- To replace the top of the layer-palette
79. Layers- New Raster Layer
80. Selections –load/save selection –load selection from disc and select my selection:‘’pigeons_7’’
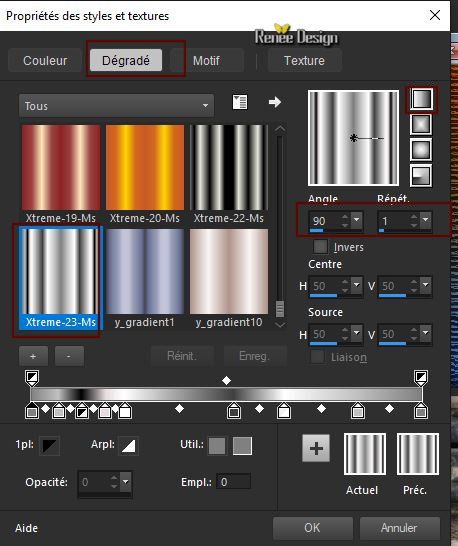
-
Properties foreground: - Change foreground material into gradient and select :
‘’Xtreme-23 Ms’’
- Put your foreground on the linear gradient with the settings below
81. Activate Flood Fill Tool
– Flood fill the selection with the gradient
Selections- Deselect All
82. Effects – 3 D Effects – Drop Shadow with these settings : 1/1/100/1 color black
83. Activate the tube ‘’ Dossier tube-tutoriel –Chaussée
des pigeons’’
-
Copy and Paste all the tubes of this folder and move it in the right place
84. Activate the tube ‘’ pigeons-vautour.png’’
-
Edit - Copy- Activate your work -Edit - Paste as a new layer and move
85. Activate the tube’’
Renee_TUBES_Pigeons.pspimage’’
-Edit - Copy- Activate your work -Edit - Paste as a new layer and move it in the right place
86. Image - Add borders-Symmetric checked 1 pixel Color #272727 (4)
87. Image - Add borders-Symmetric checked 3 pixels Color #ffffff
88. Image - Add borders-Symmetric checked 1 pixel #272727 (4)
89. Image - Add borders-Symmetric NOT checked -Color #ffffff
90. Open the tube ‘’titre‘’ and paste as a new Layer and move
91. Image - Add borders-Symmetric checked 1 pixel Color #272727 (4)
92. Image - Add borders-Symmetric checked 15 pixels #ffffff
Save as JPG
I hope you enjoyed this lesson
Renée
This lesson was written by Renée 10-09- 2018
Edited and Update
2018
*
Any resemblance with an existing lesson is a coincidence
* Do not forget to thank the people who work with us and for us I have appointed the tubeurs and translators
Thanks
*
| 
 Translations


 If a plugin supplied appears with this icon it must necessarily be imported into Unlimited *