|
Let's begin .
1.
Open your image ''fond_CO'' /Promote Background Layer =Raster 1
2.
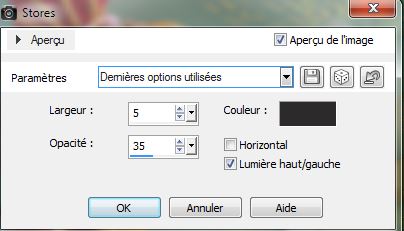
Selections-Custom selection with these settings
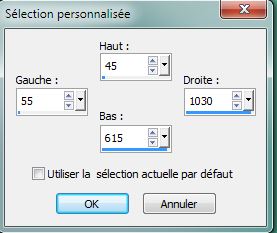
3.
Effects -3D Effects- Drop Shadow: 0/0/50/40 black
4.
Selections-Promote Selection To Layer
5.
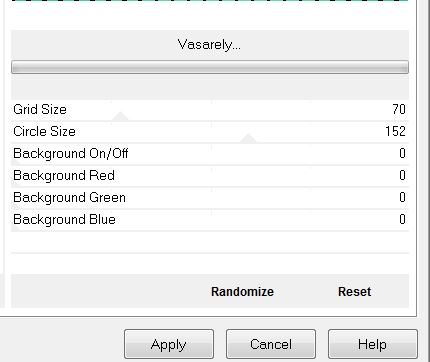
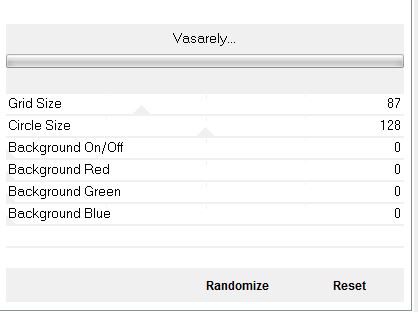
Effects-Plugins - VM Extravanga - Vasarely
Selections-select none
6. Effects-Plugins - VM
Extravanga - Vasarely
7.
Effects - Plugins - Transparency -
Eliminate black(you see nothing for now this is normal)
8.
Effects - Edge Effects-Enhance More
9.
Effects -3D Effects- Drop Shadow: (
with the same setting)
10.Layers-Duplicate
11.
Effects -Plugins Simple - Pizza Slice Mirror (repeat 2x)
12. Selections - load/save selection- load selection from disk and select my file ''CO_1'' /  Delete Delete
13.
Selections-Invert
14.
Effects -3D Effects- Drop Shadow: 1/1/62/45 black
15. Selections-select none
16.
Layers-Merge-Merge Down
17.
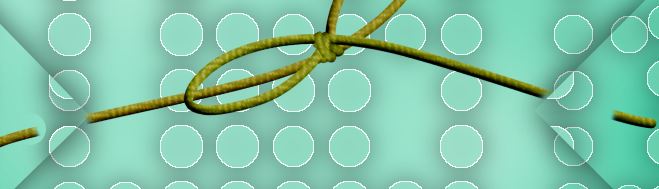
Open the tube ''CO_corde'' /Edit/ copy- Edit/ paste as new layer and place
18.
Eraser Tool: Erase a piece of cord
19.
Layers-New Raster layer
Selection Tool ( S) /Circle - Draw two small circles. Flood Fill Tool: Fill the selections with black (see Example)
Layers-Arrange-Move Down
20.
Selections-select none
Aktivate the top of the layer palette
21.
Open the tube ''etdesigns_easter_101.pspimage''/Edit/ copy- Edit/ paste as new layer and place
Effects -3D Effects- Drop Shadow: 4/ -2
/ 60 / 32 black
22.
Layers-New Raster layer
23.
Selections - load/save selection- load selection from disk and select my file 'CO_2"
Material Properties: Foreground color: #f9ce55/ .Flood Fill Tool :Fill the selection with your FG-Color
24.
Effects- Plugins - Eyecandy 5 Impact - Glass -Preset
''CO_glass"
25.
Selections-select none
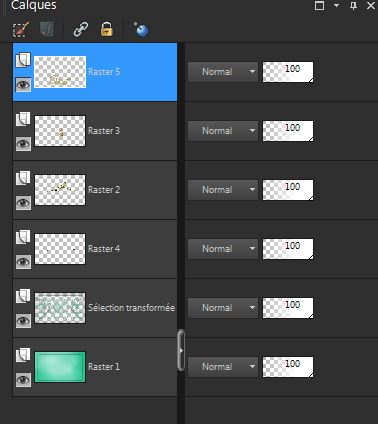
Your Layer Palette looks like this now
26.
Layers-Merge-Merge Visible
27.
Layers-Duplicate
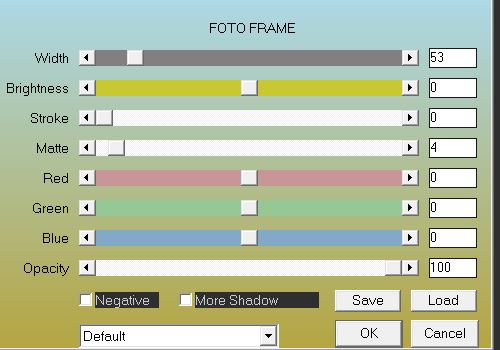
28.
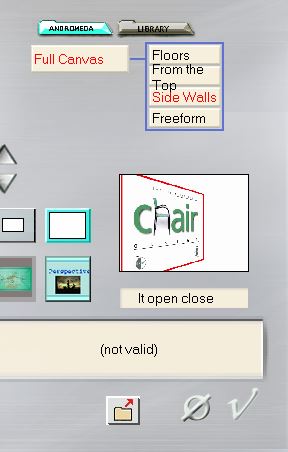
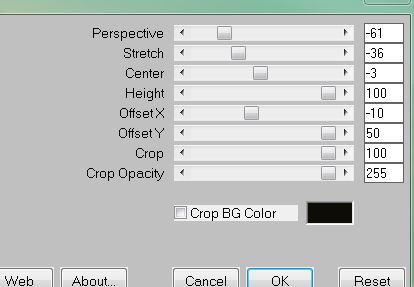
Effects- Plugins- Andromeda -Perspective /Side
Walls / It open close
29.
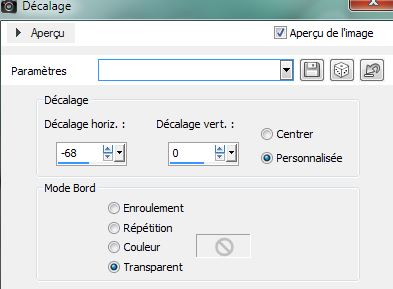
Effects -Image Effects - Offset
30.Aktivate the bottom of the Layers palette
( le fusionné)
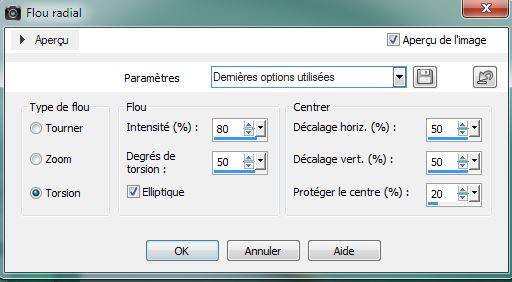
31.
Adjust-Blur-Radial Blur
32.
Effects - Edge Effects- Enhance
33.
Open the tube
''Easter-Bunny-Bicycle-Delivery.pspimage''/Image
Resize 75% /Edit/copy-Edit paste as a new layer and place
34. Layers-New Raster layer
35.
Flood Fill Tool: fill the layer with this color: #f9ce55
36. Layers- New Mask Layer From Image and choose Mask:
"chasse_aux_oeufs_masque .jpg''
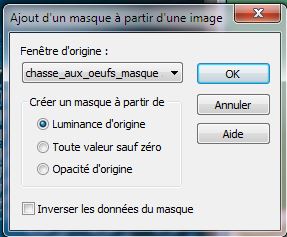
37. Layers- Merge-Merge Group
38. Effects- Edge Effects- Enhance
39. Effects
-Plugins - Mura's Meister - Perspective
Tilling
40. Effects
- 3D effects-Drop Shadow: 1/1/62/45 black
Layers-Arrange-Move 2x Down
Material Properties: Foreground color to color: #f9ce55 .Background color tot color black
42.
Prepare a linear gradient configured like this: Angle
= 45/ Repeats = 5 / no check invert
Aktivate the top of the Layers palette
43. Layers-New Raster layer
44.
Selections-Custom selection with these settings
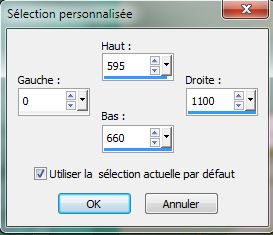
45.Flood Fill Tool :Fill the selection with the gradient - Adjust-Blur-Gaussian Blur: Radius: 32
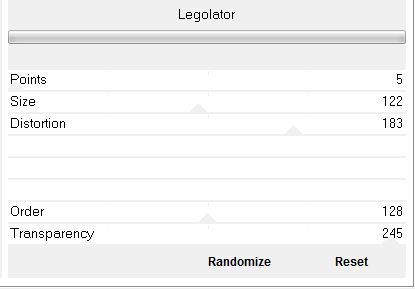
46.
Effects-Plugins Unlimited - Factory Gallery D/ Legolator
47. Effects
- Plugins -Mura's Meister Perspective Tilling / click on reset - default
48.
Selections - Deselect all
Layers-Arrange-2x Down ( above Groupe -Raster
2)
49. Open the tube ''arbre_oeufs'' /Edit/copy-Edit paste as a new layer /Image Mirror / Move to the right
50. Effects-Edge Effects-Enhance.Layer Palette: Set the Blend Mode to "Soft Light "
Aktivate the top of the Layers palette
51.
Open the tube: Lize-ADR- 19 and tube 28 '' / Edit/copy-Edit paste as a new layer and place
52. On these two tubes. Effet -Plugins Eye Candy 5 Impact - Perspective shadow
-preset- ''CO_perspective''
53.Layers-Merge-Merge Visible
54. Image - Add Borders - Symmetric 1 pixels black
55. Image - Add Borders - Symmetric 10 pixels color #f9ce55
56. Image - Add Borders - Symmetric 1 pixels black
57. Image - Add Borders - Symmetric 50 pixels color #7bdabc
58. Image - Add Borders - Symmetric 1 pixel black
59. With the magic wand -select the border of 50 pixels
60. Effects- Texture Effects- Blinds / color black
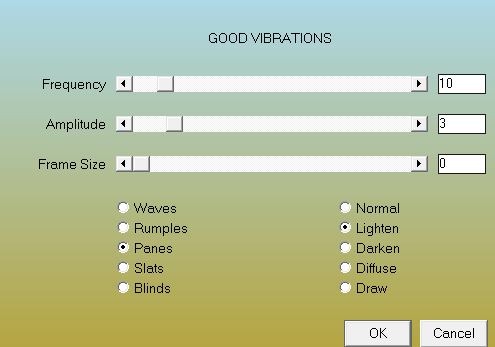
61. Effects
- Plugins - AAA Filter - Good vibration
62.
Selections-Promote Selection To Layer
63. Effects
-Plugins- Medhi - Weaver
64. Effects
- Plugins - AAA Frame - Foto Frame
65.
Selections-select none
66. Aktivate Text Tool"Adrenaline zero '' Write your text
67.
Layers-Merge-Merge All (Flatten)

I hope you enjoyed this lesson
Renée
This lesson was written by Renée the 14/03/2014
Created
the 01/ 04/2014
*
Any resemblance with an existing lesson is merely a coincidence
Don't forget to thank the people who work for us and with us. I named the tubeurs - Testers and the translators.
Thanks Renée | 

 Translations