|
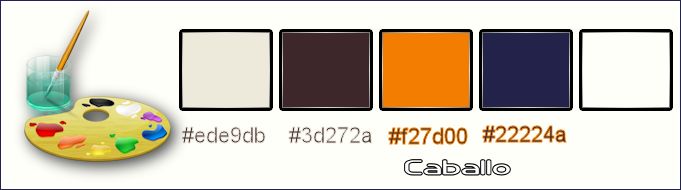
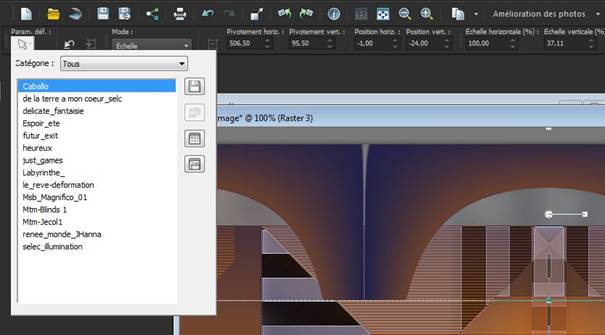
Cavallo
di controllo_V.Campanella
-
Let's start the lesson./Open the Color-Palette
- Material Properties:
Set your foreground color to:#ede9db-
Set your background color to #3d272a
-
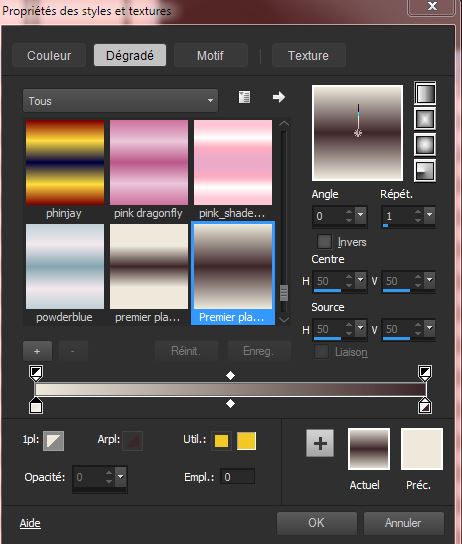
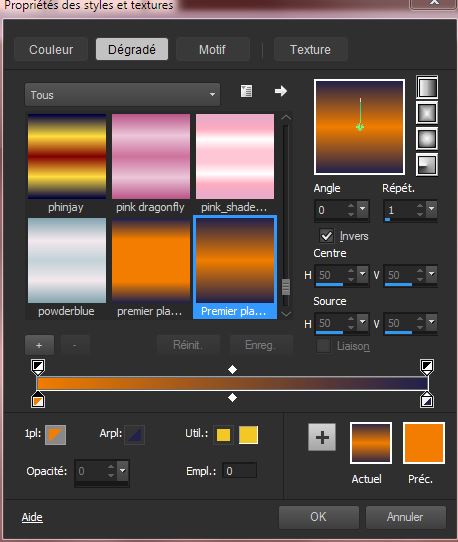
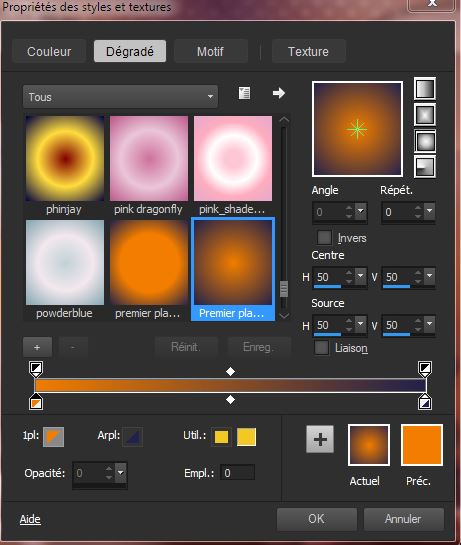
Set your foreground to gradient 'Foreground-background' - Linear - with these settings as shown below
1. Open a new transparent image of 1015 x 645 pixels
- Activate Flood Fill Tool and fill the layer with the gradient
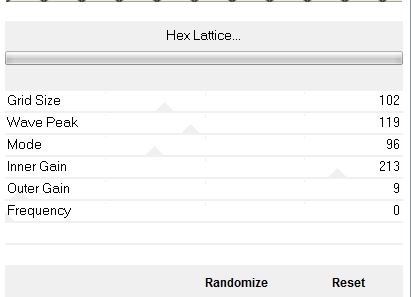
2. Effects-Plugins–
Unlimited 2.0 – Filter Factory Gallery E- Hexx
Lattice
3. Adjust-Blur-Gaussian Blur- Radius: 18%
4. Effects-Plugins –
Simple – Blintz
5.
Effects-Edge Effects- Enhance More
6. Layers- Duplicate
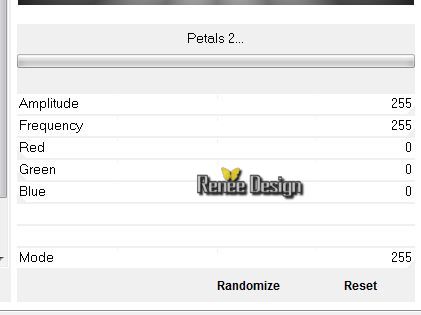
7.
Effects-Plugins –Unlimited 2.0 – Alf's Power Sines-Petals
2...
8. Double click on this layer and set the Blendmode to Exclusion
9. Effects- User Defined Filter – Emboss 3 /using the default settings
- Material Properties:
Set your foreground color to: #f27d00-
Set your background color to #22224a
10.
Set your foreground to gradient 'Foreground-background' - Linear -with these settings as shown below
11. Layers - New raster layer.
-Activate Flood Fill Tool and fill the gradient
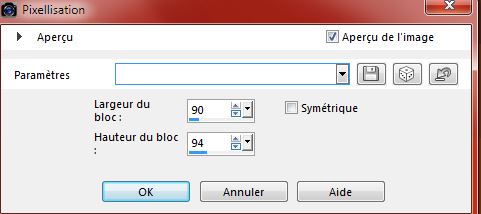
12. Effects-Distortion Effects-Pixelate with these settings
13.
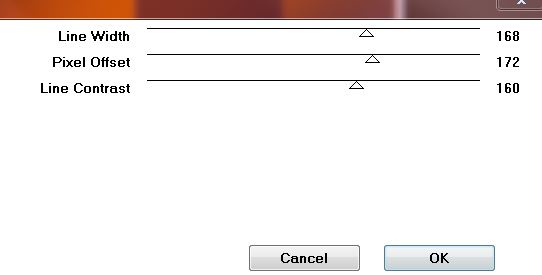
Effects-Plugins – Unlimited 2.0- Funhouse- Angulate...using the default settings 13/41/149/0/0/0/0/0/0
14.
Layers- Duplicate
15.
Image -Mirror
- Double click on this layer and set the Blendmode to Soft Light
16. Layers- Merge- Merge Down
17. Adjust-Blur-Gaussian Blur- Radius: 32%
18.
Selections - load/save selection - load selection from disk and select my file: « sélection
Caballo_1 »
19. Layers-New raster layer
20. Pot of Paint: Change the opacity of the color at 60%- Activate Flood Fill Tool and fill the selection with the Backgroundcolor
21.Effects-Edge Effects- Enhance More
Selections- Deselect All
22. Effects- Plugins - Visual Manipulation –
Transmission
23. Effects - 3D Effects - Drop shadow with these settings 1/1/100/25 black
24. Layers- Merge- Merge Down
25. Effects- Plugins – Simple – Pizza slice mirror
- Repeat: Effects- Plugins – Simple – Pizza slice mirror
26. Image -
Mirror
27. Effects-Edge Effects- Enhance More
28. Layers-New raster layer
29.
Selections - load/save selection - load selection from disk and select my file: ‘’selection cabello_2’’
30 .
Pot of Paint: Change the opacity of the color at 100%- Activate Flood Fill Tool and fill the selection with the gradient
Selections- Deselect All
31. Effects-Plugins -
Visual Manipulation Transmission 10/103/0
32. Layers- Merge- Merge Down
33. Effects- Plugins - Simple - 4 Way Average
34.
Selections - load/save selection - load selection from disk and select my file:
« caballo_3 »
35. Edit-Cut-Edit paste as a new layer on your working area
Selections- Deselect All
36.
Effects-Plugins –Unlimited 2.0 - &<Bkg Designer sf10
I>-Corner Half Wrap
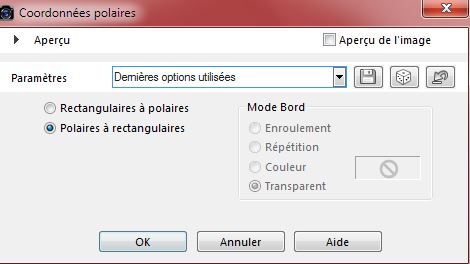
37. Effects- Distortion Effects- Polar Coordinates -Polar to Rectangular
38. Activate your Pick Tool (K) –click on the-Preset ‘’Preset_Pick_Caballo’’
- Click
Ok
(Preset is included into the zipfile)
39.
Effects- Plugins - EyeCandy 5 Impact - Extrude-
tab Settings/User settings choose my preset:"Caballo_extrude"
Layer Palette look like this now:

- In the layer palette-activate- Copy of Raster 1
40. Effects- Plugins - Mock –Window / using the default settings 128/216/25/25/25/25
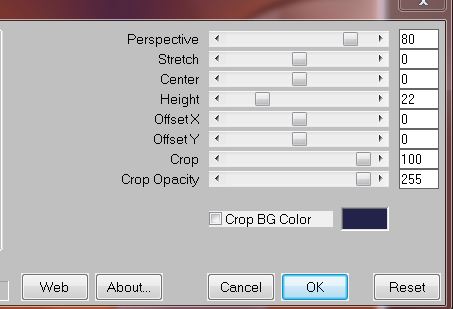
41. Effects- Plugins – Mura’s Meister –Perspective
Tilling
42. Double click on this layer and set the Blendmode to Luminance-Legacy
- Activate the top of the layer-Palette
43. Activate the tube ‘’caballo_colonnes’’
-
Edit/copy- Edit/ paste as new layer on your working area .With your move tool place it in the right place
- Double click on this layer and set the Blendmode to Luminance -Legacy
- In the layer palette-activate Raster 2
44. Activate the tube ‘’caballlo_miroir »
- Edit/copy- Edit/ paste as new layer on your working area
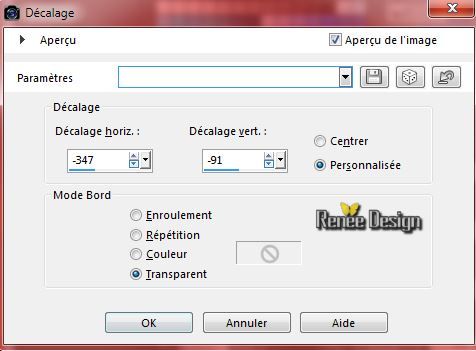
45. Effects-Image Effects-Offset with these settings
- In the layer palette-activate Raster 3
46. Activate the tube ‘’Renee_tube_CaballoV.Campanella5.
- Image
Resize with 65%
- Edit/copy- Edit/ paste as new layer on your working area
- With your move tool move to the right side
- Activate the top of the layer-Palette
47. Layers - New raster layer.
48.
Selections - load/save selection - load selection from disk and select my file: ‘’ caballo_4’’
- Material Properties:
Set your foregroundcolor to:#ffffff (white)
49. Activate Flood Fill Tool and fill the selection with the foregroundcolor /click 2 times into selection
Selections- Deselect All
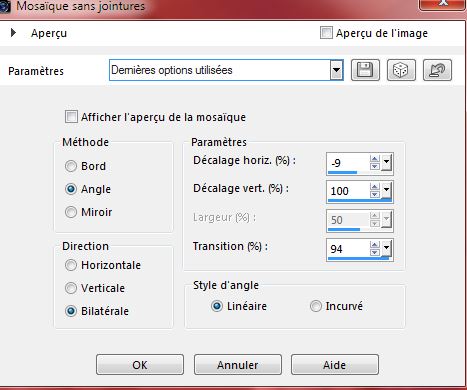
50. Effects - Image effects -Seamless tiling with these settings
51. Layers- Merge-Merge- Visible
52. Activate the tube ‘’ caballo_image_deco_1’’
- Edit/copy-Edit paste as a new layer on your working area
- With your move tool move on top
-Color-Palette -Set your foreground to
#f27d00
53.
Set your foreground to gradient 'Foreground-background' -Sunburst with these settings as shown below
54. Layers-New raster layer
55.
Selections - load/save selection - load selection from disk and select my file: ‘’ caballo_5’’
56. Activate Flood Fill Tool and fill the selection with the gradient
Selections- Deselect All
57. Activate the tube ‘’Renee_tube_pions’’
- Activate layer = pions_1 of the tube
- Image
Resize with 50%
-
Edit/copy- Edit/ paste as new layer on your working area .With your move tool place it in the right place
58. Effects - 3D Effects - Drop shadow with these settings 1/1/100/2 black
- Activate the same tube
59. Activate layer = pions_of the tube
-
- Edit/copy- Edit/ paste as new layer on your working area . With your move tool move to the bottom left
- Double click on this layer and set the Blendmode to Screen
60. Effects - 3D Effects - Drop shadow with these settings 1/1/100/2 black
-Activate the same tube
61. Activate layer = pions_3 of the tube
- Image
Resize with 50%
-
Edit/copy- Edit/ paste as new layer on your working area .With your move tool place it in the right place
62. Effects - 3D Effects - Drop shadow with these settings 1/1/100/2 black
63. Activate Shape Tool (P)–select=Kugel as shown in the example below
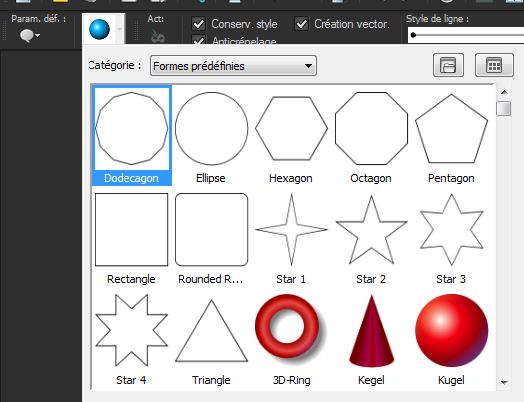
64. Draw two shapes –(place on two different raster layers )
-Convert to raster layer
65. Image - Add borders-Symmetric checked:1 pixel Backgroundcolor
66. Image - Add borders-Symmetric checked:5 pixels Foregroundcolor
67. Image - Add borders-Symmetric checked:1 pixel Backgroundcolor
68. Image - Add borders-Symmetric checked:75 pixels White
69. Image - Add borders-Symmetric checked:5 pixels Foregroundcolor
70. Image - Add borders-Symmetric checked:1 pixel Backgroundcolor
71. Activate Magic Wand and click in the border of 75 pixels
72. Layers-New raster layer
73. Activate Flood Fill Tool and fill the selection with the gradient
74. Double click on this layer and set the Blendmode to Hard Light
75.
Effects-Plugins –Unlimited2.0 - &<Bkg Designer sf10 I>-
Corner Half Wrap
Selections- Deselect All
76.
Effects- Plugins –EyeCandy 5 Impact –Perpsective shadow-
tab Settings/User settings choose my preset:‘’ caballo_perspShadow’’
77. Activate the tube ‘’Caballo_titre’’- Edit/copy-Edit paste as a new layer on your working area. With your move tool move to the top
78. Activate the tube ‘’Caballo_signature’’-Edit/copy-Edit paste as a new layer on your working area. With your move tool move to the bottom left
79. Layers-Merge-Merge-All
80. Image
Resize with 995 pixels Width
Save as JPG
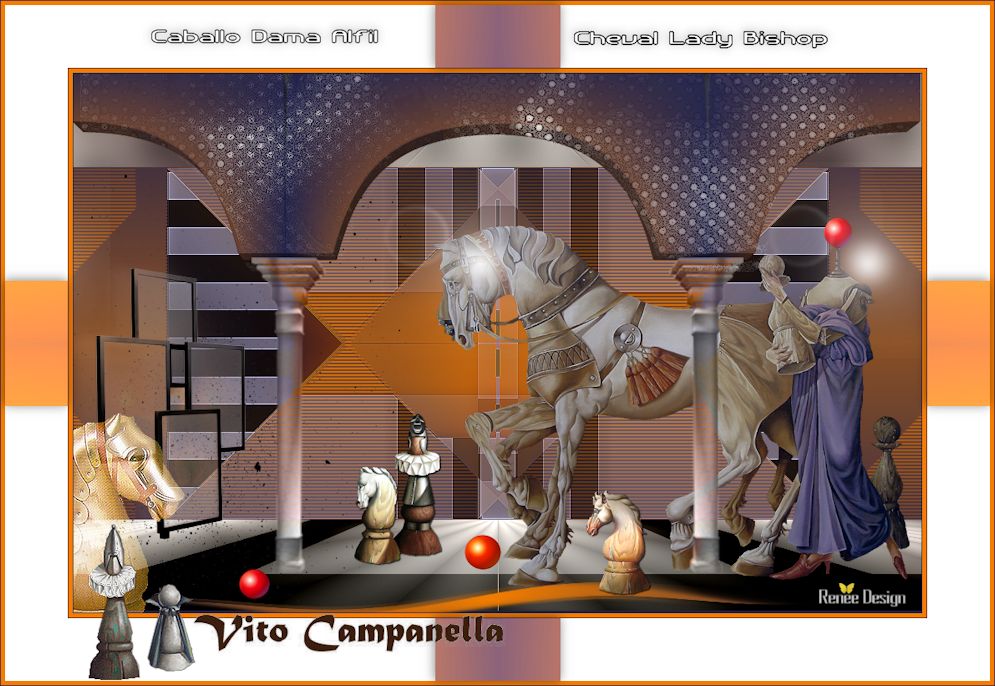
I hope you enjoyed this lesson
Renée
This lesson was written by Renée 12/02/2015
/15/02/2015
Placing
2015
*
Any resemblance with an existing lesson is merely a coincidence *
* Don't forget to thank the people who work for us and with us. I named the tubeurs - Testers and the translators.
Thanks Renée.
*
| 
 Translations

 When you see this logo the filter is imported in Unlimited

 All rights reserved