|
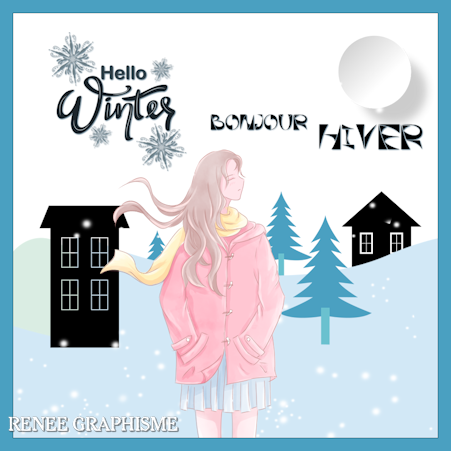
Hello- Winter 2021/Bonjour- Hiver 2021

-
Preparation
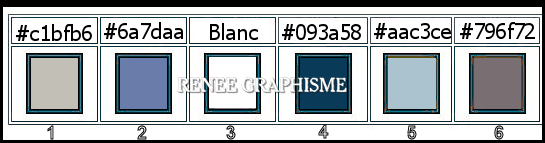
- Material Properties: Set your foreground color to color #c1bfb6= 1 – Set your background color to color #6a7daa = 2
1. Open the Background Image
‘’Winter-image ‘’- Promote Background Layer =Raster 1
(Be careful if you use any other picture, you need to choose the colors related to this picture)
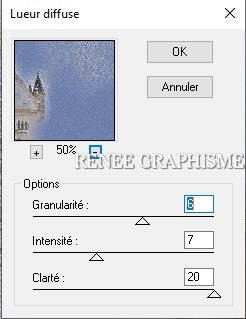
2. Effects –Plugins – Deformation- Lueur diffuse use the settings below
3. Adjust – Blur–
Motion Blur / Angle = 127 and Strenght = 100%
4. Layers- Duplicate
5. Image - Mirror - Mirror Horizontal (Image - Mirror in older versions of PSP)
5a. Image - Mirror - Mirror vertical ( Image - Flip in older versions of PSP)
6. Layers-Properties-Lower the Opacity to
46
7. Layers- Merge- Merge Down
8. Effects – Edge Effects– Enhance
9. Layers- Duplicate
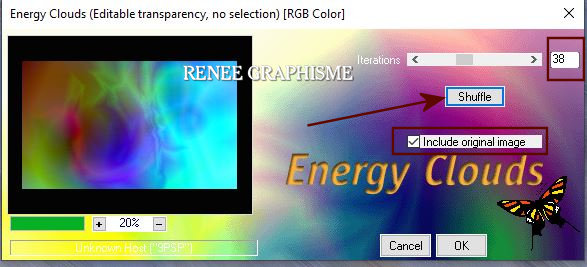
10. Effects – Plugins – FM/FF- Energy Clouds youse the settings below
Attention For this filter click on >> Shuffle to get a similar result
You can repeat this until you are satisfied with the result.
If you don't achieve the desired effect there is an image in the folder (effet energy clouds) Add as a new layer
Then delete the duplicated layer
11. Layers-Properties-Change the Blend Mode to " Overlay " and Lower the Opacity to 48
12. Layers- Merge- Merge Down
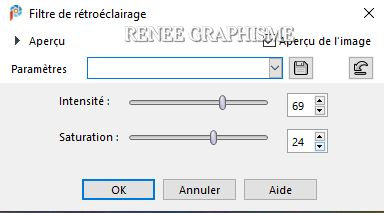
13. Adjust-Backlighting with these settings
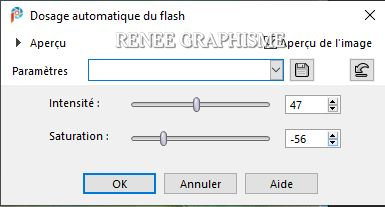
14. Adjust– Fill Flash with these settings
15. View - Toolbars - Script checked in your PSP ! (Put the Script ‘’Chute de neige ‘’ in your Script folder –Restricted Script from PSP! )
Activate Toolbar Script, choose my file in the list ‘’Chute de neige ‘’- click the little blue arrow and let the Script run

- Promoted Background Layer
16. Layers- New Raster Layer
17.
Selections –load/save selection –load selection from disc and select my selection:‘’B_Hiver-2020’’
- Color Palette- Set your Foreground color to color #ffffff
18. Flood Fill Tool
 –
Fill the selection with the Foreground color #ffffff –
Fill the selection with the Foreground color #ffffff
Selections- Deselect All
19. Open the tube ‘’ Bonjour-Hiver
2020- Image 1’’ Edit - Copy- Activate your work -Edit - Paste as a new layer
20. Objects - Align
– Bottom
- Color Palette- Set your Foreground color to color #ffffff=3 -Set you Background color to color #796f72 = 6
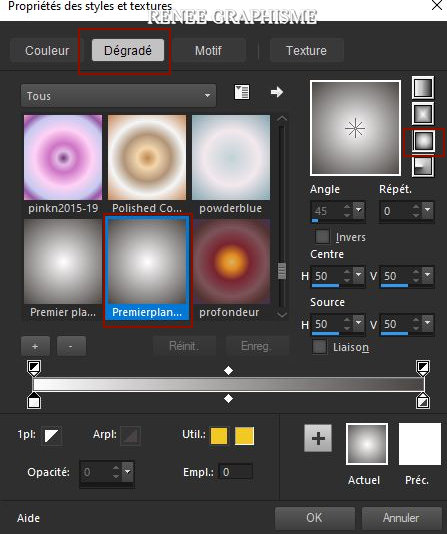
Set your Foregroundcolor to foreground-background "Sunburst" gradient configured like this
21. Layers- New Raster Layer
22. Selections –load/save selection –load selection from disc and select my selection:‘’B_Hiver-2020-1’’
23. Flood Fill Tool
–
Fill the selection with the gradient
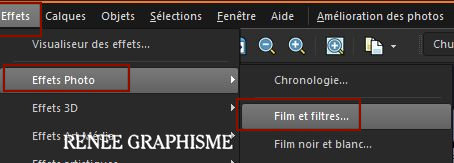
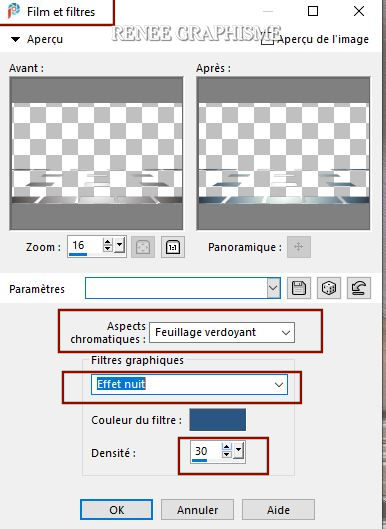
24. Effects – Photo Effects– Film and Filters / Films Looks -Vibrant foliage -Creative fillters-Night effects -Color #2c5684
Selections- Deselect All
25. Effects- Plugins – Alien skin EyeCandy5 – Nature- SnowDrift–Tab-Settings-User Settings and select my file- Preset :
‘’ B_HIVER_snowDrift’’
26.Open the tube
‘’ Renee_TUBEBonjour- Hiver-2020- Arbres’’- Choose a tree to your liking
- Edit - Copy- Activate your work -Edit - Paste as a new layer
- Move tool- Move to the left side (see finished image )
27. Layers- New Raster Layer
28. Selections –load/save selection –load selection from disc and select my selection:‘’B_Hiver-2020-2’’
29. Flood Fill Tool
- Fill the selection with the Foreground color #ffffff
Selections- Deselect All
30. Open the tube ‘’ Renee_TUBEBonjour-
Hiver-2021- Branche-bleue’’ -Edit - Copy- Activate your work -Edit - Paste as a new layer
31. Objects Align –
Top
32. Objects –
Align- Right
If that does not work. Pick Tool: (K) on your keyboard -Enter these parameters
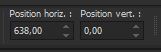 638/0
638/0
Put the image aside for now, we will need it later
33. Open the tube ‘’BONJOUR-HIVER-CONSTRUCTION’’
(this layer contains the effect)
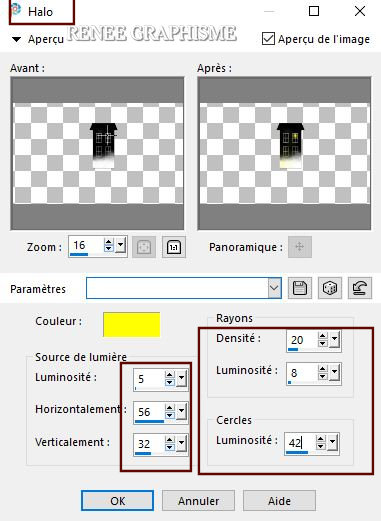
34. Layers- New Raster Layer
35. Selections –load/save selection –load selection from disc and select my selection:‘’B_Hiver-2020-3’’
36. Flood Fill Tool
–
Fill the selection with the Foreground color #ffffff (3 clics)
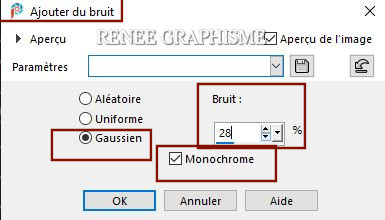
Selections- Deselect All
37. Effects – Edge Effects- Enhance
38. Layers- New Raster Layer
39. Selections –load/save selection –load selection from disc and select my selection:‘’B_Hiver-2020-4’’
40. Flood Fill Tool -
Fill the selection with the Foreground color #ffffff
Selections- Deselect All
41. Effects – 3 D Effects– Drop Shadow with these settings: 1/1/80/0 Color Black
42. Layers- New Raster Layer
43. Selections –load/save selection –load selection from disc and select my selection:‘’B_Hiver-2020-5’’
44. Flood Fill Tool -
Fill the selection with the Foreground color #ffffff
Selections- Deselect All
45. Effects – 3 D Effects– Drop Shadow with these settings: 1/1/80/0 Color Black
46. Layers- New Raster Layer
47. Selections –load/save selection –load selection from disc and select my selection:‘’B_Hiver-2020-6’’
48. Flood Fill Tool -
Fill the selection with the Foreground color #ffffff
Selections- Deselect All
49. Effects – 3 D Effects– Drop Shadow with these settings:1/1/80/0 Color Black
50. Layers- New Raster Layer
51. Selections –load/save selection –load selection from disc and select my selection:‘’B_Hiver-2020-7’’
52. Flood Fill Tool -
Fill the selection with the Foreground color #ffffff
Selections- Deselect All
53. Effects – 3 D Effects– Drop Shadow with these settings: – 4 /0 / 65 /48 Color #093a58=4
54. Layers- New Raster Layer
55. Selections –load/save selection –load selection from disc and select my selection:‘’B_Hiver-2020-8’’
56.Color Palette- Set your Foreground color to color #093a58=4
Flood Fill Tool
- Fill the selection with the Foreground color #093a58=4 (3 to 6 clicks)
Selections- Deselect All
57. Layers- New Raster Layer
58. Selections –load/save selection –load selection from disc and select my selection:‘’B_Hiver-2020-9’’
59.Color Palette- Set your Foreground color to color #ffffff=3
Flood Fill Tool -
Fill the selection with the Foreground color #ffffff
Selections- Deselect All
60. Effects – 3 D Effects– Drop Shadow with these settings: 1/1/80/3 - Color #093a58=4
61. Open the tube ‘’ Renee_TUBEBonjour-
Hiver-2021-Lune’’ -Edit - Copy- Activate your work -Edit - Paste as a new layer
62. Pick Tool: (K) on your keyboard -Enter these parameters 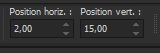 2/
15 2/
15
63. Layers- Merge- Merge Visible
64. Image - Mirror - Mirror Horizontal (Image - Mirror in older versions of PSP)
65. Image -
Resize 68 % Resize all layers checked
66. Edit - Copy
- Activate your minimized image of step 32
67. Edit - Paste as a new layer
68. Pick Tool: (K) on your keyboard -Enter these parameters
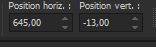 645/
- 13
645/
- 13
69. Layers- Arrange -Move down and repeat once
Your work and Layer Palette look like this now-You should have this result
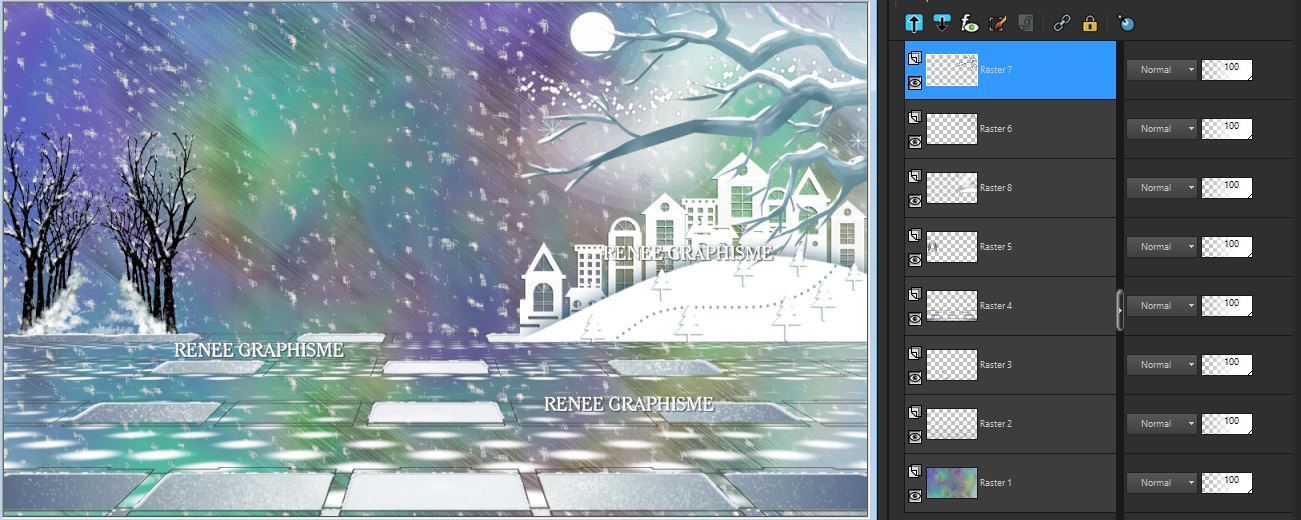
- Activate the top of the layer palette
70. Open the tube ‘’ Renee_TUBEBonjour-
Hiver-2021-Maison -Noire.’’ -Edit - Copy- Activate your work -Edit - Paste as a new layer
-Pick Tool: (K) on your keyboard -Enter these parameters
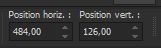 484
/ 126
484
/ 126
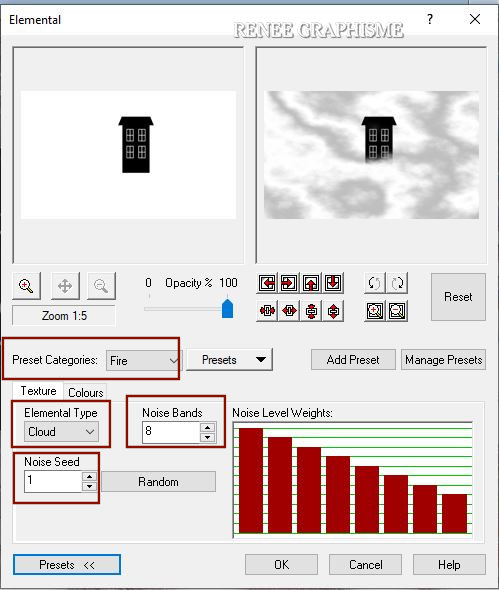
71. Effects - Plugins - XTras- Elemental-Fire-Customize use the settings below
72. Layers- New Raster Layer
73. Selections –load/save selection –load selection from disc and select my selection:‘’B_Hiver-2020-10’’
74. Flood Fill Tool -
Fill the selection with the Foreground color #ffffff (2 or 3 clicks)
Selections- Deselect All
75. Layers-Properties-Change the Blend Mode to "Dodge"
-Activate the layer underneath ( black house)
76. Effects – Illumination Effects– Sunburst with these settings / Color #ffff00
- Activate the top of the layer palette
77. Layers- New Raster Layer
78. Selections –load/save selection –load selection from disc and select my selection:‘’B_Hiver-2020-11’’
79. Color-Palette-Set the Foreground color to color # aac3ce =5
Flood Fill Tool -
Fill the selection with the Foreground color # aac3ce =5
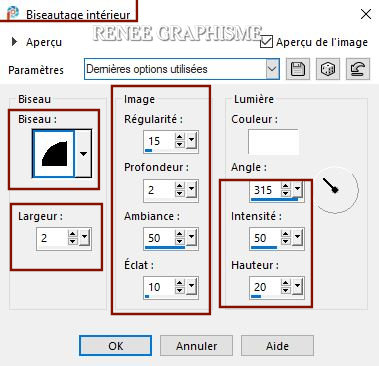
80. Effects– 3 D Effects– Inner Bevel use the settings below / Color White
81. Adjust-Add/ Remove Noise-Add Noise with these settings
Selections- Deselect All
82. Open the tube ‘’ Hello-winter-titre’’ -Edit - Copy- Activate your work -Edit - Paste as a new layer
- With your move tool place the text at your choice
83. We Are Going to Decorate
Open the tube
‘’Tube-Renee-Bonjour-Hiver 2020.’’
- Edit - Copy- Activate your work -Edit - Paste as a new layer and place the decorative elements individually according to your taste
84. Image - Add borders-Symmetric checked: 1 Pixel Color Black
85. Edit - Copy!!
- Open the tube ‘’Cadre-Bonjour-Hiver’’ in your Psp
86. Edit - Paste as a new layer (Image is still in your PSP memory)
87. Layers- Merge- Merge All
88. Image -
Resize to 1005 pixels Width
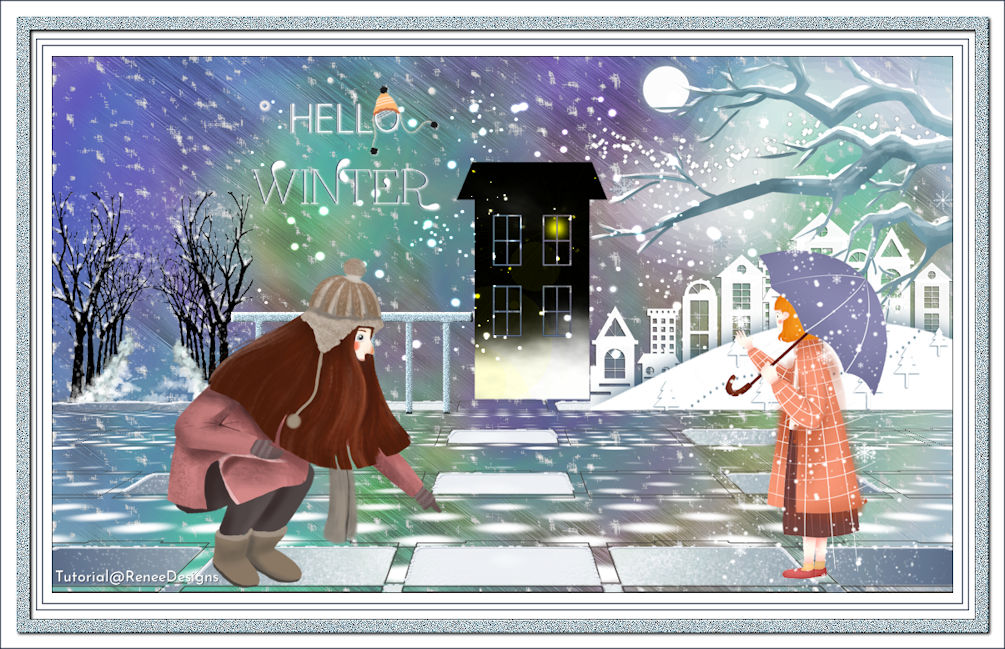
Save as JPG
I hope you enjoyed this lesson
Renée
This lesson was written by Renée
25-10- 2020
Edited and Update
2020
*
*
Any resemblance with an existing lesson is a coincidence
* Do not forget to thank the people who work with us and for us I have appointed the tubeurs and translators
Thanks
|

 Translations