|
Let's start the lesson
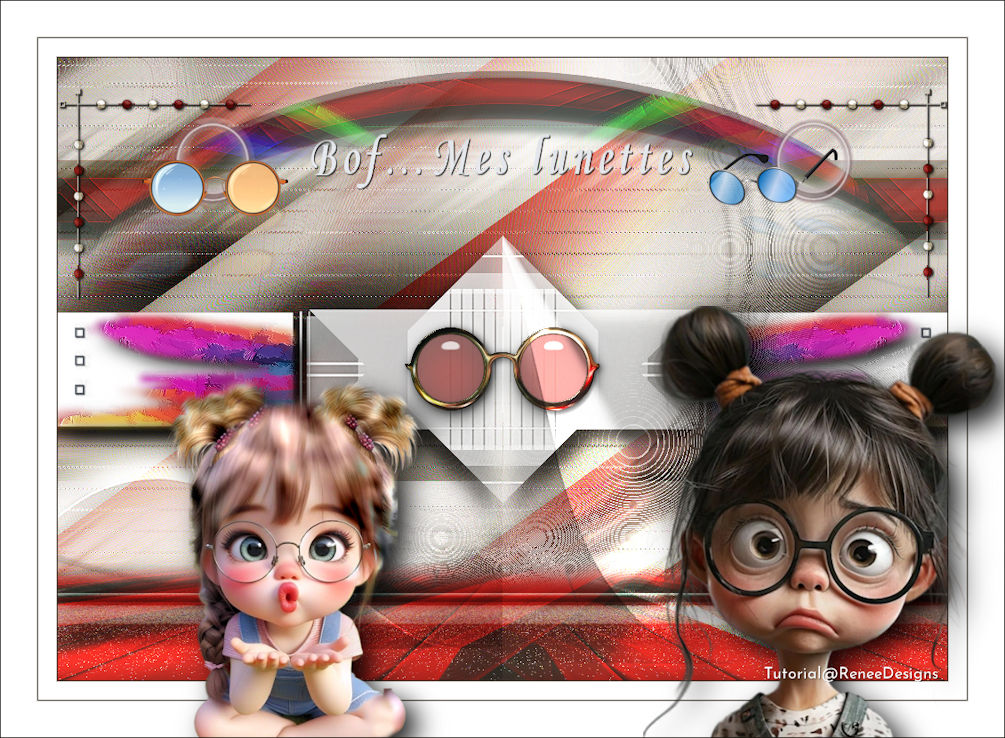
Bof…Mes lunettes
-
Preparation
-Material Properties: Set your Foreground color to color
1 – Set your Background color to color 2
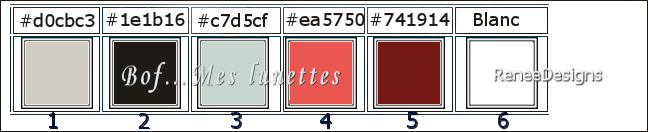
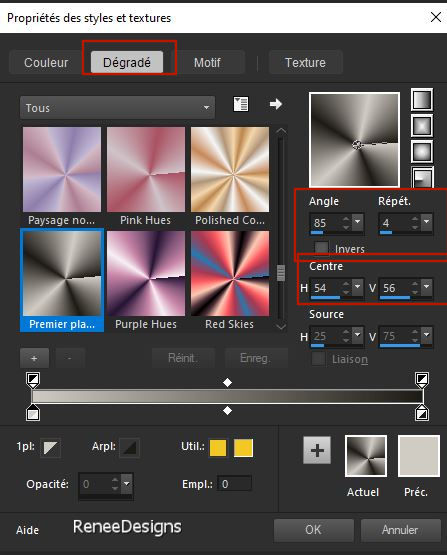
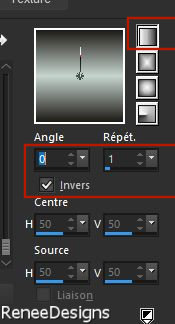
- Replace your Foreground
color with a Foreground/Background Radial Gradient
configured like this
1. File-Open a New
Transparent Image in this size : 1000 x 700 Pixels =Raster 1
2. Activate Flood Fill Tool
 –
Fill the layer with the Gradient –
Fill the layer with the Gradient
3. Adjust- Blur-Gaussian
Blur-Radius 42%
4. Adjust– One Step Photo
Fix
- Edit- Repeat One Step
Photo Fix
5. Layers- Duplicate
6. Effects- Plugins - Filters
in Unlimited 2.0 - Alf's Power Toys -
Tangent Waves... : 184/ 10
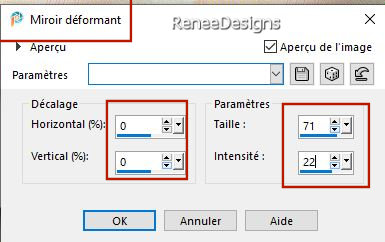
7. Effects- Geometric
Effects- Skew use the settings below
8. Effects- Plugins – Toadies – What are you
: 43/43
9. Effects- 3D- Effects-
Drop Shadow with these settings: 0 /0 /85 /48
Color black
- Edit- Repeat Drop Shadow
10. Effects- 3D- Effects-
Drop Shadow with the same settings
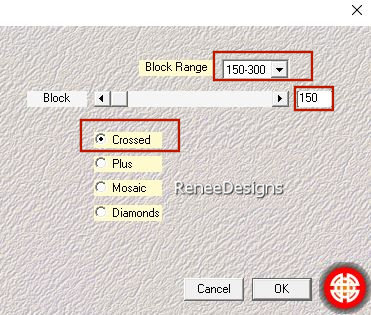
11. Effects- Plugins – Mura’s Meister - Perspective Tiling
use the settings below

12. Effects- Plugins - Filters
in Unlimited 2.0 - Color Effects -
Channel Shift: 29/119
13. Layers- Duplicate
14. Image - Mirror - Mirror
Horizontal (Image - Mirror in older versions of PSP)
-
Layers-
Merge- Merge Down
15. Activate your Magic
Wand – Tolerance at 0 and Feather at 38--click in the
upper empty area
 Hit your delete key 5 to 6
times
Hit your delete key 5 to 6
times

- Activate Raster 1 in the
layer palette
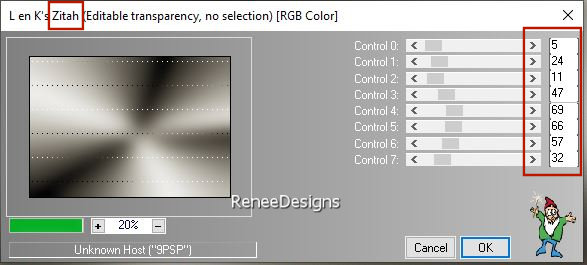
16. Effects- Plugins – L & K ‘s – Zitah
use the settings below
17. Effects – Edge Effects–Enhance
18. Layers- Duplicate
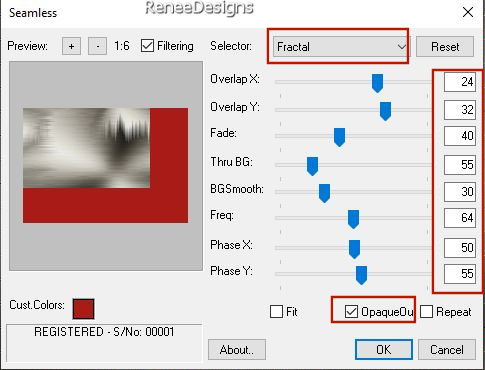
19. Effects- Plugins – MuRa Pro – Seamless –
use the settings below- Color #a81b16-Attention-Fractal
and OpaqueOu checked
20. Effects – Image Effects
– Seamless Tiling use the settings below

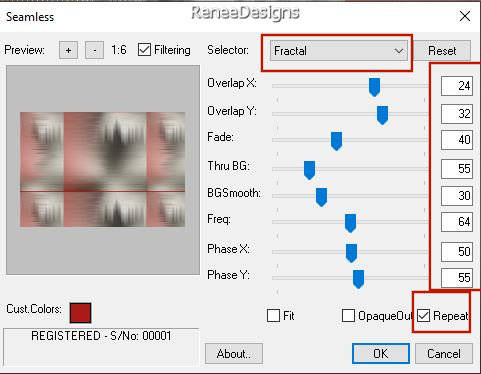
21. Effects- Plugins – MuRa Pro – Seamless
with these settings- Attention-Fractal and
Repeat checked
22. Effects – Geometric
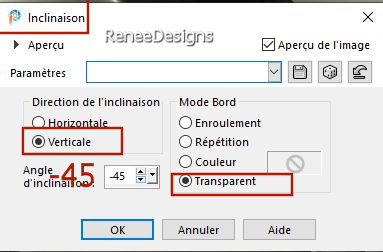
Effects – Skew use the settings below
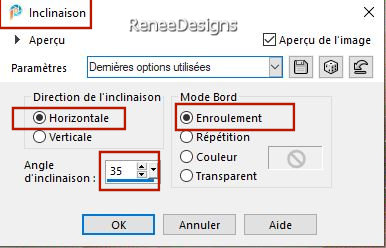
- Edit-Repeat Skew
23. Layers-Properties-Set
the Blend Mode to " Hard Light "
24. Layers- New Raster
Layer
25. Material Properties:
Set your Foreground color to color #ffffff=6
Activate Flood Fill
Tool
–
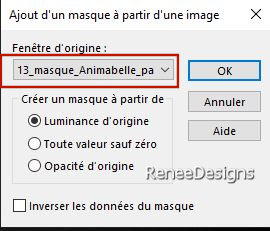
Fill the layer with color 6
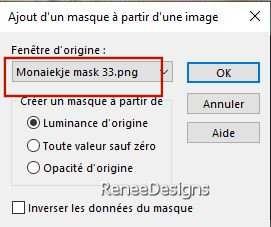
26. Layers- New Mask
Layer-From Image and select Mask ‘’ Monaiekje mask
33.jpg’’
- Layers- Merge- Merge
Group
27. Effects- Plugins – Simple – Pizza Slice Mirror
- Edit- Repeat Pizza Slice
Mirror
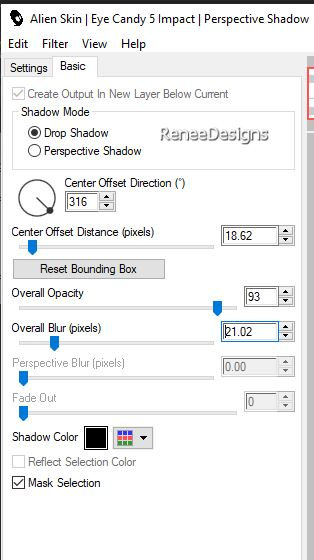
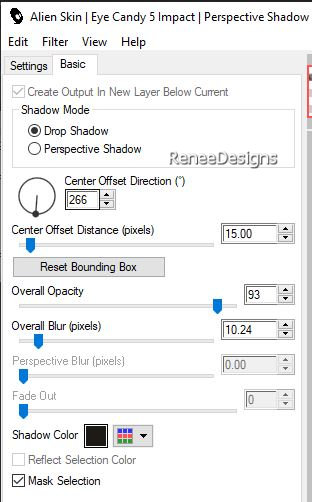
28. Effects- Plugins - Alien Skin EyeCandy 5 – Impact – Perspective
Shadow use the settings below
29. Effects – Reflection
Effects – Rotating Mirror using the default settings
30. Selections –load/save
selection –load selection from disc and select my
selection: ‘’ Bof-Mes lunettes-1’’
31. Layers- New Raster
Layer
32. Open the tube
‘’Bof...Mes-lunettes-2’’ (you need a colored tube)
-
Edit
- Copy- Activate your work -Edit - Paste into Selection
33. Effects – Art Media
Effects–
Brush Strokes using the default settings
34. Effects – Reflextion
Effects – Rotating Mirror using the default
settings
35. Effects- Plugins - Alien Skin EyeCandy 5 – Impact – Perspective
Shadow with the same settings
36.
Layers-
Merge- Merge Down
- Activate the top of the
layer palette
37. Layers- New Raster
Layer
38. Selections –load/save
selection –load selection from disc and select my
selection: ‘’ Bof-Mes lunettes-2’’
- Material Properties: Set
your Foreground color to color 3 – Set your Background
color to color #ffffff=6
39. Activate Flood Fill
Tool
–
Fill the selection with color 3
40. Effects- Plugins - Filters
in Unlimited 2.0 - Andrew's Filter
Collection 55 - Amazing Brew... using the default
settings
41. Layers-Properties-Set
the Blend Mode to " Luminance Legacy "
42. Effects- Plugins - Filters
in Unlimited 2.0 – Toadies – Blast 'em!...:
54/125
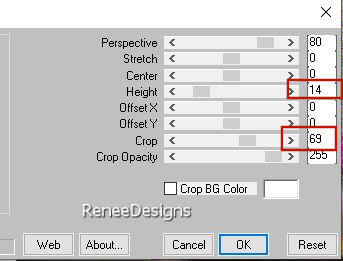
43. Effects- Plugins – Mura’s Meister – Perspective Tiling
use the settings below
44. Layers-Properties-Set
the Blend Mode to " Hard Light "
45. Effects- 3D- Effects-
Drop Shadow with these settings: 0/0/85/48 Color Black
46. Layers- New Raster
Layer
47. Selections –load/save
selection –load selection from disc and select my
selection: ‘’ Bof-Mes lunettes-3’’
48. Material Properties:
Set your Foreground color to color 2
Activate Flood Fill
Tool
–
Fill the selection with color 2
49. Effects- Plugins - Alien Skin EyeCandy 5 – Impact – Chrome -
Preset : Night, Small Edge using the default
settings
50. Activate your Magic
Wand – Tolerance at 0 and Feather at 4
- Select inside glasses ( 2
circles)
51. Layers- New
Raster Layer
52. Material Properties:
Set your Foreground color to color 4
Activate Flood Fill
Tool
–
Opacity 65 -
Fill the selection with color 4
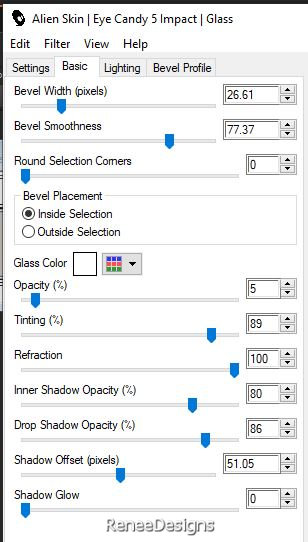
53. Effects- Plugins - Alien Skin EyeCandy 5 – Impact – Glass
use the settinge below
54. Layers- Arrange- Move
Down
-Activate the layer above
55. Layers- Merge- Merge
Down
56. Effects- Plugins - Alien Skin EyeCandy 5 - Impact - Preset Drop
Shadow Lowest using the default settings
- Material Properties: Set
your Foreground color to color 3 – Set your Background
color to color 2
- Replace your
Foreground color with a Foreground/Background Linear
Gradient configured like this
57. Layers- New Raster
Layer
58. Selections –load/save
selection –load selection from disc and select my
selection: ‘’ Bof-Mes lunettes-4’’
59. Activate Flood Fill
Tool
–
Opacity 100 – Fill the selection with the Gradient
60. Effects- Plugins – Medhi – Sorting Tiles
use the settings below
61. Effects- Plugins - Filters
in Unlimited 2.0 – Toadies – What are
you / Overdose 8
62. Effects – Edge Effects –
Enhance More
63. Effects –Distortion
Effects – Warp use the settings below
64. Effects- Plugins - Alien Skin EyeCandy 5 – Impact – Perspective
Shadow use the settings below
65. Effects – Geometric
Effects – Spherize – Strenght 100 Ellipse
checked
66. Effects- Plugins - Filters
in Unlimited 2.0 - Color Effects -
Channel Shift : 134/14
67. Layers- Properties -Reduce
the opacity of this layer to 77%
68.
Open the Tube ‘’Renee-Bof-mes-lunettes-Image
1’’ -
Edit - Copy- Activate your work -Edit - Paste as new
layer
69.
Pick
Tool: (K) on your keyboard -Enter these parameters on
the Toolbar
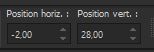 -2/ 28
Press ( M ) to close the
Tool
70. Activate Text
Tool -Write the title
‘’Bof..Mes lunettes’’ - using this font‘’ MTCORSVA’’
-(In your Psp ( Monotype Corsiva) Size 48 (
or one of your choice)
Effects- 3 D-Effects- Drop Shadow with these settings: 1/1/100/1
Color Black
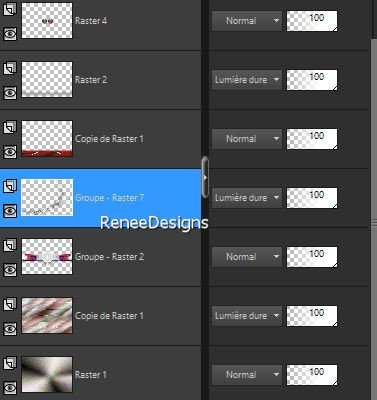
- In the layer palette
activate – Group Raster 2 third layer from below
71. Layers- New Raster
Layer
72.Material Properties: Set
your Foreground color to color #ffffff=6
Activate Flood Fill Tool
–
Fill the layer with color 6
73. Layers- New Mask
Layer-From Image and select Mask ‘’
Narah_mask_0670.jpg’’
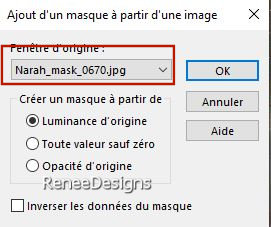
- Layers- Merge- Merge
Group
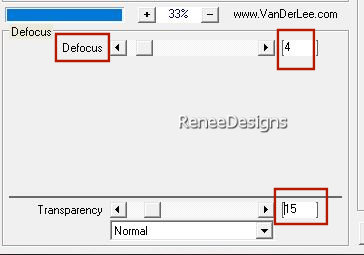
74. Effects- Plugins – Vanderlee – Unplugged X – Defocus
use the settings below
75. Layers-Properties-Set
the Blend Mode to " Hard Light "
- Properties Background-Set
your Background color to color #741914 =5
76. Effects- Plugins - Filters
in Unlimited 2.0 - Tramages - Cirquelate...
: 110
77. Effects - Edge Effects-
Enhance More
- Activate the top of the
layer palette
78. Layers- New Raster
Layer
79. Activate Flood Fill
Tool
–
Fill the layer with the Foreground color 6
80. Layers- New Mask
Layer-From Image and select Mask ‘’
13_masque_Animabelle_page4.jpg’’
- Layers- Merge- Merge
Group
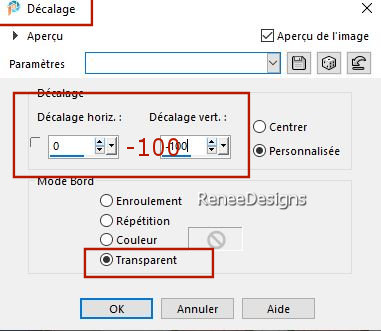
81. Effects – Image Effects
– Offset use the settings below
82.
Layers-Properties-Set the Blend Mode to " Overlay "
83. Effects- Plugins - Filters
in Unlimited 2.0 - &<Bkg Designer sf10
I> - Corner Right Wrap
84.
Layers-Properties-Set the Blend Mode to " Overlay "
85. Layers- New Raster
Layer
86. Selections –load/save
selection –load selection from disc and select my
selection: ‘’ Bof-Mes lunettes-5’’
87. Activate Flood Fill
Tool
–
Fill the selection with the Foreground color 6
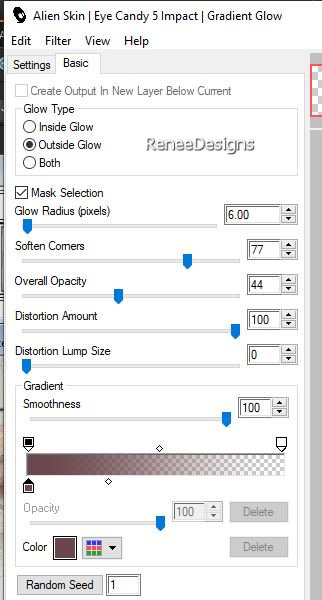
88. Effects- Plugins - Alien Skin EyeCandy 5 – Impact – Gradient
Glow –Tab- Settings- User Settings and select my file- Preset : Bof-Mes-lunettes-Glow
Or put the settings in
manually -Color #6a464d (
depending on the colors you use, you'll have to change
it)
89. Open the Tube
‘’Renee-Bof-mes-lunettes-Image 2’’
-Edit - Copy- Activate your work -Edit - Paste as new
layer
90.
Pick
Tool: (K) on your keyboard -Enter these parameters on
the Toolbar
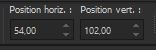 54 /102
Press ( M ) to close the
Tool
Alternatively
You can also choose your
own glasses, are in this folder ’Renee-TUBES-LUNETTES’’
91. Image - Ajouter des
bordures de 1 Pixel -Color 2
Image - Add
Borders-Symmetric checked: 1 Pixel -Color 1
Image - Add
Borders-Symmetric checked: 20 Pixels -Color White=6
Image - Add
Borders-Symmetric checked: 1 Pixel -Color 2
Image - Add
Borders-Symmetric checked: 1 Pixel -Color 1
Image - Add
Borders-Symmetric checked: 40 Pixels -Color White = 6
92. Choose 2 tubes of your
choice - Resize if necessary -Edit-Copy- Edit
Paste as new layer
- Drop shadow of your
choice
93. Paste the author's
watermark on your work and your own watermark
94.
Layers-Merge- Merge All (flatten)
95. Image - Add
Borders-Symmetric checked:
1 Pixel -Color 2
96. Image – Resize 1005 Pixels
Width
Save as JPG
I hope you enjoyed this
lesson
This lesson was written by
Renée 01/04/2024
Edited and Update
in 2024
*
Any resemblance with an existing
lesson is a coincidence
* Do not forget to thank the people who work with us and
for us - I have appointed the tubeurs and translators
Thanks
*
|

 Translations